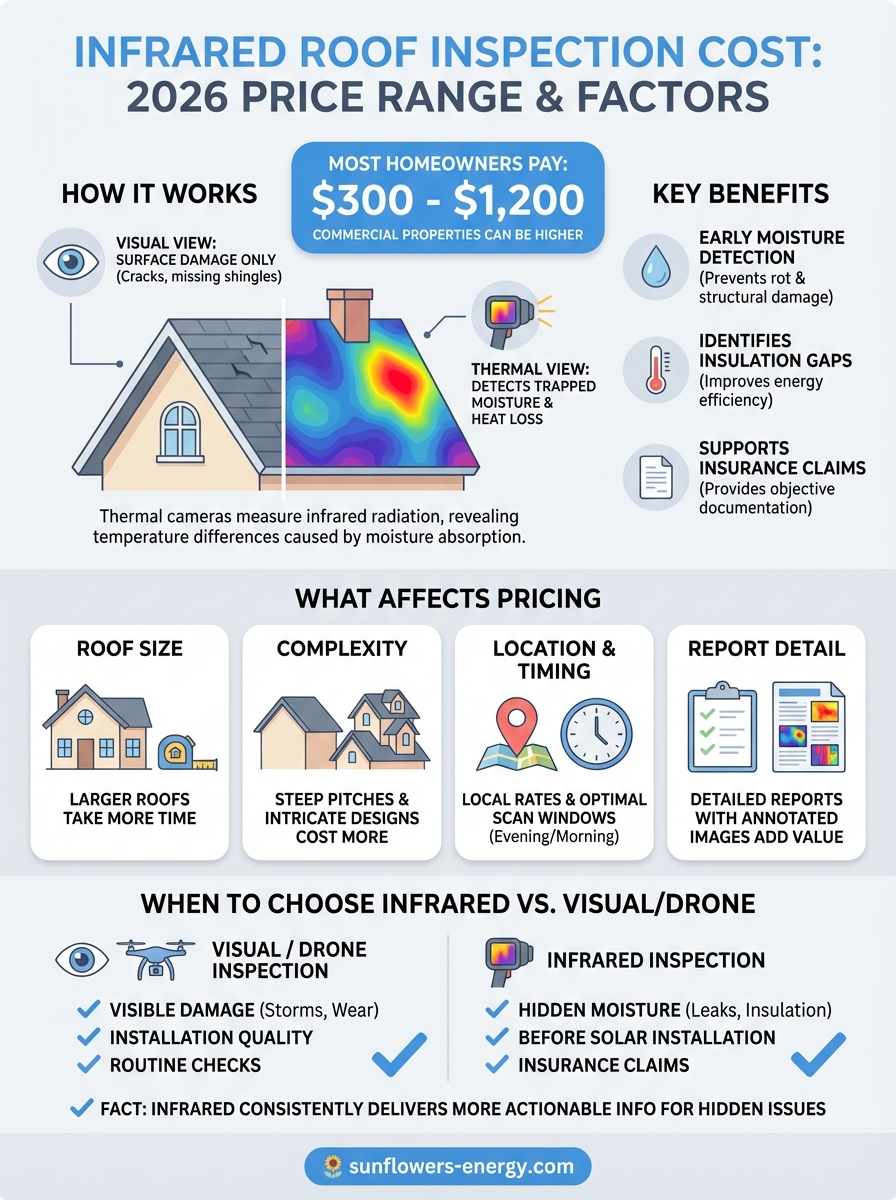
If you’re considering a thermal scan for your roof, the infrared roof inspection cost is probably your first question. It’s a fair one, this type of inspection uses specialized imaging cameras to detect trapped moisture, heat loss, and hidden damage that a standard visual walkthrough simply can’t catch. But prices vary widely depending on your roof’s size, complexity, and where you’re located, which makes it hard to get a straight answer from a quick search. Most homeowners and business owners pay somewhere between $300 and $1,200, though commercial properties with large flat roofs can push that number higher.
At Sunflowers Energy LLC, we inspect roofs before every installation and repair project, residential and commercial. We’ve seen firsthand how thermal imaging changes the game when it comes to identifying problems early, especially after storm damage or on aging roofing systems. Whether you’re weighing an infrared scan before a solar panel installation or trying to pinpoint a stubborn leak, understanding what drives the cost helps you make a smarter decision.
This article breaks down the 2026 price range for infrared roof inspections, explains what factors affect your final quote, and compares thermal scans to traditional inspection methods. By the end, you’ll know exactly what to expect, and whether this investment makes sense for your property.
Why infrared roof inspections matter
A standard roof inspection tells you what’s visible: cracked shingles, obvious punctures, deteriorated flashing. What it can’t reveal is what’s happening beneath the surface. Infrared roof inspections work by detecting temperature differences in roofing materials. When moisture gets trapped in insulation or decking, it absorbs and releases heat at a different rate than dry materials. A thermal imaging camera picks up those differences and maps them, giving the inspector a clear picture of where water intrusion has already started, even before a leak shows up inside your home or building.
What thermal cameras actually detect
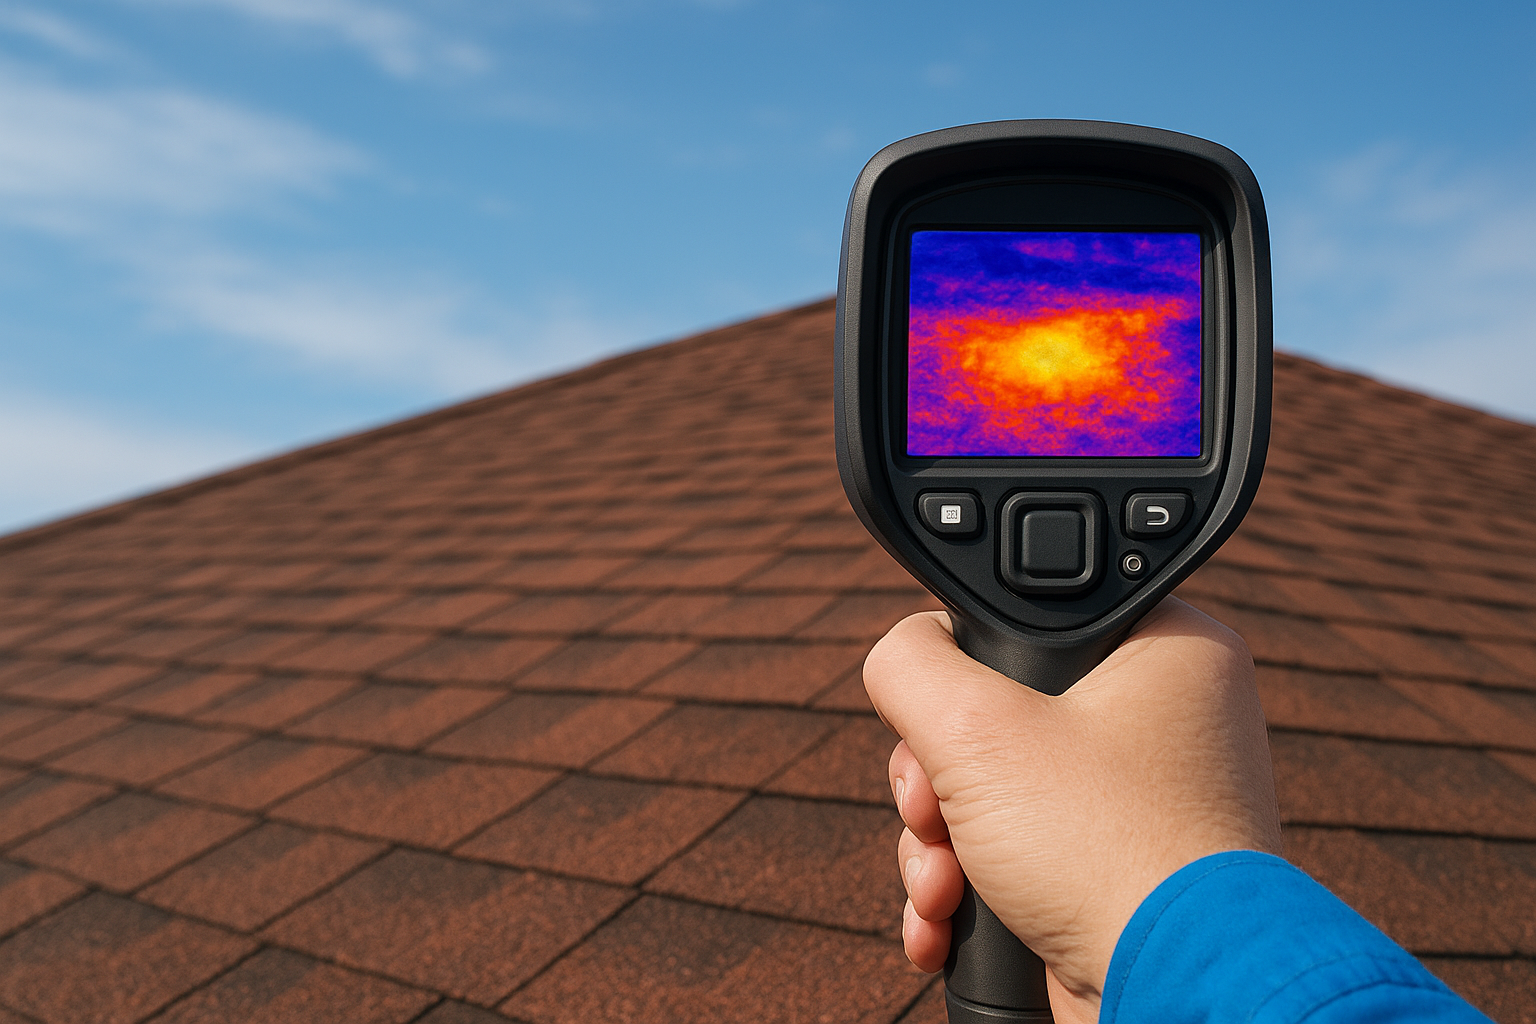
Thermal cameras used in roof inspections don’t take ordinary photos. They measure infrared radiation emitted from surfaces and convert those readings into color-coded images. Warmer areas appear as bright reds and yellows, while cooler areas show as blues and purples. When a roof section holds moisture, it retains heat longer after sunset, which causes it to stand out clearly in a thermal scan. This is why inspectors typically schedule scans in the evening or early morning, when the temperature contrast between wet and dry materials is at its peak.
Beyond moisture, the technology also identifies air leaks and insulation gaps that drive up your energy bills. If your HVAC system is working harder than it should, heat loss at the roof level may be the reason. For homeowners planning a solar installation, finding and fixing these issues before the panels go on can improve long-term energy output noticeably.
How early detection saves money
Catching moisture damage early is where the financial case for an infrared inspection becomes clear. A small wet spot in roof insulation might cost a few hundred dollars to fix today. Left undetected, that same problem can rot the decking, compromise structural components, and turn into a repair bill that runs several times higher. The longer saturated insulation sits, the more it degrades surrounding materials. When you weigh the infrared roof inspection cost against the repair costs it helps you avoid, the math consistently favors the scan.
Addressing moisture damage before it spreads can reduce your total repair costs significantly compared to waiting until visible interior damage appears.
Insurance adjusters and roofing contractors who handle storm damage claims regularly find that the true scope of damage runs far wider than what a visual check captures. A thermal scan creates objective documentation that can also strengthen your position when filing a storm damage insurance claim.
When infrared inspections are most useful
Infrared inspections deliver the most value in specific situations: after a major storm, before purchasing a commercial property, before a solar installation, or when you have a persistent leak that standard inspections haven’t been able to locate. Flat roofs on commercial buildings are especially suited to thermal scanning because moisture tends to migrate laterally through insulation rather than draining off the edge, making it easy to miss without a thermal scan.
Consider scheduling a thermal scan if your roof is approaching the end of its expected service life and you want a complete picture before committing to a full replacement. It gives you a reliable way to prioritize repairs and put your roofing budget where it will have the greatest impact. A thermal scan also provides useful baseline data if you plan to sell the property or hand off a detailed maintenance report to a future owner.
Infrared roof inspection cost in 2026
The infrared roof inspection cost in 2026 runs between $300 and $1,200 for most residential properties. That range reflects differences in roof size, local labor rates, and the complexity of the inspection itself. Smaller homes with straightforward roof layouts land closer to the low end, while larger or multi-story homes with complex geometry push toward the higher end. Most contractors price thermal inspections per square foot, typically between $0.15 and $0.35 per square foot, though minimum job fees often apply regardless of roof size.
Residential roof pricing
For a standard single-family home, you’re typically looking at a total cost between $300 and $600. A 2,000-square-foot ranch-style roof with asphalt shingles and a simple layout will cost less than a 3,500-square-foot home with dormers, valleys, and multiple roof levels. Some inspection companies charge a flat fee for residential jobs up to a certain size and then add per-square-foot charges beyond that threshold. Always confirm how the contractor structures pricing before you book.
Getting itemized pricing upfront helps you compare quotes accurately and avoids surprises on the final invoice.
Here’s a general breakdown for residential infrared inspections:
| Roof Size (sq ft) | Estimated Cost |
|---|---|
| Up to 1,500 | $300 – $450 |
| 1,500 – 2,500 | $400 – $600 |
| 2,500 – 3,500 | $550 – $800 |
| 3,500+ | $750 – $1,200+ |
Commercial roof pricing
Commercial properties carry a higher price tag because flat roofs cover significantly more area and moisture tends to spread across wider sections of insulation. Large commercial buildings can run from $1,500 to $5,000 or more depending on total roof square footage and local market rates. Contractors who specialize in commercial thermal scanning often include a written report with mapped moisture locations, which adds value but also adds cost. If you manage multiple buildings, some inspection firms offer volume pricing that reduces the per-square-foot rate.
Several factors can push commercial inspection costs above baseline estimates:
- Roof access requirements (lift or crane rental)
- Multiple roof levels or separate sections
- Short turnaround time for the written report
- Distance from the contractor’s base location
What affects infrared roof inspection pricing
The infrared roof inspection cost you receive depends on several variables that go well beyond roof square footage. Understanding which factors drive pricing up or down helps you evaluate quotes accurately and avoid choosing an inspector based solely on the lowest number without knowing what you’re actually getting.
Roof size and complexity
Roof size is the most straightforward pricing factor because most inspectors work from a per-square-foot model. A larger surface takes more time to scan, more time to analyze the thermal data, and more time to include in a final report. Roof complexity adds to that baseline: a steep residential roof with dormers, valleys, and multiple pitches requires more careful setup and repositioning than a flat commercial roof that an inspector can walk in a systematic grid pattern.
Flat and low-slope roofs tend to be faster to scan per square foot, but their sheer size on commercial properties makes the total job cost higher. Residential roofs with intricate geometry can cost 20 to 30 percent more than a comparably sized simple design.
Location and scheduling
Your local market and the inspector’s travel distance both affect the final price. Contractors in dense metro areas charge more than those in smaller markets, and properties in rural locations may carry an added travel fee. Scheduling also matters because thermal scans require specific conditions, typically low ambient light with a meaningful temperature drop after a warm day. Inspectors who work evenings or early mornings to meet those requirements sometimes charge a scheduling premium for those time slots.
Booking during optimal scanning windows, rather than forcing a midday appointment, gives you more accurate results and is worth any minor scheduling adjustment.
Report format and inspector credentials
A basic verbal walkthrough costs less than a detailed written report with annotated thermal images, moisture maps, and prioritized repair recommendations. If you need documentation for an insurance claim or a property transaction, the written report format is worth the added expense. Certified thermographers with professional credentials and high-resolution equipment charge more than uncertified operators, but their results are significantly more reliable. An inconclusive scan from under-qualified equipment often leads to a second inspection, which ends up costing more in total.
What an infrared roof inspection includes
Knowing what you’re paying for makes it easier to evaluate the infrared roof inspection cost and decide whether a given quote is reasonable. A thorough thermal inspection covers more than just the scan itself. It involves preparation, the actual imaging process, and a follow-up report that tells you where problems are, how serious they are, and what to do next.
Pre-scan preparation and timing
Before any camera points at your roof, the inspector needs to confirm the right conditions are in place. Thermal scans only work accurately when there’s a meaningful temperature difference between wet and dry roofing materials, which typically happens in the evening after several hours of direct sun exposure have heated the surface. Your inspector will assess recent weather patterns, since a rainy day before the scan can skew results by introducing surface moisture that isn’t trapped. Clear communication about your roof’s history (recent repairs, known leak locations, drainage patterns) helps the inspector prioritize where to focus attention during the scan.
The thermal scan process
During the scan, the inspector moves across the roof in a systematic pattern while capturing continuous thermal images with a calibrated infrared camera. Each image records surface temperature variations across the roofing material. Areas where moisture is trapped in the insulation or decking will appear warmer than surrounding dry sections as they release stored heat. The inspector marks these anomalies in real time and takes reference photos to match thermal images with actual roof locations. The entire scan for a residential roof typically takes one to two hours, depending on roof size and complexity.
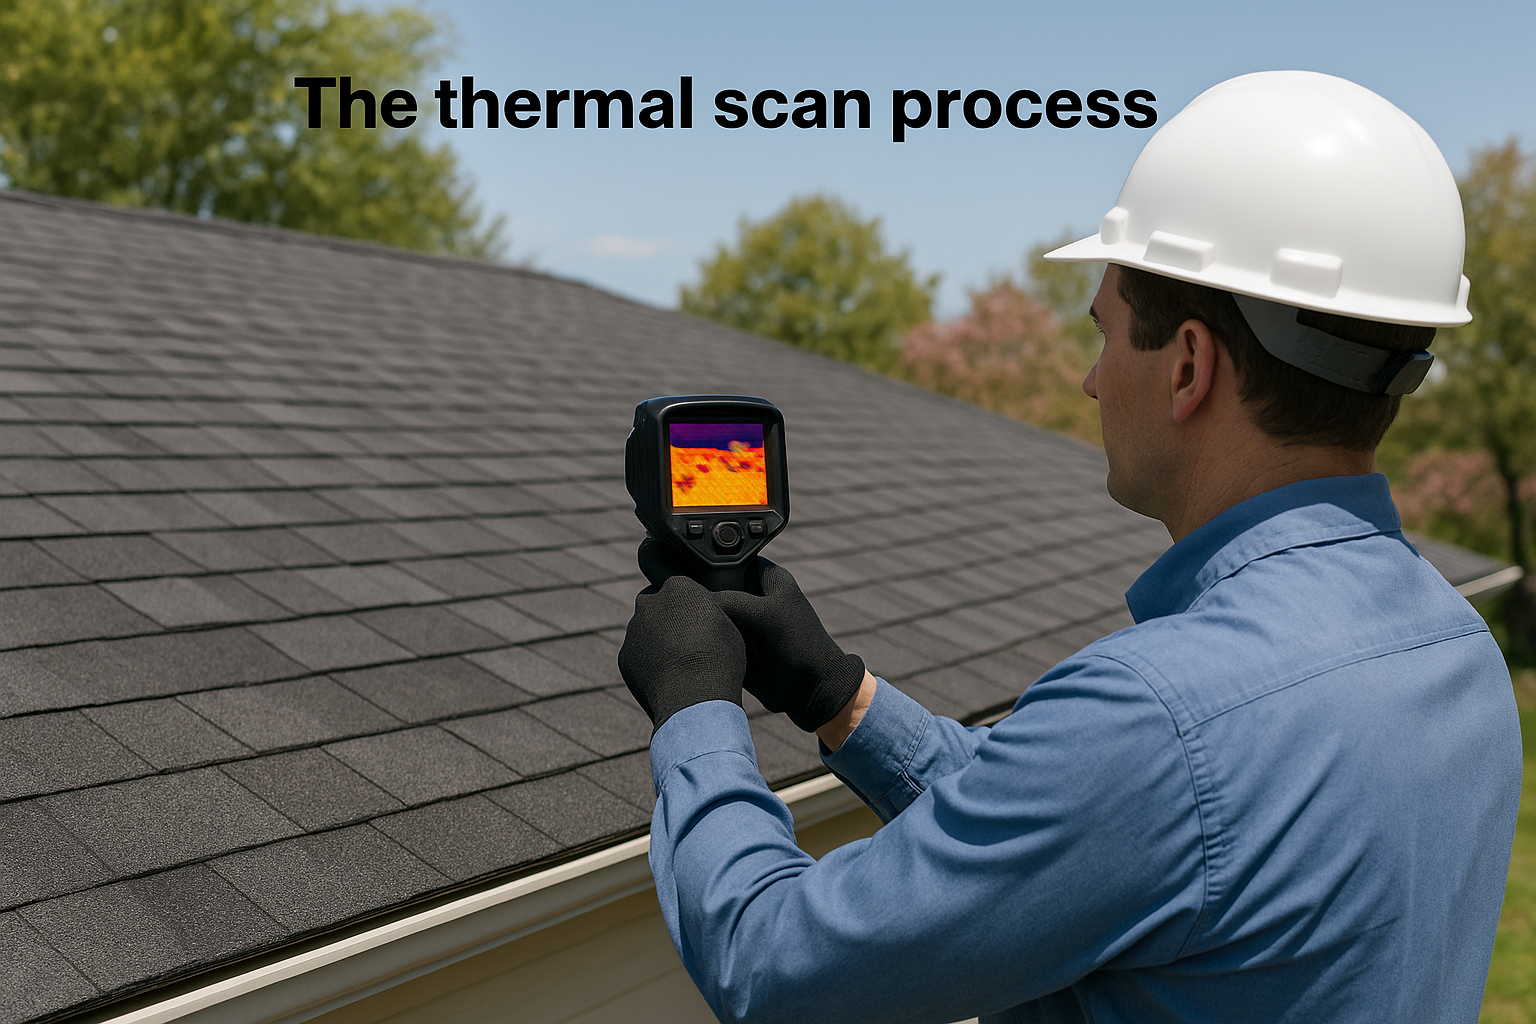
Pairing thermal images with standard reference photos gives you a clear, side-by-side record that makes the final report far easier to act on.
The inspection report
After the scan, you receive a written report that maps out every area of concern on your roof. The report includes annotated thermal images, moisture location maps, and a priority ranking for repairs so you know which issues need immediate attention and which ones can be monitored. A well-documented report also serves as evidence for insurance claims or pre-sale disclosures, making it one of the most practical deliverables you can request from any roofing inspection.
Infrared vs visual vs drone and when to choose
Not every roof situation calls for the same type of inspection. Visual, drone, and infrared methods each serve a different purpose, and understanding what each one covers helps you spend your inspection budget where it actually gets results. Matching the inspection type to your specific problem saves you from paying for a service that won’t answer your actual question.
Visual inspections
A visual inspection is the baseline standard for most roofing assessments. A qualified inspector walks the roof surface and examines shingles, flashings, penetrations, gutters, and other accessible areas for visible signs of wear or damage. It works well for confirming obvious physical damage after a storm, evaluating installation quality, or doing a routine check on a newer roof. The limitation is clear: a visual inspection only captures what the inspector can see from the surface. Hidden moisture, compromised insulation, and subsurface deterioration stay invisible no matter how thorough the walkthrough is.
Drone inspections
Drone inspections use an aerial camera to photograph or video your roof from above without requiring anyone to walk on the surface. They’re particularly useful for steep residential roofs where walking the surface poses a safety risk, or for quick documentation of large commercial rooftops. A drone gives you a comprehensive visual record and can identify missing shingles, pooling water, and visible punctures efficiently. What it cannot do is detect subsurface moisture or measure temperature differentials in roofing materials, which means it shares the same blind spot as a standard visual inspection when it comes to hidden water damage.
If your goal is to find where moisture has already infiltrated your roof system, neither a visual nor a drone inspection will give you a reliable answer.
Choosing the right inspection type
The decision comes down to what you’re trying to find out. Use a visual inspection for routine maintenance checks or post-storm damage surveys on accessible roofs. Choose a drone when steep pitch or safety concerns make surface access impractical. When you need to locate trapped moisture, confirm insulation integrity before a solar installation, or build documentation for an insurance claim, an infrared inspection is the right call. Factoring in the infrared roof inspection cost against the value of what it detects, thermal imaging consistently delivers the most actionable information when hidden damage is the concern.
Next steps
You now have a clear picture of the infrared roof inspection cost, what drives the price, and when this type of inspection is the right choice for your property. The core takeaway is straightforward: thermal imaging uncovers hidden moisture and insulation problems that visual and drone inspections simply miss, and the cost of an inspection is almost always lower than the cost of letting undetected damage spread.
Before you schedule an inspection, confirm that the contractor uses a calibrated thermal camera and provides a written report with annotated images. Ask how they handle scheduling to meet optimal scan conditions, and get itemized pricing so you can compare quotes on equal terms.
If your roof needs a professional evaluation, Sunflowers Energy LLC is ready to help. We serve both residential and commercial properties and back every job with thorough on-site assessments. Request your free roof inspection and get a clear picture of what your roof actually needs.
