How to prepare for solar inspection: pass easily in 2026
TL;DR:
- Proper documentation and safety labels are critical to passing solar inspections.
- Visual and physical system checks help identify issues before the inspector arrives.
- Working with certified professionals reduces the risk of inspection failure and compliance errors.
A failed solar inspection doesn’t just bruise your pride. It delays your system activation, pushes back your savings timeline, and can cost you hundreds in reinspection fees. Many homeowners invest in premium solar equipment and expert installation, then stumble at the finish line because of missing paperwork or overlooked labels. Shading can reduce solar output by 20-80%, and dirt alone can cut performance by 5-25%, so inspectors look at far more than just whether panels are bolted down. This guide walks you through every step you need to take before inspection day so you can pass the first time and start powering your home right away.
Table of Contents
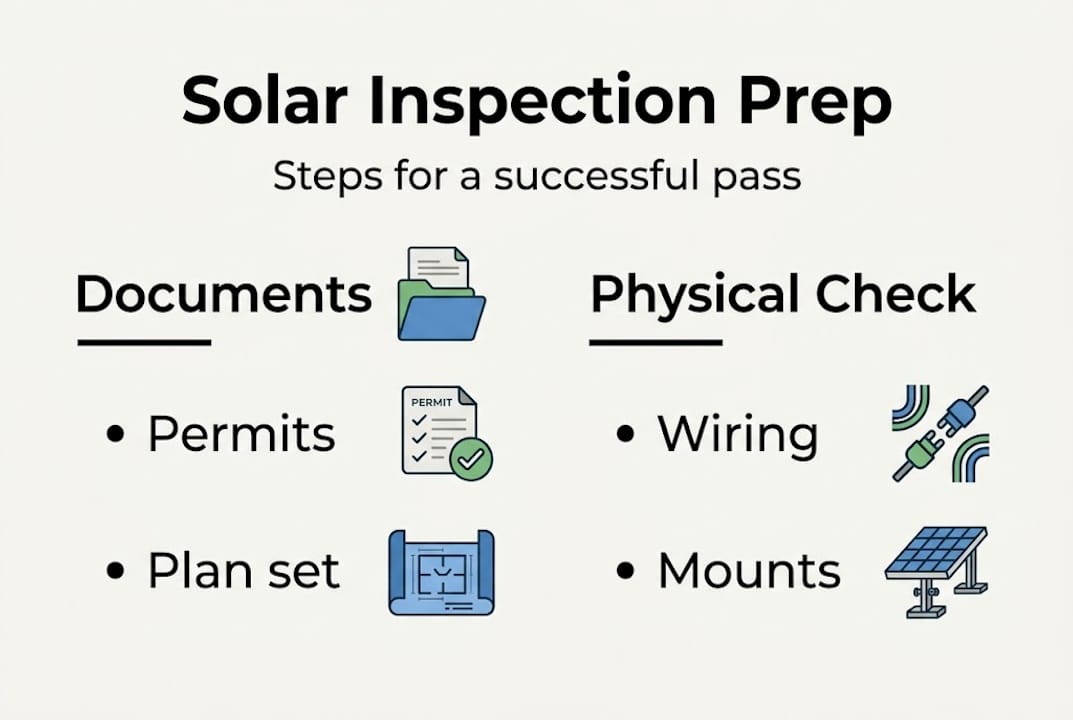
- Gather essential documents and tools
- Check installation quality and physical components
- Verify electrical safety and code compliance
- Pre-inspection testing and common troubleshooting
- What most homeowners get wrong about solar inspections
- Let Sunflowers Energy simplify your solar inspection
- Frequently asked questions
Key Takeaways
| Point | Details |
|---|---|
| Prepare paperwork early | Missing permits or incomplete plans are the top cause of inspection delays. |
| Inspect for physical flaws | Check for dirt, cracks, misaligned panels, and secure mounts before the inspector arrives. |
| Verify code and safety | Labels, grounding, and breaker sizing should be double-checked for fast approval. |
| Test and troubleshoot | Monitor system output and fix common problems like error codes or loose wires ahead of time. |
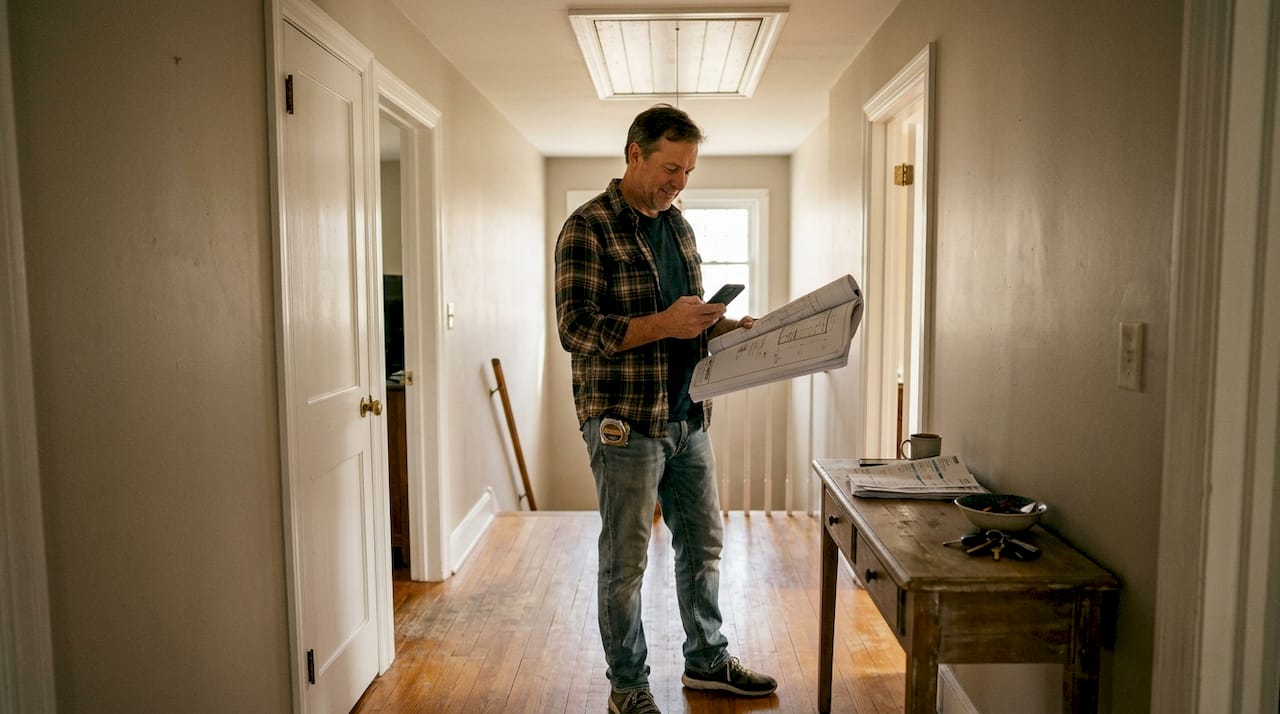
Gather essential documents and tools
Once you know why preparation is crucial, your first step is gathering the right paperwork and tools. Inspectors arrive with a checklist, and they expect you to have yours ready too. Missing a single document can result in a failed inspection, even if your physical installation is perfect.
Missing or incomplete documentation is one of the most common reasons homeowners fail solar inspections, and it has nothing to do with the quality of the panels or the wiring. Deviations from approved plans are another frequent cause of failure. Inspectors compare what they see on your roof against what was submitted and approved, so every detail matters.
Here is what you need to have ready before the inspector arrives:
- Building permit issued by your local authority
- Approved electrical and structural plans stamped by the relevant department
- Equipment specification sheets for panels, inverter, and racking system
- Manufacturer installation manuals for all major components
- Single-line electrical diagram showing system layout
- Inspection checklist from your installer or jurisdiction
- Utility interconnection agreement if applicable
- Test results or commissioning reports from your installer
Beyond paperwork, you also need a few basic tools to support the process:
| Tool | Purpose |
|---|---|
| Flashlight | Check attic wiring and dark spaces |
| Ladder | Access roof and panel mounts safely |
| Camera or smartphone | Document conditions before and after |
| Measuring tape | Verify setbacks and clearances |
| Notepad or inspection app | Track findings and questions |
Pro Tip: Ask your installer for a digital copy of all plan sets and permits. Many jurisdictions now accept digital documents on a tablet, which speeds up the review process and eliminates the risk of losing paper copies.
You can also use our solar maintenance checklist to cross-reference your prep work and make sure nothing slips through the cracks before inspection day.
Check installation quality and physical components
With paperwork and tools in hand, now shift focus to the physical aspects of your solar system. A visual walkthrough of your installation before the inspector arrives gives you a real advantage. You can catch and fix minor issues without the pressure of a formal review.
Start by comparing your actual installation to the approved plans. Panels should match blueprints, with no cracks or physical damage, secure mounting rails, proper roof flashing and seals, correct wire and breaker sizing, verified grounding, and confirmed equipment compatibility. If anything looks different from the approved drawings, flag it with your installer before inspection day.
Here is a step-by-step visual check to run through:
- Walk the roof perimeter and look for any panels that appear misaligned or loosely mounted.
- Inspect each rail and clamp connection for tightness and corrosion.
- Check roof flashing around every penetration point for gaps or improper sealing.
- Look at conduit runs for secure attachment, proper sizing, and protection from physical damage.
- Verify that grounding conductors are connected at the array, combiner box, and inverter.
- Confirm that no tree branches or new structures are casting shade on the panels.
A comparison of common physical issues and their inspection impact:
| Issue | Risk level | Fix before inspection? |
|---|---|---|
| Cracked panel | High | Yes, replace immediately |
| Loose rail clamp | High | Yes, retighten |
| Improper flashing | High | Yes, reseal |
| Shading from trees | Medium | Trim if possible |
| Dirty panels | Low to medium | Yes, clean before visit |
| Minor conduit scuff | Low | Document and disclose |
“A clean, well-mounted array that mirrors the approved plans is the fastest path to a passed inspection.” Inspectors are not looking to fail you. They are looking for safety and accuracy.
Pro Tip: Review the full inspection checklist details before your visit so you know exactly what the inspector will examine. Then walk through each item yourself using our step-by-step solar installation guide as a reference point.
Dirty panels are easy to overlook, but they matter. Learn the right approach to cleaning solar panels before your inspection to protect both performance and your pass rate.
Verify electrical safety and code compliance
After the physical inspection, it is critical to check your electrical setup and paperwork for compliance. This is where many homeowners feel least confident, but it is also where inspectors look most closely. Electrical safety failures are not just inspection problems. They are real safety risks.
The National Electrical Code (NEC) sets specific requirements for residential solar systems. One of the most important is NEC 690.12, which governs rapid shutdown. Rapid shutdown is a safety feature that allows firefighters and emergency responders to quickly de-energize your solar array in an emergency. All required labels, placards, and rapid shutdown compliance must be confirmed before your inspection, along with fire setbacks and roof access pathways.
Here is what to verify on the electrical side:
- Confirm rapid shutdown equipment is installed and labeled correctly.
- Check that all AC and DC disconnect switches are properly labeled and accessible.
- Verify breaker ratings match the approved plans and inverter specifications.
- Confirm that all conduit and wiring is properly secured and protected.
- Make sure the utility meter and interconnection point are clearly marked.
- Verify that the inverter is operational and displaying normal status.
Labels are a surprisingly common failure point. Every placard must be:
- Weatherproof and UV-resistant to survive outdoor conditions
- Clearly legible with correct emergency contact information
- Placed in the exact locations specified in the approved plans
- Compliant with NEC and local jurisdiction requirements
Inspectors have failed systems over a single missing or illegible label. It takes five minutes to check every placard. Do not skip this step.
Residential solar inspections typically cost between $150 and $300 depending on system size and location. A failed inspection means paying again, scheduling another visit, and delaying your system activation. Every fix you make before inspection day protects that investment.
Review our guide on common solar installation mistakes to understand the errors that most often lead to failed inspections. Our roofing checklist is also useful if your inspection covers roof structure and penetrations. For a deeper look at code compliance essentials, the full checklist resource covers jurisdiction-specific requirements in detail.
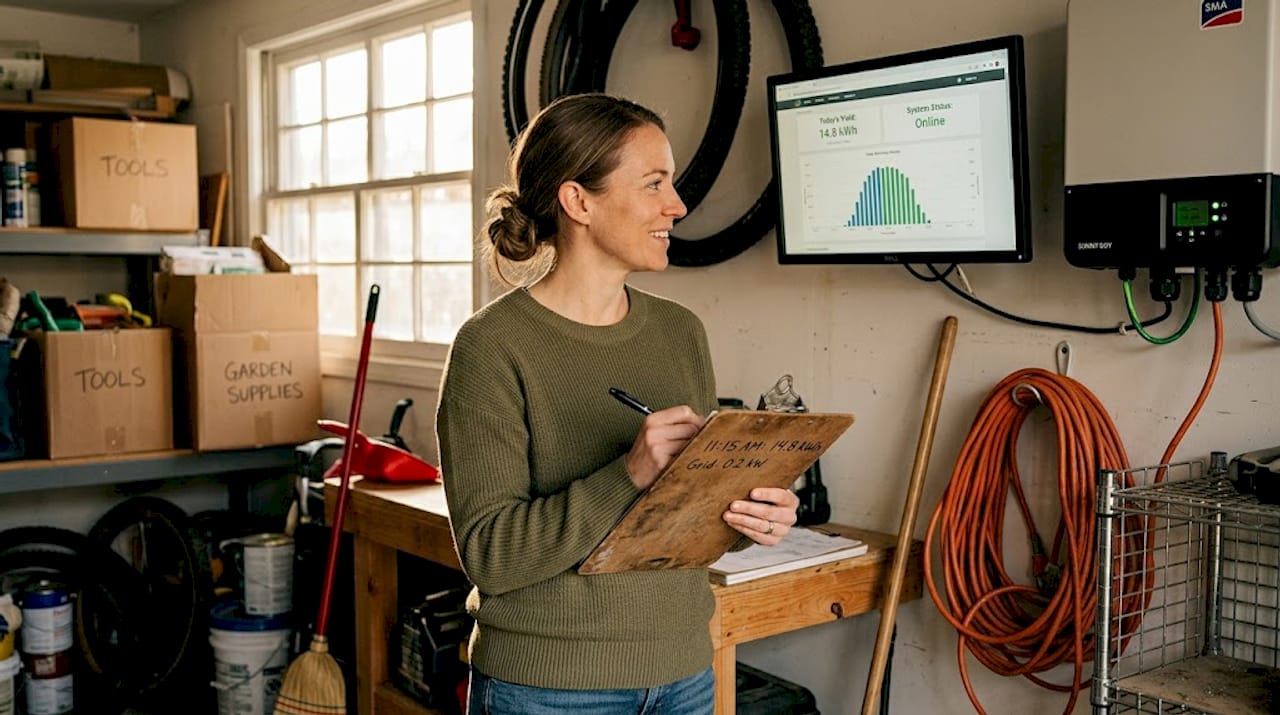
Pre-inspection testing and common troubleshooting
Having checked compliance, the last step is testing your system and troubleshooting common roadblocks. Running a few basic performance checks before the inspector arrives gives you confidence and catches problems while you still have time to fix them.
Secure and tight connections, inverter functionality, and monitored output are the three pillars of pre-inspection testing. Loose connections are not just a performance issue. They are a fire risk, and inspectors treat them seriously.
Follow these steps to test your system before inspection day:
- Turn on the inverter and confirm it reaches normal operating mode without error codes.
- Check the inverter display or monitoring app for current output levels.
- Compare actual output to expected output based on system size and current weather.
- Inspect every accessible connection point for tightness, including combiner box terminals.
- Look for any error codes or warning lights on the inverter panel.
- Confirm that monitoring data is logging correctly if your system uses a cloud-based platform.
Common issues to troubleshoot before your inspection:
- Inverter error codes: Check the manufacturer manual for meaning and reset procedures.
- Low output: Look for new shading sources, dirty panels, or tripped breakers.
- Loose connections: Retighten any accessible terminals, but call a pro for anything inside the inverter.
- Labeling gaps: Walk the system one more time and confirm every required label is present.
- Grounding issues: If grounding conductors appear loose or missing, contact your installer immediately.
Pro Tip: DIY visual checks and basic output monitoring are well within reach for most homeowners. However, any electrical work inside the inverter, combiner box, or service panel should always be handled by a licensed professional. The risk is not worth it.
For a broader look at system health, use our solar system performance checklist and our guide on maintenance for efficiency. For common solar troubleshooting scenarios, external resources can also help you identify issues your installer may need to address.
What most homeowners get wrong about solar inspections
Here is something we see repeatedly: homeowners spend weeks worrying about whether their panels are the right brand or whether the inverter is top-tier, and then they fail because a label is missing or a permit document is not on site. The technical stuff rarely causes failures. The paperwork and small details do.
Most inspection failures trace back to documentation errors, not equipment faults. A permit left at home. A placard installed in the wrong location. A plan set that does not match the final installation. These are fixable problems that cost almost nothing to address in advance.
The other thing we know from experience is that NABCEP-certified installers and local code expertise genuinely reduce failure rates. Local requirements vary significantly from one jurisdiction to another, and what passes in one city may fail in another. Working with certified professionals who know your area is not just a comfort. It is a practical advantage.
DIY pre-checks are valuable. But when it comes to electrical compliance and code accuracy, professional oversight is what actually protects your investment. Our guide on maximize home solar savings shows how professional-grade preparation connects directly to long-term performance and savings.
Let Sunflowers Energy simplify your solar inspection
Preparing for a solar inspection does not have to feel overwhelming. With the right team behind you, every step from documentation to final approval becomes straightforward and stress-free.
At Sunflowers Energy, we support homeowners through every stage of solar readiness. Our professional service team handles documentation review, compliance checks, and expert guidance so nothing gets missed. Whether you are preparing for your first inspection or optimizing an existing system, we bring cutting-edge expertise and reliable support to every project. Explore our home solar efficiency tips or contact us today for a free onsite consultation. Let us help you pass with confidence and start maximizing your solar investment right away.
Frequently asked questions
What documents do I need for a solar inspection?
You will need your permit, approved plans, installation manual, inspection checklist, and all safety and labeling documentation. Missing documentation is one of the most common reasons homeowners fail their inspection on the first visit.
What are the most common reasons homeowners fail solar inspections?
Typical failures come from missing labels, improper grounding, plan deviations, and loose wiring. These are common inspection failures that are simple to fix when caught before the inspector arrives.
Should I hire a pro or do a DIY pre-inspection?
DIY checks work well for visual reviews and cleaning, but certified professionals should always handle electrical and code compliance steps. Installer expertise is the most reliable way to minimize failure risk.
How much does a professional solar inspection cost?
Residential solar inspections generally cost between $150 and $300 depending on system size and location. A failed inspection means paying for a reinspection, so preparation is worth every minute.
What is NEC rapid shutdown and why is it important?
NEC rapid shutdown, governed by NEC 690.12, is a code requirement that allows emergency responders to safely de-energize your solar system during a fire or other emergency. It is a non-negotiable compliance item in most jurisdictions.
Recommended
- Evaluate roofing materials for solar: durability guide – Sunflowers Energy LLC A Roofing and Solar Companys
- Solar tax credits in 2026: What homeowners need to know – Sunflowers Energy LLC A Roofing and Solar Companys
- 7-Step Solar Roofing Checklist for Urban Homeowners – Sunflowers Energy LLC A Roofing and Solar Companys
- How to choose solar panels for your home in 2026 – Sunflowers Energy LLC A Roofing and Solar Companys
- Your 2026 guide to NFPA inspection compliance in Colorado
