A small puddle on a flat roof might not look like much. But left unchecked, that standing water can quietly eat through membranes, rot decking, and turn a minor fix into a five-figure repair bill. The difference between catching problems early and dealing with full-blown leaks almost always comes down to one thing: a thorough flat roof inspection checklist that you actually follow.
Flat roofs, common on commercial buildings and many modern homes, don’t shed water the way sloped roofs do. That makes them more vulnerable to pooling, membrane splits, flashing failures, and drainage clogs. Regular inspections aren’t optional; they’re the single most effective way to extend your roof’s lifespan and avoid emergency calls.
At Sunflowers Energy LLC, we inspect and repair both residential and commercial flat roofs, including TPO, PVC, and rubber roofing systems. We built this guide based on what our crews actually look for on every job. Below, you’ll find a step-by-step checklist covering drainage, surface condition, flashings, penetrations, and interior warning signs, everything you need to spot trouble before it becomes damage.
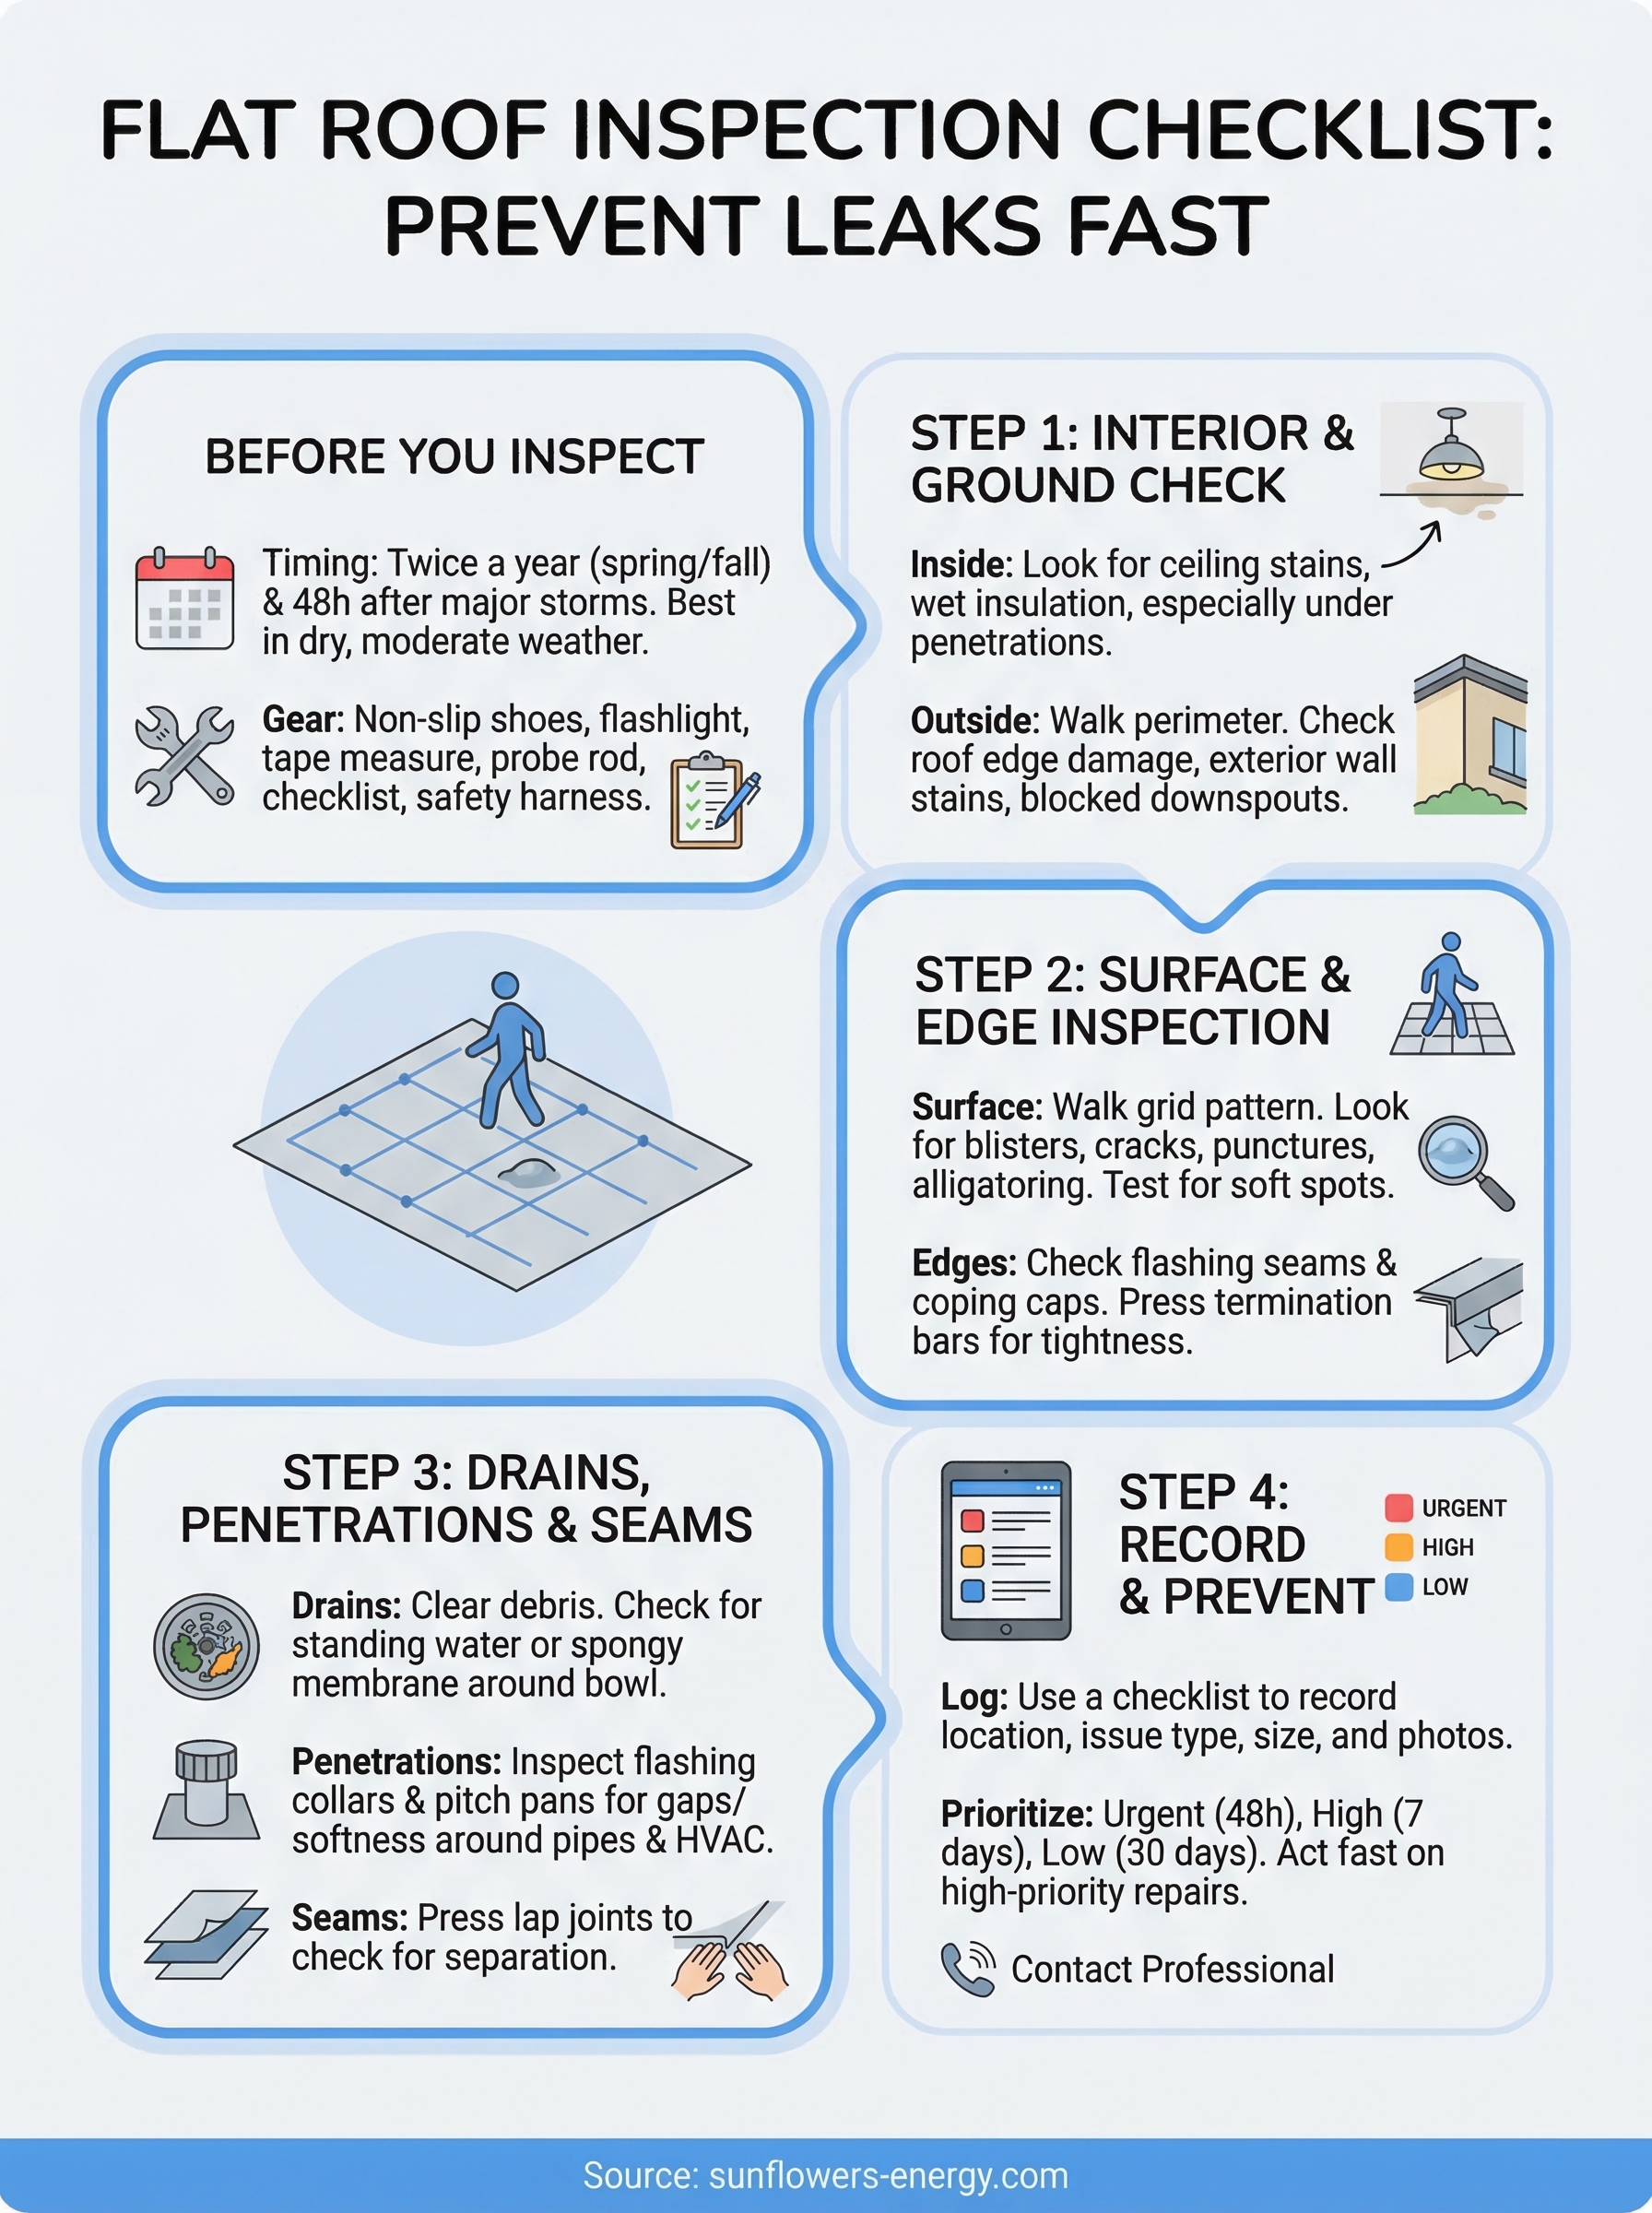
What to do before you inspect a flat roof
A flat roof inspection isn’t something you do by walking outside and taking a quick look. Preparation determines whether you catch problems early or miss the signs that lead to serious leaks. Before you climb up, take 15 minutes to set yourself up correctly. A rushed inspection almost always overlooks the issues that matter most, and those are exactly the ones that cause the most damage.
Pick the right time to inspect
Timing matters more than most people realize. Inspect your flat roof at least twice a year, ideally in spring after winter freeze-thaw cycles and in fall before heavy rain season starts. You should also inspect within 48 hours after any major storm, hail event, or high winds. Post-storm inspections are especially important because that’s when membrane punctures, displaced flashing, and blocked drains appear most clearly.
Avoid inspecting immediately after rainfall. Wet membranes are slippery and harder to read visually, and standing water can obscure the actual source of a leak.
The best conditions for an inspection are dry weather, moderate temperatures, and strong natural daylight. Early morning or late afternoon tends to work well, since the sun sits lower in the sky and side lighting helps you spot surface irregularities like bubbles, cracks, or low spots that might otherwise blend in.
Gather your tools and safety gear
You need the right equipment before you step onto the roof. Going up without it wastes time and creates real safety risks. Here’s what to bring:

Safety equipment:
- Non-slip, rubber-soled shoes
- Safety harness and anchor line (required for roofs higher than one story)
- Hard hat if there are workers or people below
Inspection tools:
- Flashlight or headlamp for interior checks
- Measuring tape
- Moisture meter (optional but useful for membrane checks)
- Camera or smartphone for photo documentation
- Blunt screwdriver or probe rod to test soft spots
- Notepad or a printed flat roof inspection checklist to record findings on the spot
Never walk on a roof surface you haven’t confirmed can hold your weight. If you find spongy or soft areas while inspecting, stop, mark them clearly, and contact a roofing professional before continuing.
Review past inspection records
Before you go up, pull any records from previous inspections or repairs. Knowing where problems appeared before tells you exactly where to focus your attention first. If you don’t have any records yet, start one today. A simple written log with dates, photos, and brief notes is enough to build a useful history.
Your records should cover:
- Date of the last inspection
- Any repairs completed and the materials used
- Known problem areas such as drains, seams, or flashing edges
- Roof age and membrane type, for example TPO, PVC, or EPDM rubber
Reviewing this history takes five minutes and can save you hours of searching for the source of a new leak. Patterns matter here. A drain that keeps clogging, or a seam that has been patched more than once, points to a structural issue that a repeat patch won’t fix permanently. Flag those spots before you head up so they get the extra attention they need during your walkthrough.
Step 1. Check inside and from the ground
The first checks happen before you ever set foot on the roof. Starting inside and from the ground lets you spot active problems quickly and gives you a clear roadmap of where to focus once you’re up top. This step is a core part of any flat roof inspection checklist and takes less than 20 minutes to complete.
Look for interior warning signs first
Walk through the top floor of your building and look at the ceiling. Water stains, discoloration, bubbling paint, and soft drywall are all signs that moisture has already breached the roof system. Check corners and areas around light fixtures carefully, since water travels along framing before it drips, which means the stain you see may not sit directly below the actual entry point.
Pay close attention to any rooms directly below roof penetrations like HVAC units, pipes, or skylights. Those spots are the most common entry points for water. Use your flashlight to inspect the attic or any accessible roof cavity for wet insulation, rust on metal decking, or dark staining on structural members.
If you find active dripping or saturated insulation, document it with photos and mark the location on a simple floor plan before you continue.
Walk the perimeter before climbing up
Stand at ground level and scan the full perimeter of the building. Look for visible signs of roof edge damage, including lifted or buckled membrane along the fascia, sagging sections, or debris buildup against parapet walls. Binoculars help significantly here, especially on taller commercial buildings where close inspection from the ground is difficult.
Watch for water stains running down exterior walls below the roofline. These stains usually point to failed flashing or blocked scuppers that let water back up and overflow. Also check the base of downspouts for debris, which signals that drainage isn’t clearing properly from the roof above.
Here’s what to note during your ground-level walkthrough:
- Visible membrane lifting or separation at roof edges
- Water staining on exterior walls below the roofline
- Debris or blockages at downspouts and scuppers
- Sagging sections or unusual low points visible from below
- Cracks or gaps in parapet walls or coping
Record every finding with a photo and a brief note before you move to the next step. The interior and ground-level checks give you a solid foundation for the hands-on surface inspection that follows.
Step 2. Inspect the roof surface and edges
Once you’re safely on the roof, the hands-on portion of your flat roof inspection checklist begins. Walk the entire surface in a systematic grid pattern, starting at one corner and moving in parallel passes from one side to the other. This approach ensures you cover every square foot and don’t overlook sections that look fine from a distance but show real damage up close.
Check the membrane for damage
The membrane is your roof’s primary defense against water, and it takes the most punishment from UV exposure, temperature swings, and foot traffic. Look for blistering, bubbling, cracking, or punctures as you move across the surface. Press lightly on any raised areas with your hand. A blister that feels soft and hollow underneath indicates moisture is already trapped between the membrane and the substrate beneath it.
Any soft spot larger than your hand needs professional evaluation before you walk near it again.
Also watch for alligatoring, which is the dry, scaly cracking pattern that forms when a membrane loses flexibility and starts breaking down. Use your blunt probe rod to test areas that look dry or discolored, and photograph every defect with something in frame for scale, like a coin or tape measure, so you can track whether damage grows between inspections.
Record each defect with these details:
- Type of damage (blister, crack, puncture, alligatoring)
- Location using a simple grid reference, for example "NW corner, 6 feet from parapet"
- Approximate size in inches
- Photo reference number
Inspect the edges and flashings
Roof edges and flashing points fail more often than open-field membrane because they endure constant thermal movement and mechanical stress. Walk the full perimeter and check where the membrane meets the parapet walls, fascia, and any metal edging. Press along the termination bar or flashing seam to test whether the seal is still tight. Any area where the membrane has lifted, separated, or pulled away from the wall needs immediate attention.
Check the coping caps on top of parapet walls for cracks, missing mortar, or loose sections. Water that enters through the coping drains straight down the interior wall face and causes damage that looks like a leak coming from somewhere else entirely. Flashing should lie flat, overlap correctly at every seam, and show no rust or visible gaps where two sections meet.
Step 3. Inspect drains, penetrations, and seams
Drainage failures and penetration leaks account for the majority of flat roof water intrusion problems. This part of your flat roof inspection checklist covers the three areas where water is most likely to find its way through: drains, roof penetrations, and membrane seams. Each one requires hands-on testing, not just a visual pass.
Check roof drains and scuppers
Start at every interior drain on the roof surface. Clear away any leaves, gravel, or debris sitting on the drain cover, then lift the strainer and look directly into the drain bowl. The bowl should show no standing water, no cracking in the surrounding membrane, and no separation between the membrane and the drain ring. Press the membrane around the drain edge with your fingers. Soft or spongy material here means water is already pooling underneath, which points to a failing drain connection rather than a simple clog.
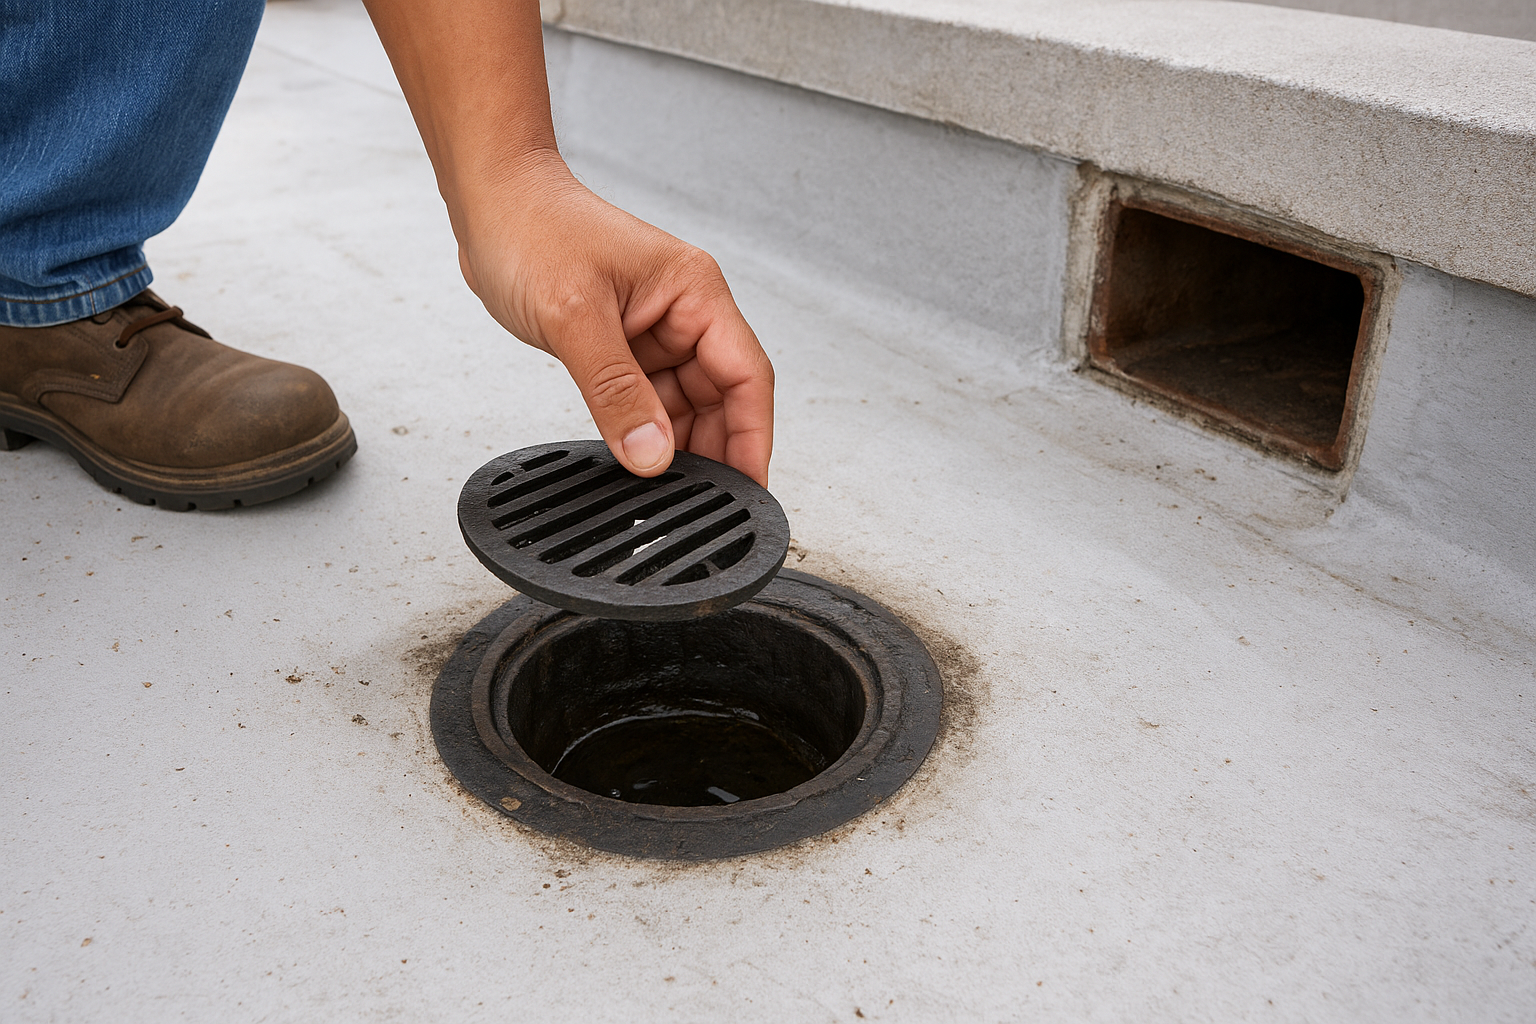
A drain that collects debris repeatedly in the same spot usually means the surrounding membrane has sagged, creating a low point that collects both water and debris faster than a properly sloped drain.
Move to every scupper opening along the parapet walls. Check that each scupper opening is fully clear and that the metal sleeve or liner inside the wall shows no rust, gaps, or separation from the surrounding masonry or membrane. Scuppers that drain onto an extension downspout should have that downspout firmly attached with no visible gaps at the joint.
Inspect penetrations
Every pipe, HVAC curb, vent, and conduit that passes through your roof membrane is a potential leak point. Walk to each one and press the flashing collar firmly around the base of the penetration. The collar should feel stiff and fully bonded, with no lifting edges or visible gaps. Soft or flexible collars on older roofs signal that the sealant has dried out and the flashing no longer provides a watertight seal.
Check the pitch pans or pitch pockets used around irregular penetrations by looking for cracked or sunken filler material. These need to be topped up with fresh sealant material when the fill sits below the rim of the pan.
Check seams and lap joints
Seams are where two sections of membrane overlap, and lap joint failures are one of the most common sources of slow leaks on TPO, PVC, and EPDM roofs. Run your fingers along every visible seam and press down firmly. Any seam edge that lifts or shows a visible gap needs to be re-welded or re-bonded by a qualified technician.
Log each problem seam with its location, approximate length, and whether it shows moisture staining or just separation, so you can prioritize repairs accurately in the next step.
Step 4. Record issues and prevent leaks fast
Finding problems on a flat roof means nothing if those findings don’t turn into action. This final step in your flat roof inspection checklist is where you organize everything you’ve documented and set a clear repair timeline so nothing gets buried in a folder and forgotten until the next storm.
Build your inspection log
Your inspection log is the record that protects you over time. Every issue you found during the walkthrough needs a consistent format so you can compare results across inspections and spot patterns before they become emergencies. Use the template below as your starting point. You can adapt it in a spreadsheet or print it out and fill it in on the roof.
| Date | Location | Issue Type | Size / Severity | Photo # | Repair Priority | Repair Date |
|---|---|---|---|---|---|---|
| 2026-03-13 | NW drain | Debris blockage | Minor | 01 | Low | Within 30 days |
| 2026-03-13 | East parapet flashing | Membrane separation | 8 inches | 02 | High | Within 7 days |
| 2026-03-13 | HVAC curb collar | Soft flashing, lifting edge | 4 inches | 03 | High | Within 7 days |
| 2026-03-13 | Center field membrane | Blister, soft underside | 12 inches | 04 | Urgent | Within 48 hours |
Fill in every row before you leave the roof so that no detail gets reconstructed from memory later. Attach your photos directly to the log in a shared folder, labeled by photo number and date.
Prioritize repairs by severity
Not every finding requires the same response speed. Use a three-tier system to sort what needs immediate attention from what can wait for a scheduled service visit.
- Urgent (within 48 hours): Active leaks, large membrane blisters, fully separated flashing, blocked drains with standing water above one inch
- High (within 7 days): Partial seam separation, soft collar flashings at penetrations, cracked coping caps
- Low (within 30 days): Minor debris buildup at drains, small surface scuffs, worn sealant that hasn’t separated yet
Urgent repairs left past 48 hours frequently escalate into water intrusion events that damage interior materials and multiply your repair costs significantly.
Act on findings before the next rain
Once your log is complete and priorities are assigned, contact a qualified roofing contractor for anything rated High or Urgent before checking the weather forecast. Scheduling repairs within days of your inspection, not weeks, is the only way the documentation you just created actually prevents damage. For Low-priority items, set a calendar reminder 25 days out so the repair window doesn’t quietly expire while the issue gets worse underneath.
Next steps
Running through a flat roof inspection checklist twice a year gives you a real advantage over the most common and expensive roofing failures. Document every finding, prioritize repairs by severity, and follow through on urgent items before the next storm arrives. That discipline keeps small problems from turning into large ones.
Your records matter just as much as the inspection itself. Each log entry you create builds a maintenance history that helps contractors diagnose recurring problems faster and helps you justify warranty claims when materials fail prematurely. Store your notes and photos in one place and review them before every inspection cycle.
If your inspection turned up High or Urgent items, or if it’s been more than a year since a professional looked at your roof, now is the right time to get expert eyes on it. Sunflowers Energy LLC provides free on-site roof inspections for residential and commercial properties, with honest assessments and no-obligation estimates so you know exactly what your roof needs.
