Master the residential roof repair process in 2026
Roof damage strikes when you least expect it, leaving homeowners scrambling to understand repair costs, timelines, and quality concerns. Whether dealing with storm aftermath, aging materials, or sudden leaks, navigating the residential roof repair process feels overwhelming without a clear roadmap. This comprehensive guide walks you through every critical phase from initial assessment to final verification, including sustainable roofing options that cut energy costs while protecting your investment for decades to come.
Table of Contents
- Key takeaways
- Assessing your roof and preparing for repair
- Step-by-step residential roof repair process
- Common challenges and verification after repair
- Incorporating sustainable and energy-efficient roofing solutions
- Explore expert roofing and solar services to enhance your home
- FAQ
Key Takeaways
| Point | Details |
|---|---|
| Thorough initial assessment | Begin with ground level and attic inspections to identify leaks, damage, and age, and document findings for contractors or insurers. |
| Determine repair scope | Evaluate whether minor fixes are enough or a full replacement is needed based on age, severity, and potential energy code implications. |
| Prepare proper materials | Gather matching shingles, underlayment, flashing, and tools, then remove damaged materials carefully to protect surrounding shingles. |
| Adopt sustainable options | Explore metal roofing, cool roof coatings, and recycled shingles to save energy and extend roof life. |
Assessing your roof and preparing for repair
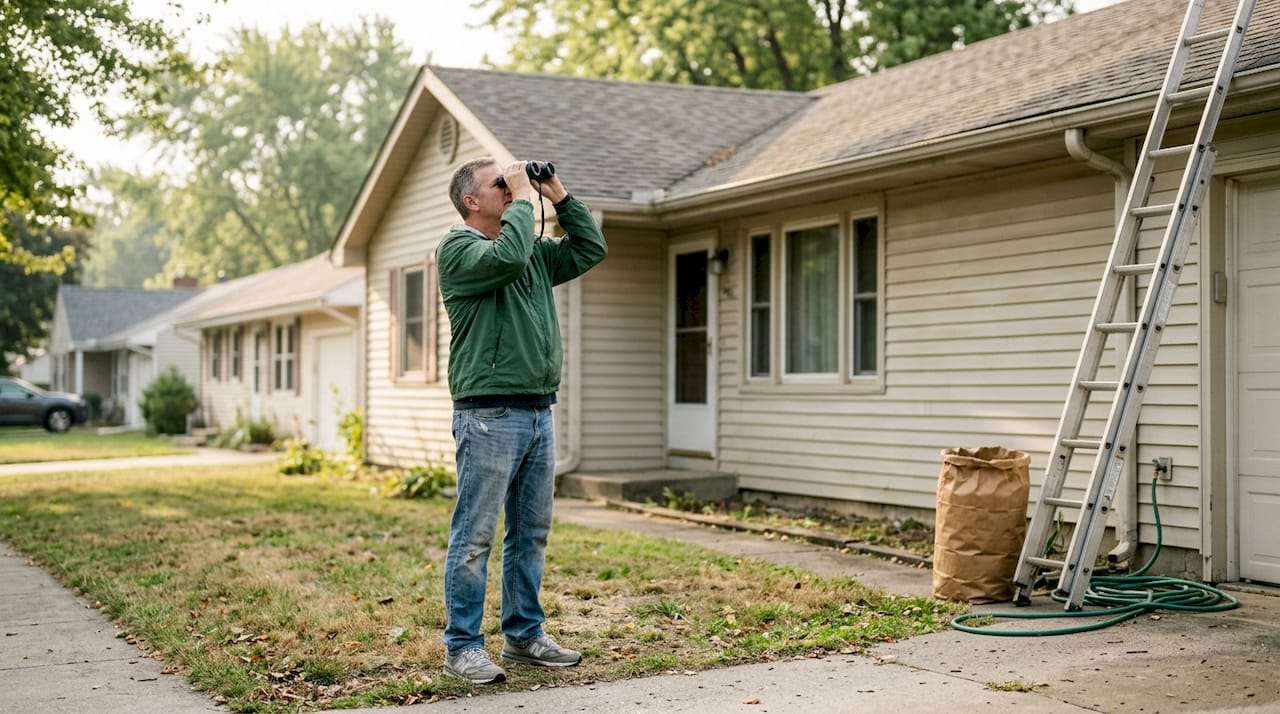
Before any repair work begins, you need a complete picture of your roof’s condition. Start by safely examining your roof from ground level using binoculars to spot missing shingles, sagging areas, or visible holes. Look for granule loss in gutters, water stains on ceilings, and daylight visible through attic boards. Proper inspection and damage assessment form the foundation of successful repairs.
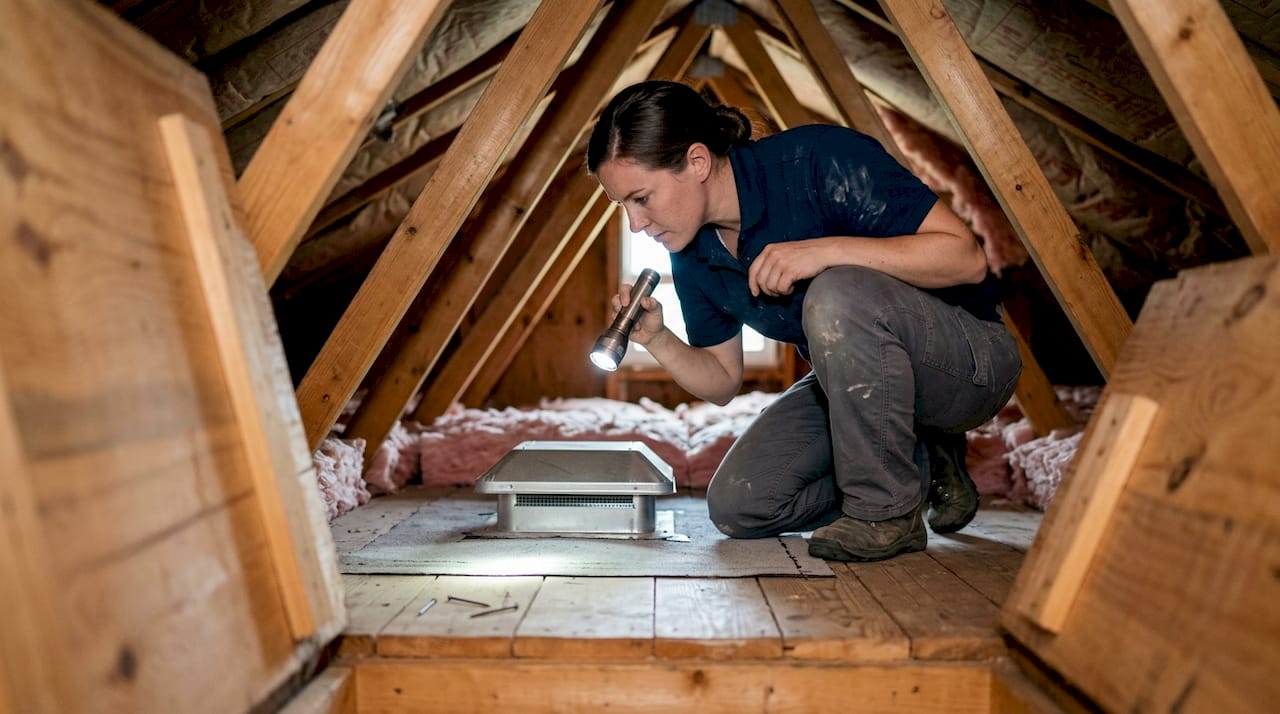
Climb into your attic during daylight to check for water stains, mold growth, or compromised insulation. These interior signs often reveal damage invisible from outside. Document everything with photos and measurements to share with contractors or insurance adjusters. This evidence proves invaluable when determining whether you need targeted repairs or full replacement.
Assessing damage severity requires honest evaluation of your roof’s age and condition. Minor issues like a few missing shingles warrant simple repairs, while widespread deterioration, multiple leak points, or roofs over 20 years old often justify replacement. Consider how sustainable roofing options could transform a necessary repair into an energy-saving upgrade.
Gather essential materials before starting repairs. Standard asphalt shingle repairs require replacement shingles matching your existing color, roofing nails, underlayment, flashing, roofing cement, and basic tools like hammers, pry bars, and utility knives. For sustainable upgrades, research metal roofing panels, cool roof coatings, or recycled-content shingles that offer superior durability.
| Material Type | Lifespan | Energy Efficiency | Cost Range | Sustainability Rating |
|---|---|---|---|---|
| Asphalt shingles | 15-30 years | Standard | $3-5/sq ft | Moderate |
| Metal roofing | 40-70 years | High reflectivity | $7-12/sq ft | Excellent |
| Cool roof coating | 10-20 years | Reduces heat 20-30% | $1-3/sq ft | Very good |
| Solar shingles | 25-30 years | Generates power | $21-25/sq ft | Outstanding |
| Recycled composite | 30-50 years | Good insulation | $4-8/sq ft | Excellent |

Pro Tip: Schedule repairs during dry, mild weather between 45-85°F for optimal material adhesion and worker safety. Avoid winter months when shingles become brittle and summer heat makes roof surfaces dangerously hot.
Check local building codes and permit requirements before purchasing materials. Many jurisdictions require permits for roof work exceeding basic shingle replacement. Verify whether your planned repairs comply with current energy codes, which increasingly mandate reflective roofing in hot climates. Missing this step causes expensive project delays and potential fines.
Consider eco-friendly roofing approaches that align repairs with environmental goals. Even small projects offer chances to improve ventilation, add insulation, or select materials with recycled content. These choices compound over time, reducing your carbon footprint while cutting utility bills.
Step-by-step residential roof repair process
Executing repairs methodically prevents mistakes that compromise roof integrity. A structured repair process ensures each layer performs its protective function correctly. Follow these numbered steps for professional results:
-
Remove damaged materials carefully by lifting shingle edges with a pry bar and extracting nails without tearing surrounding good shingles. Work from top to bottom to maintain water runoff patterns. Dispose of old materials properly, separating recyclable metal flashing from asphalt waste.
-
Inspect and repair the roof deck by checking plywood or OSB sheathing for rot, warping, or water damage. Replace any compromised sections with exterior-grade plywood cut to exact dimensions. Secure new deck boards with ring-shank nails spaced every 6 inches along rafters.
-
Install ice and water barrier along eaves, valleys, and around penetrations like chimneys and vents. This self-sealing underlayment prevents water intrusion at vulnerable points. Overlap seams by 6 inches and press firmly to activate adhesive backing.
-
Lay roofing felt or synthetic underlayment across the entire repair area, working from bottom to top with 2-inch horizontal overlaps. Staple every 12 inches to hold in place temporarily. Quality underlayment adds a critical secondary water barrier beneath shingles.
-
Replace or repair flashing around chimneys, skylights, vents, and valleys using corrosion-resistant materials like aluminum or copper. Proper flashing installation prevents 90% of roof leaks. Seal all edges with roofing cement and ensure water flows over, not under, flashing edges.
-
Install new shingles starting at the bottom edge, aligning carefully with existing courses. Nail each shingle with four nails placed just below the adhesive strip. Stagger seams between courses to prevent water channeling. For solar energy efficiency benefits, consider integrating solar shingles in south-facing sections.
-
Seal and finish edges by applying roofing cement under lifted shingle tabs and pressing firmly. Install ridge cap shingles along peaks using longer nails that penetrate both roof sides. Check that all penetrations are sealed and flashing is secure.
-
Clean the work area by removing all debris, nails, and packaging from roof and ground. Magnetic sweepers catch stray nails that puncture tires or injure pets. Proper cleanup prevents accidents and shows professional attention to detail.
Pro Tip: Before starting repairs, verify your homeowner’s insurance covers the damage and understand your deductible. Many policies cover storm damage but exclude wear and tear. Document everything for potential claims.
Integrating energy-efficient materials during repairs maximizes your investment. Cool roof coatings reflect sunlight, reducing attic temperatures by 30-50°F and cutting cooling costs significantly. Adding radiant barriers or extra insulation during repairs pays dividends for decades. Explore solar roofing options that generate electricity while protecting your home.
Ventilation improvements often get overlooked during repairs but dramatically impact roof lifespan. Proper attic airflow prevents moisture buildup that rots decking and reduces shingle life by years. Install ridge vents, soffit vents, or powered fans to maintain consistent air circulation. These upgrades cost little during active repairs but prove expensive to add later.
Common challenges and verification after repair
Even well-planned repairs encounter obstacles that test your patience and budget. Hidden damage beneath surface problems ranks as the most common surprise. What appears as a small leak often reveals extensive water damage to decking, rafters, or insulation once shingles come off. Budget an extra 20% beyond initial estimates to handle unexpected issues without project delays.
Weather delays frustrate homeowners and contractors alike. Rain, high winds, or extreme temperatures halt work abruptly, leaving your home vulnerable with exposed areas. Protect open sections with tarps secured at all edges. Accept that rushing repairs in poor conditions creates bigger problems than waiting for suitable weather.
Improper material installation causes premature failures that void warranties. Shingles nailed too high or too low blow off in moderate winds. Inadequate flashing allows water to bypass shingles entirely. Misaligned courses create unsightly waves visible from the street. Hiring experienced contractors or carefully following manufacturer instructions prevents these costly mistakes.
| Common Problem | Impact | Best Practice Solution |
|---|---|---|
| Inadequate ventilation | Shortened roof life, ice dams | Install balanced intake/exhaust vents |
| Missing ice barrier | Leaks at eaves and valleys | Apply self-sealing membrane at vulnerable areas |
| Improper nail placement | Shingle blow-offs | Follow manufacturer’s nailing pattern exactly |
| Mismatched shingles | Poor aesthetics, warranty void | Use same brand, color, and product line |
| Skipped flashing repairs | Persistent leaks | Replace all deteriorated flashing during repairs |
Ventilation impacts often go unnoticed until damage accumulates. Insufficient airflow traps heat and moisture in attics, cooking shingles from below while promoting mold growth. During repairs, assess whether your current ventilation meets building codes requiring 1 square foot of vent area per 150 square feet of attic space. Upgrading ventilation during active repairs costs far less than retrofitting later.
Verify repair quality before making final payment. Walk your property’s perimeter examining the roofline for straight, even courses without bumps or dips. Check that all vents, pipes, and chimneys have proper flashing and sealant. Climb into your attic during the next rain to confirm no new leaks appear. Run a hose over repaired sections for 15 minutes while someone watches for drips inside.
Create a verification checklist covering these critical points: all damaged shingles replaced, flashing secure and sealed, no exposed nails visible, gutters clear of debris, attic shows no new water stains, ventilation adequate, materials match existing roof, cleanup complete. Methodically checking each item catches problems while contractors can easily fix them.
Pro Tip: Schedule a professional roof inspection 30-60 days after repairs to validate quality and activate warranty coverage. Independent inspectors spot issues you might miss and provide documentation for insurance or future buyers. This small investment protects your larger repair expenditure.
Document completed repairs with dated photos from multiple angles. Note material brands, colors, and quantities used. Save all receipts, permits, and warranty information in a dedicated home maintenance file. Future buyers appreciate this documentation, and insurance companies require it for claims. Recognizing signs of needed replacement helps you distinguish between repair and replacement scenarios.
Understand how quality roofing enhances solar efficiency if you plan future solar installations. Repairs create opportunities to reinforce roof structure for panel weight and ensure optimal south-facing surface conditions. Coordinating roofing and solar projects saves money compared to separate installations.
Incorporating sustainable and energy-efficient roofing solutions
Transforming necessary repairs into sustainability upgrades delivers compounding benefits for decades. Sustainable roofing reduces energy consumption substantially while increasing home value and reducing environmental impact. Modern materials offer performance far exceeding traditional options at increasingly competitive prices.
Metal roofing stands out for longevity and recyclability. Aluminum and steel panels last 50-70 years, reflecting solar heat to cut cooling costs by 10-25%. Metal roofs weigh less than asphalt, reducing structural stress. At end of life, metal roofing is 100% recyclable, avoiding landfill waste. Initial costs run higher, but lifetime value surpasses cheaper alternatives.
Cool roof coatings provide budget-friendly sustainability upgrades during repairs. These specialized paints or membranes reflect 65-90% of solar radiation, dramatically lowering roof surface temperatures. Homes with cool roofs need less air conditioning, reducing peak electricity demand. Application takes hours, not days, making cool coatings ideal for quick efficiency improvements.
Solar shingles integrate electricity generation directly into your roof surface. Unlike bulky panels, solar shingles blend aesthetically while producing clean energy. Technology improvements have boosted efficiency and reduced costs significantly. Federal tax credits cover 30% of installation costs through 2032, improving return on investment. Pairing roof repairs with solar installation maximizes both projects’ value.
Recycled-content roofing materials divert waste from landfills while performing comparably to virgin materials. Rubber shingles made from recycled tires, composite shingles containing reclaimed wood fiber, and metal roofing from recycled aluminum all offer eco-friendly alternatives. These materials often cost less than premium options while delivering superior durability.
Evaluate energy-saving options using these actionable steps:
- Calculate your current energy costs and identify how much cooling/heating relates to roof performance
- Research available tax credits, utility rebates, and financing programs for energy-efficient roofing upgrades
- Request quotes comparing standard repairs against sustainable alternatives with 20-year cost projections
- Assess your roof’s solar potential using online tools that analyze sun exposure and shading
- Consider whole-house energy audits that identify how roofing improvements integrate with other efficiency upgrades
- Prioritize upgrades offering fastest payback periods, typically cool coatings and improved insulation
- Factor in increased home resale value from energy-efficient features when calculating ROI
Long-term thinking transforms repair decisions. A roof lasting 50 years costs half as much annually as one lasting 25 years, even with higher upfront expense. Energy savings compound monthly, returning thousands over decades. Environmental benefits extend beyond your home, reducing grid demand and fossil fuel consumption. Sustainable roofing benefits multiply when you consider all factors together.
Insulation and ventilation upgrades during repairs offer exceptional returns. Adding 6 inches of blown-in insulation costs little when attic access is already open but cuts energy bills for the home’s lifetime. Proper ventilation prevents moisture damage that destroys even the best roofing materials prematurely. These behind-the-scenes improvements matter more than shingle selection for overall performance.
Urban homeowners face unique considerations when planning sustainable roof repairs. Local codes may mandate cool roofing or restrict material choices. Homeowner associations often control color and style options. Review solar roofing checklists for urban settings to navigate these constraints while maximizing sustainability.
Explore expert roofing and solar services to enhance your home
Professional guidance ensures your roof repair delivers maximum value and longevity. Sunflowers Energy specializes in integrating sustainable materials and energy-efficient solutions into every roofing project, transforming necessary repairs into lasting home improvements. Our team brings decades of combined experience in both traditional roofing and cutting-edge solar technology.
Discover comprehensive expert roofing services that handle everything from storm damage assessment to complete sustainable roof installations. We prioritize quality materials, meticulous installation, and customer education throughout every project. Explore best solar energy solutions that complement your roofing investment, generating clean electricity while protecting your home. Our detailed solar energy efficiency guide shows exactly how combining roofing upgrades with solar installations maximizes your home savings and environmental impact.
FAQ
How long does a typical residential roof repair take?
Most residential roof repairs require one to five days depending on damage extent, weather conditions, and material availability. Simple shingle replacements covering small areas often finish in a single day, while complex repairs involving deck replacement, multiple leak sources, or sustainable material integration take longer. Weather delays extend timelines unpredictably, so build flexibility into your schedule.
What are signs that my roof repair needs to include sustainable or energy-efficient upgrades?
If your energy bills seem high relative to your home size or your roof exceeds 15 years old, repairs present ideal opportunities for sustainable roofing benefits. Visible wear like granule loss, curling shingles, or frequent leaks indicates materials nearing end of life, making sustainable replacement more cost-effective than repeated repairs. Consider upgrades when your roof needs work anyway, avoiding double labor costs.
How can I verify that my roof repair was done correctly?
Conduct thorough visual inspection checking for proper shingle alignment, secure flashing, and complete sealant application around all penetrations. Test repaired areas with a hose while someone monitors your attic for leaks. Professional post-repair inspections provide expert validation and documentation, especially important for warranty activation and future home sales. Watch for signs requiring roof replacement that indicate repairs proved insufficient.
Should I repair or replace my aging roof?
Repair makes sense when damage covers less than 30% of roof area and existing materials have 5-10 years of useful life remaining. Replace when repairs approach 50% of replacement cost, your roof exceeds its expected lifespan, or you plan to sell within five years. Replacement allows comprehensive sustainable upgrades impossible with piecemeal repairs, potentially delivering better long-term value despite higher initial costs.
Recommended
- How to repair storm-damaged roof safely in 2026 – Sunflowers Energy LLC A Roofing and Solar Companys
- How to estimate roofing costs accurately for 2026 – Sunflowers Energy LLC A Roofing and Solar Companys
- Patch It Up: Your Guide to the Best Wet Roof Sealants – Sunflowers Energy LLC A Roofing and Solar Companys
- Commercial Roof Inspection Checklist: 6 Key Areas To Check – Sunflowers Energy LLC A Roofing and Solar Companys

One Response