Installing Owens Corning shingles correctly makes the difference between a roof that lasts decades and one that fails prematurely. Whether you’re a DIY homeowner or a contractor looking for the official Owens Corning shingles installation instructions, having access to manufacturer-approved guidelines protects your investment and validates your warranty.
At Sunflowers Energy LLC, we install Owens Corning products daily across residential roofing projects. We’ve seen firsthand how proper technique, from nailing patterns to starter strip placement, determines long-term performance. That experience taught us exactly what matters most during installation and where common mistakes occur.
This guide walks you through the essential steps, specifications, and resources for installing Owens Corning shingles the right way. You’ll find information on accessing official PDF manuals, understanding nailing requirements, and ensuring your installation meets manufacturer standards for full warranty coverage.
Before you start: choose the right instructions and tools
You can’t install Owens Corning shingles properly without the manufacturer’s official documentation for your specific product line. Each shingle series (Duration, Oakridge, TruDefinition, etc.) has unique installation requirements that affect everything from nail placement to exposure measurements. Using generic instructions or guessing based on experience with other brands voids your warranty and creates vulnerabilities.
Download the correct installation guide for your shingle line
Owens Corning publishes detailed PDF installation manuals on their professional resources website. You need the guide that matches your exact shingle product, not a general overview. The Duration series requires different specifications than Oakridge shingles, particularly for nailing patterns and starter strip installation. Search "owens corning shingles installation instructions" plus your specific product name to find the current version, as Owens Corning updates these documents regularly to reflect building code changes.
Always verify you have the most recent version dated within the last two years, as outdated instructions may not meet current warranty requirements.
Gather professional-grade tools before climbing
Your installation quality depends on having the right equipment from the start. You’ll need a pneumatic roofing nailer (with proper pressure settings), chalk lines, utility knives, a speed square, measuring tape, and a straight edge. Keep replacement blades handy, since cutting through shingles dulls them quickly. Don’t compromise with hand nailing unless your instructions specifically permit it for certain applications.
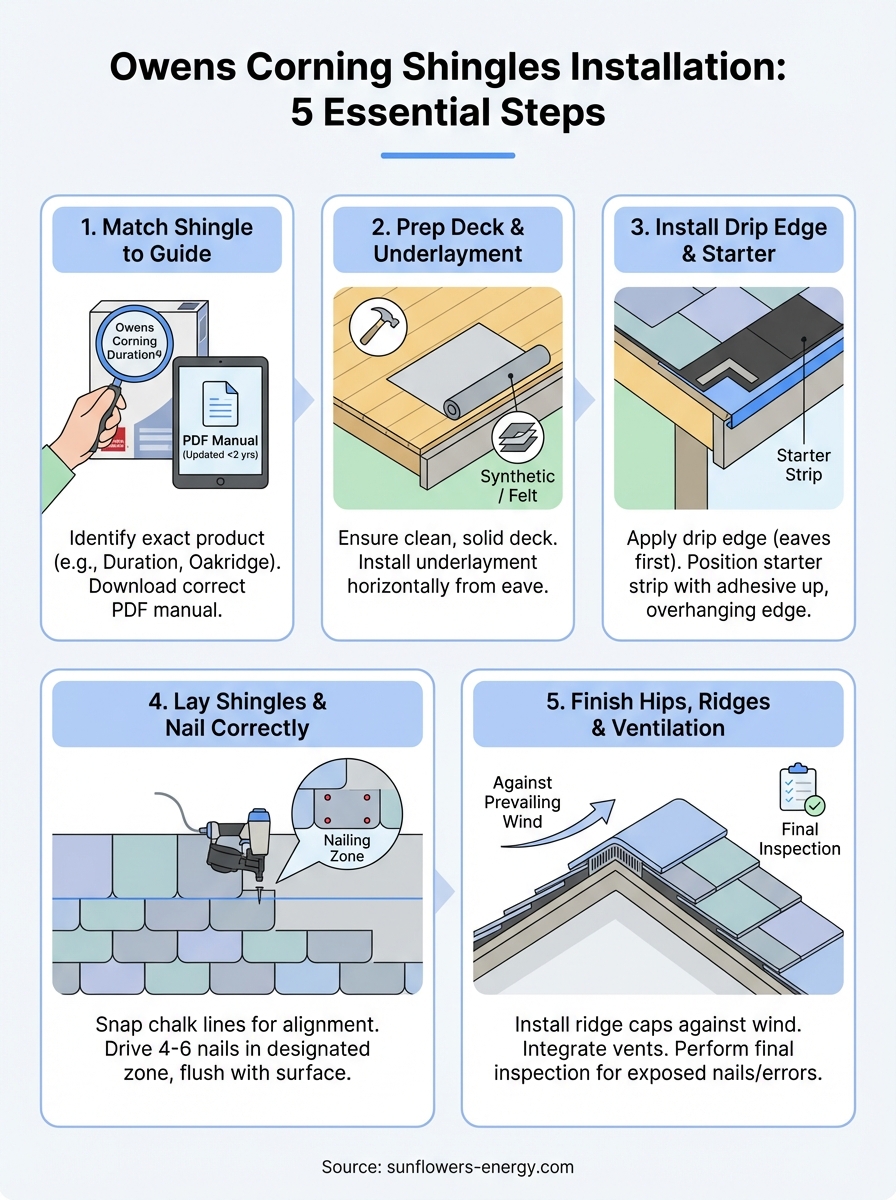
Step 1. Match your shingle line to the official guide
Your first task is identifying your exact shingle product from Owens Corning’s lineup. The instructions for Duration series differ significantly from Oakridge or TruDefinition, with variations in nailing requirements, exposure distances, and starter strip specifications. Installing Duration shingles using Oakridge instructions creates warranty violations and performance issues.
Identify your exact shingle product name and series
Check your product packaging or purchase documentation for the complete name. Duration comes in multiple versions: Duration, Duration Storm, Duration Flex, and Duration Designer. Each requires different installation techniques documented in separate manuals. Oakridge shingles have their own technical bulletin, while architectural lines like TruDefinition follow distinct specifications.
Using the wrong manual for your specific shingle type automatically voids manufacturer warranties.
Locate and download the current technical manual
Visit Owens Corning’s professional resources section and search for your product’s installation instructions PDF. You need the document labeled with your shingle name plus "installation instructions" or "technical bulletin." Download the version dated within the last 24 months, as older editions may not reflect current code requirements or warranty conditions.
Step 2. Prep the roof deck and underlayment the right way
Your roof deck and underlayment create the foundation for shingle performance. Owens Corning shingles installation instructions specify that the deck must be clean, dry, and structurally sound before you install any underlayment or shingles. Skipping proper deck preparation causes premature failures that no shingle quality can overcome.
Inspect and repair the deck surface
Walk the entire deck checking for loose boards, protruding nails, and damaged sections. Your deck must provide a solid, flat nailing surface without gaps exceeding 1/4 inch between boards. Replace any rotted or warped decking, and hammer down or remove all protruding fasteners that could puncture your underlayment.
A deck with structural defects compromises your entire roofing system regardless of shingle quality.
Install underlayment per manufacturer specifications
Apply underlayment horizontally from eave to ridge with proper overlap distances specified in your Owens Corning manual. Most installations require synthetic underlayment or felt paper rated for your climate zone. Secure it with cap nails or staples spaced according to your instructions, ensuring the material lies flat without wrinkles or bubbles.
Step 3. Install drip edge, flashing, and starter course
Your drip edge and starter course create the critical edge protection that prevents water infiltration at the eaves and rakes. Owens Corning shingles installation instructions specify exact positioning requirements for these components, and incorrect placement causes warranty issues and leaks that damage your entire roofing system.
Install drip edge along eaves and rakes first
Apply metal drip edge directly to the roof deck at the eaves before installing underlayment. The drip edge should extend 3/4 inch beyond the fascia and sit flat against both the deck and fascia board. Secure it with roofing nails spaced every 8 to 12 inches, overlapping sections by at least 2 inches at joints.

Proper drip edge installation prevents water from wicking back under shingles and rotting your fascia boards.
At rake edges, install drip edge over the underlayment rather than under it. This layering sequence ensures water flows correctly away from the roof structure.
Position starter strips according to specifications
Your starter course provides the foundation for the first shingle row and must align with manufacturer specifications. Install starter shingles along the eaves with the adhesive strip facing up toward the ridge, positioned to overhang the drip edge by 1/4 to 3/4 inch for proper water runoff.
Step 4. Lay shingles, align courses, and follow nail patterns
Once your starter course sits properly, you begin the actual shingle installation that determines your roof’s long-term performance. This step requires precise alignment and consistent nailing according to your specific Owens Corning shingles installation instructions. Mistakes here multiply across every course you install, creating visible patterns and potential leak points.
Start your first full course with proper offset
Begin your first full course directly over the starter strip with a full-length shingle aligned to create proper water channels. Snap horizontal chalk lines every few courses to maintain straight alignment across the roof surface. Offset each successive course according to your manual’s specifications, typically 5 to 6 inches for standard three-tab patterns, though architectural shingles like Duration require different offset measurements.
Drive nails at specified locations and depths
Your nailing pattern makes the difference between secure attachment and premature blow-offs. Place four to six nails per shingle (depending on your product line and slope) in the designated nailing zone marked on your installation guide. Drive each nail flush with the shingle surface without overdriving, which tears the material and weakens your attachment points.

Incorrect nail placement voids your warranty and creates weak spots where wind can lift shingles during storms.
Step 5. Finish hips, ridges, and ventilation, then inspect
Completing your ridge caps and ventilation system represents the final installation phase before your roof protection becomes fully functional. Your Owens Corning shingles installation instructions include specific requirements for ridge cap dimensions, nail placement, and ventilation integration that affect both appearance and performance.
Apply ridge cap shingles and complete ventilation
Install ridge cap shingles starting from the end opposite prevailing winds, overlapping each cap by 5 to 6 inches as specified in your manual. Secure each cap with two nails positioned one inch from each edge and below the adhesive strip. Integrate ridge vents according to manufacturer specifications, ensuring proper airflow requirements for your attic space.
Proper ridge cap installation prevents wind-driven rain from penetrating your roof’s most vulnerable points.
Perform final inspection against checklist
Walk the entire roof checking for exposed nails, misaligned courses, and damaged shingles. Verify that all flashing sits properly, drip edges extend correctly, and valleys show proper water channeling. Your final inspection ensures warranty compliance and identifies any installation errors before they cause problems.
Wrap-up
Following the official Owens Corning shingles installation instructions protects your investment and ensures your warranty remains valid. Each step from deck preparation through final ridge cap installation matters for creating a roof system that performs reliably for decades. Skipping specifications or improvising techniques creates vulnerabilities that compromise your entire installation regardless of material quality.
Your success depends on matching your exact shingle product to the correct technical manual, then executing every requirement from nailing patterns to exposure measurements. These details separate professional installations from amateur attempts that fail during the first severe weather event.
Professional installation eliminates guesswork and guarantees manufacturer compliance. At Sunflowers Energy LLC, our certified teams install Owens Corning products according to exact specifications daily. We handle everything from deck inspection through final warranty documentation, so you get proper protection without the installation risks. Contact us for a free onsite inspection and estimate.

One Response