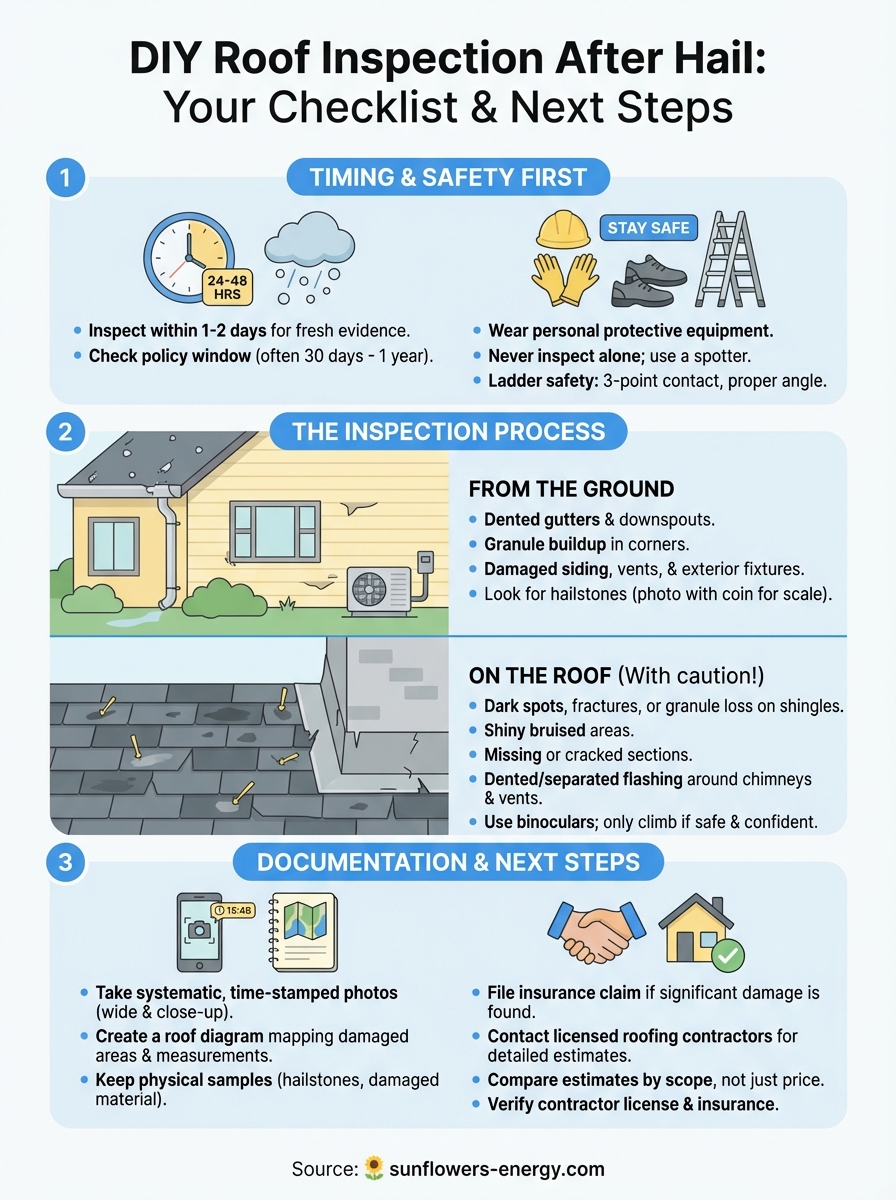
A hailstorm just rolled through your neighborhood, and now you’re staring at your roof wondering what’s hiding up there. Hail damage isn’t always obvious from the ground, dents, cracks, and compromised shingles can go unnoticed until they turn into leaks, mold, or costly repairs. That’s why a roof inspection after hail is one of the smartest moves you can make to protect your home and your wallet.
At Sunflowers Energy LLC, we’ve helped countless homeowners assess and restore their roofs following severe weather. We know firsthand that acting quickly matters, both for catching damage early and for meeting insurance claim deadlines. But before you call in the professionals, there’s plenty you can evaluate on your own to understand the situation.
This guide walks you through a practical DIY checklist for inspecting your roof after hail, explains the telltale signs of damage to look for, and outlines your next steps, whether that means filing an insurance claim or scheduling a professional inspection. By the end, you’ll have the confidence to make informed decisions about your roof’s future.
When you should inspect after a hailstorm
Timing your roof inspection after hail can make the difference between a quick insurance claim and a denied settlement. You need to understand that hail damage doesn’t always announce itself with obvious leaks or fallen shingles. Some damage develops slowly, and insurance companies set strict deadlines for reporting storm-related claims. Your inspection window starts the moment the storm clears, but the urgency depends on several key factors that determine when you should act.
Inspect within the first 24-48 hours
You should conduct your initial assessment within the first day or two after the hailstorm passes. This timeframe gives you enough time to safely access your property while the storm details are fresh and documented. Weather reports, photos of the hailstones, and timestamps become crucial evidence if you need to file a claim later.
Start by looking at your roof from the ground and checking your yard for clues. Dented gutters, damaged siding, or pockmarked air conditioning units signal that your roof likely took a hit too. If you spot hailstones larger than one inch in diameter (about the size of a quarter), your roof probably sustained damage that warrants a closer look.
The first 48 hours after a hailstorm give you the clearest picture of damage before additional weather or debris complicates what you’re seeing.
Document everything you find during this window. Take time-stamped photos of hailstones on your property, damaged outdoor fixtures, and any visible roof issues you can see from the ground. This evidence establishes a direct link between the storm and the damage, which insurance adjusters will want to verify.
Watch for the insurance claim window
Most insurance policies require you to report storm damage within a specific timeframe, typically ranging from 30 days to one year after the event. You need to check your policy documents immediately to understand your exact deadline. Missing this window can result in a complete denial of your claim, even if the damage is legitimate and extensive.
Contact your insurance company within the first week to notify them of potential damage, even if you haven’t completed a full inspection yet. This notification starts the clock in your favor and shows you’re taking the damage seriously. Your insurer will schedule an adjuster to inspect your roof, but you should complete your own assessment first so you know what to expect and discuss during their visit.
Some insurance companies offer extended reporting periods for severe storms that affect large areas. Check with your provider to see if any special provisions apply to your situation. However, don’t rely on extensions as a reason to delay your inspection or claim filing.
Schedule a follow-up inspection later
Plan a second inspection about two to four weeks after the initial storm. Some hail damage doesn’t become apparent right away, particularly issues like compromised shingle granules or small cracks that need time to show their effects. Temperature changes, additional rain, and normal roof expansion can reveal damage that wasn’t obvious during your first check.
This follow-up becomes especially important if you experienced multiple storms in a short period. You want to separate damage from different events for insurance purposes. Keep detailed notes about what you find during each inspection, including dates, weather conditions, and specific locations of damage on your roof.
Professional inspectors often recommend this two-phase approach for roof inspection after hail because it catches both immediate and delayed damage. If you’ve already filed a claim after your first inspection, you can typically submit supplemental documentation for newly discovered issues, as long as you’re still within your policy’s reporting window. Contact your insurance adjuster before conducting the follow-up to understand how they prefer to handle additional findings.
Stay safe and gather the right tools
Your safety comes before any inspection work you do on your property. Roof-related accidents send thousands of homeowners to emergency rooms each year, and most of these injuries happen during DIY assessments that seem simple on the surface. You need to approach your roof inspection after hail with the right protective equipment and tools already in hand, not halfway through when you realize you’re missing something critical.
Personal safety equipment you need
Start by assembling your safety gear before you even think about climbing a ladder or stepping onto your roof. You should wear non-slip shoes with good tread, safety glasses to protect your eyes from debris, and work gloves that give you grip without sacrificing dexterity. These basics protect you whether you’re inspecting from the ground or getting closer to damaged areas.
Your personal safety gear determines whether a routine roof inspection ends with useful information or a trip to the hospital.
Add a hard hat to your kit if you plan to inspect areas where debris might fall, particularly around damaged eaves or loose shingles. Keep your phone charged and accessible in case you need to call for help. Never conduct roof inspections alone, always have someone on the ground who knows you’re working and can respond if something goes wrong. This person serves as your safety monitor and can hand you tools or call emergency services if needed.
Essential inspection tools to bring
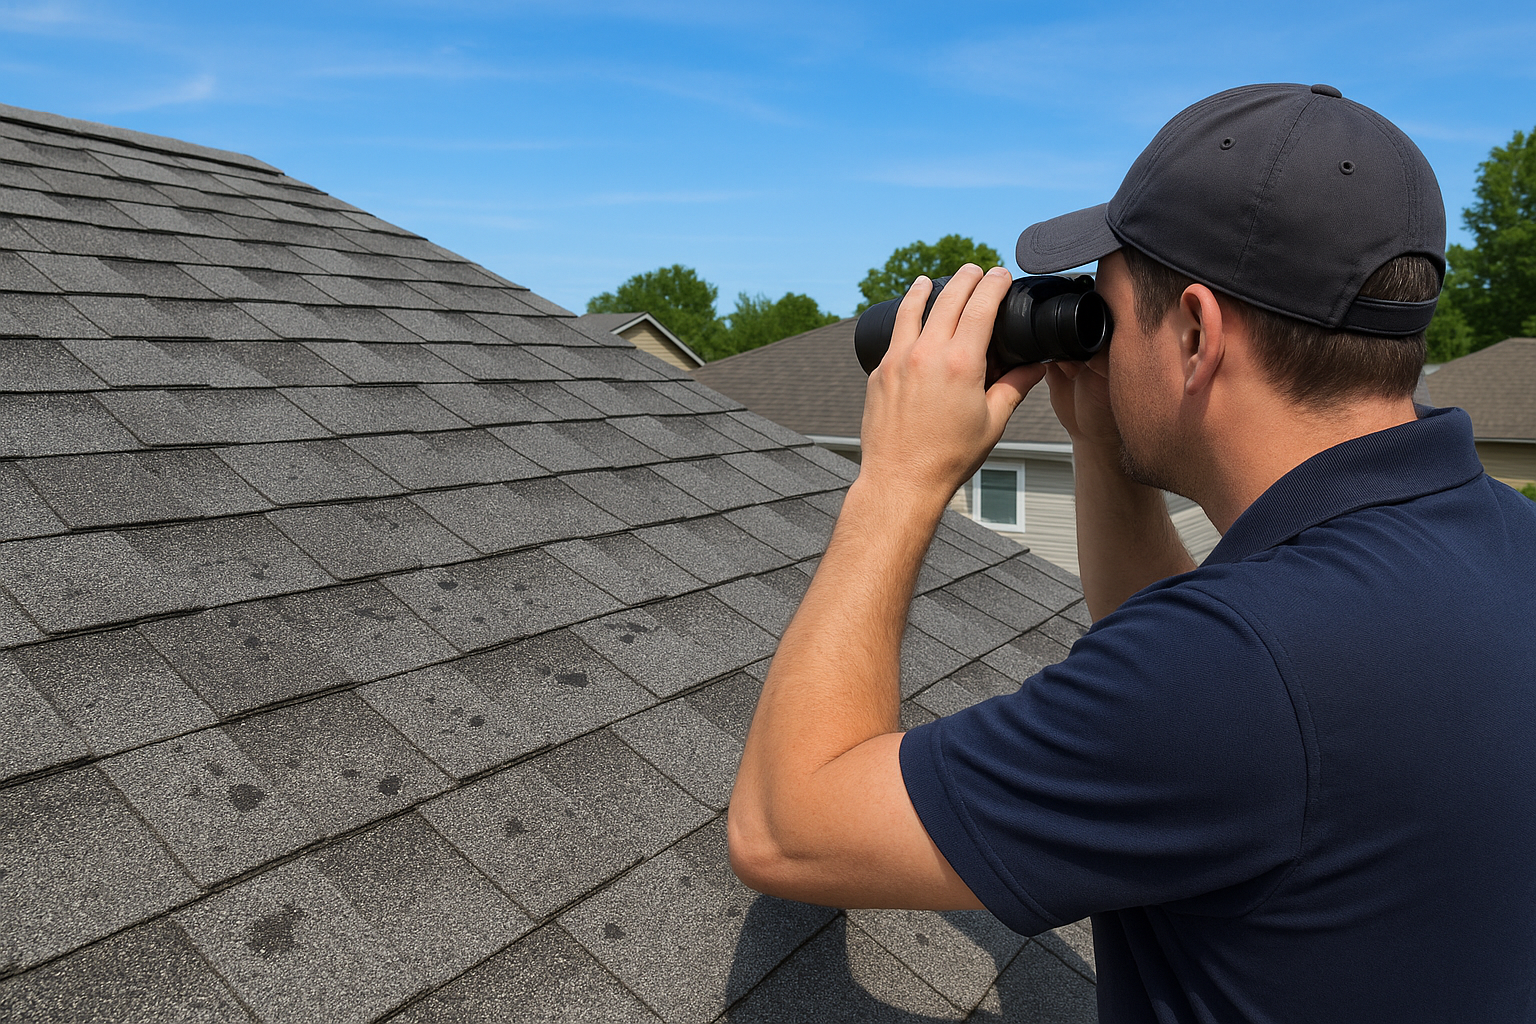
Your inspection toolkit should include both documentation equipment and assessment tools that help you identify damage accurately. Pack a quality camera or smartphone with a fully charged battery for taking detailed photos from multiple angles. Bring binoculars for ground-level roof inspection, a measuring tape to document the size of damaged areas, and a notepad for recording observations with timestamps.

Add these specific items to your collection:
- Flashlight or headlamp for inspecting dark attic spaces and shadowed roof sections
- Ladder rated for your weight plus 50 pounds, with rubber feet and proper height for your roof
- Chalk or marking spray to circle damaged spots you want professionals to examine
- Small mirror on a pole to check underneath eaves and hard-to-see angles
- Bucket or bag for collecting hailstones or damaged shingle samples
Your ladder deserves special attention because it creates the highest injury risk during inspections. Set it on level ground at a 75-degree angle (about one foot away from the wall for every four feet of height). Extend it at least three feet above your roofline if you need to access the roof surface. Secure the base and have your safety monitor hold it steady while you climb.
Check for hail damage from the ground
You can identify most critical roof damage without ever setting foot on a ladder if you know where to look and what signs matter. Ground-level inspection provides the safest starting point for your roof inspection after hail, and it often reveals enough information to decide whether you need professional help immediately. Walk around your entire property with your camera ready, examining each area methodically rather than scanning quickly and missing subtle indicators.
Examine gutters and downspouts
Your gutters tell a clear story about what happened during the storm. Look for fresh dents, dings, or dimples in the metal surfaces of your gutters and downspouts, which appear as small circular impressions that weren’t there before. Check whether your gutters pulled away from the roofline or show bent hangers and brackets that indicate impact force.
Dented gutters serve as the most reliable ground-level indicator that your roof absorbed similar impacts from hailstones.
Inspect the areas directly beneath your gutters for granule accumulation, which looks like coarse sand or small gravel piled in corners or washed into downspout strainers. These granules protect your shingles from UV damage, and excessive loss means your roof’s protective layer is compromised. Pick up a handful and check the color, it should match your roof shingles if it came from hail damage rather than normal aging.
Scan your shingles and roof surface
Use your binoculars to systematically examine your roof surface, working in small sections from multiple angles around your property. Search for these specific damage patterns:
- Dark spots or divots where hail knocked off granules, exposing the underlying asphalt
- Shiny areas that indicate bruising from impact, which appear glossy compared to surrounding material
- Missing or cracked shingles that show obvious displacement or breaks
- Curled edges or corners that lifted during the storm
Focus your attention on south and west-facing slopes because these typically receive the most direct hail impact based on storm patterns. Check whether damage appears random and scattered or concentrated in specific zones, which helps you understand the storm’s direction and intensity.
Inspect siding, vents, and exterior fixtures
Walk your property’s perimeter and document damage to everything at roof height or above. Check your air conditioning unit for dents on the top surface and bent fins on the sides. Examine roof vents, turbines, and satellite dishes for visible impacts that suggest your roof took similar hits.
Look at your siding for horizontal dent patterns that indicate hail hit at an angle, and inspect window frames and trim for fresh damage. Even your outdoor light fixtures, mailbox, and painted surfaces can show evidence of hail intensity that correlates with roof damage severity. Photograph every damaged item you find because this pattern of damage strengthens your insurance claim and helps adjusters verify the storm’s impact on your entire property.
Look for interior and attic warning signs
Your home’s interior reveals damage that hidden roof problems create long before they become obvious from outside. Water infiltration from compromised shingles shows up as stains, moisture, and structural changes in your attic and living spaces, often weeks after a hailstorm passes. You need to conduct this indoor inspection as part of your complete roof inspection after hail because these warning signs indicate active leaks that demand immediate attention.
Check your ceilings and walls for moisture
Start by examining every ceiling in your home under bright light conditions, preferably during daylight hours when natural illumination reveals subtle discoloration. Look for water stains that appear as yellowish-brown rings, dark patches, or sagging areas where moisture accumulated in the drywall or plaster. Fresh stains often feel slightly damp to the touch and may darken in color compared to older, dried marks.
Run your hand across ceiling surfaces near corners and around light fixtures, vents, and ceiling fans because these penetrations create weak points where water enters first. Check your walls along the roofline, particularly on the top floor, for bubbling paint, peeling wallpaper, or soft spots that compress when you press them gently. These signs indicate water traveled down from your roof through wall cavities.
Interior water damage from roof leaks can develop for days or weeks after a hailstorm before you notice the first stain on your ceiling.
Document every suspicious area with time-stamped photos from multiple angles, including close-ups that show texture and color changes. Measure the size of each affected area and note its location relative to permanent fixtures. Your insurance adjuster will need this detailed documentation to connect interior damage with the roof problems above.
Inspect attic spaces for penetration
Climb into your attic during daylight hours and turn off all artificial lights to perform your initial scan. Look up at the underside of your roof decking and search for pinpoints of light that shine through where hail created holes or damaged areas. These light penetrations prove your roof’s barrier failed and water can enter.
Turn your flashlight on and examine the roof decking for these specific indicators:
- Dark streaks or water stains running down rafters and support beams
- Wet or damp insulation that feels compressed or shows discoloration
- Mold growth appearing as black, green, or white fuzzy patches
- Soft or spongy wood that gives when you press it with your finger
Check your attic’s ventilation system including ridge vents, soffit vents, and gable vents for impact damage that compromised their function. Damaged vents allow additional moisture entry beyond what leaked through your shingles, accelerating interior deterioration. Photograph any damaged areas using your flash to capture details in the dim attic environment.
Document ventilation and insulation issues
Inspect whether your insulation shows compression patterns or displacement caused by water infiltration, which appears as flattened areas or gaps in coverage. Wet insulation loses its effectiveness immediately and creates conditions for mold growth and structural rot if you don’t address it quickly. Note whether you smell musty or moldy odors, which indicate hidden moisture problems that developed since the storm.
Examine your attic’s ventilation fans, turbine vents, and powered exhaust systems for damage that affects airflow. Hail can dent or disable these components, reducing your attic’s ability to regulate temperature and humidity. Record the make, model, and condition of damaged ventilation equipment because insurance claims often require this specific information for replacement calculations.
Inspect the roof surface and flashing
Your roof surface and flashing hold the most direct evidence of hail damage, but you can only see this detail by getting close to the material itself. This part of your roof inspection after hail requires careful planning and safety awareness because you’ll work at heights where mistakes create serious injury risk. You should only attempt this inspection if you feel comfortable on ladders and roofs, otherwise skip directly to hiring a professional who has the proper equipment and training.
Access your roof surface safely
Set up your ladder according to the three-point contact rule, keeping both hands and one foot (or both feet and one hand) on the ladder at all times as you climb. Step onto your roof carefully and stay in the center areas away from edges where fall risks increase dramatically. Walk on the structural support zones, typically near the ridge or over rafters, rather than in the middle of unsupported spans where your weight could damage already weakened shingles.
Inspect your roof during dry, calm conditions when temperatures stay between 50°F and 80°F because extreme heat softens shingles and cold makes them brittle. Avoid working within two hours after rain or morning dew since slippery surfaces eliminate your traction. Wear your non-slip shoes and move slowly, never rush your inspection because haste causes accidents.
Only access your roof surface if you have proper safety equipment and confidence in your climbing ability, otherwise ground-level and attic inspections provide enough information for professional contractors to assess damage.
Identify hingle damage patterns up close
Examine your shingles by running your hand gently across the surface to feel for raised bruises or soft spots that indicate impact damage beneath the granules. Look for circular indentations where hail struck, which appear as dark marks or shiny areas that lack granule protection. Check whether the mat underneath shows through, exposing the black asphalt layer that degrades rapidly under sun exposure.
Search for these specific damage types:
- Fractures or splits that create openings for water penetration
- Missing corners or torn sections where wind lifted weakened material
- Blistering or bubbling that indicates moisture trapped under the surface
- Granule loss patterns that follow the path hail took across your roof
Document the number and severity of damaged shingles you find in each roof section. Count how many impacted areas appear in a 10-foot by 10-foot zone because insurance adjusters use this density to determine claim approval.
Examine flashing and penetration points
Inspect all flashing around your chimney, skylights, vent pipes, and roof valleys for dents, tears, or separation from the roof surface. Hail damage to flashing appears as bent metal, cracked sealant, or gaps where the waterproof barrier failed. Check whether the caulking around penetrations shows cracks or pulled away from surfaces, creating channels where water enters.
Test the flashing by gently pressing on sealed edges to verify they remain firmly attached to the roof and adjacent structures. Look for rust spots or corrosion that developed since the storm, which indicates water found its way behind protective layers.
Photograph and map damage for a claim
Your insurance claim depends on the quality and completeness of your documentation, not just the severity of the damage itself. Claims adjusters review hundreds of cases monthly, and incomplete evidence gives them reason to reduce payouts or deny claims entirely. You need to create a comprehensive visual and written record that proves the extent of damage your roof inspection after hail revealed, showing clear connections between the storm event and every compromised area you found.
Take systematic photos of every damaged area
Start your photo documentation by capturing wide-angle shots of your entire roof from all four corners of your property. These establish context and show the overall condition before you zoom in on specific damage. Move closer and photograph each damaged section from multiple angles, including straight-on views and angled shots that reveal depth and texture changes in the material.
Include these specific photo types in your documentation:
- Close-up shots of individual damaged shingles showing granule loss, dents, or cracks
- Measurement references by placing a coin, ruler, or tape measure next to damage for scale
- Flashing and penetration damage around chimneys, vents, and skylights
- Gutter and downspout impacts showing dents and displaced components
- Collected hailstones with a ruler or coin to document size
- Date and time stamps enabled on your camera or phone
Photograph damaged areas in natural lighting conditions because flash can wash out details that adjusters need to see. Take more photos than you think necessary, typically 50-100 images for a complete claim package, because you can always delete extras but cannot recreate specific damage conditions weeks later.
Your photo documentation creates permanent evidence of damage that may change or worsen before an adjuster arrives, protecting your right to full compensation.
Create a written damage map with measurements
Draw a simple overhead diagram of your roof layout on graph paper or use a basic sketch that identifies all roof planes, valleys, and major features. Mark each damaged area on your diagram with a numbered reference that corresponds to your photo set, creating a clear system that connects visual evidence to specific locations.
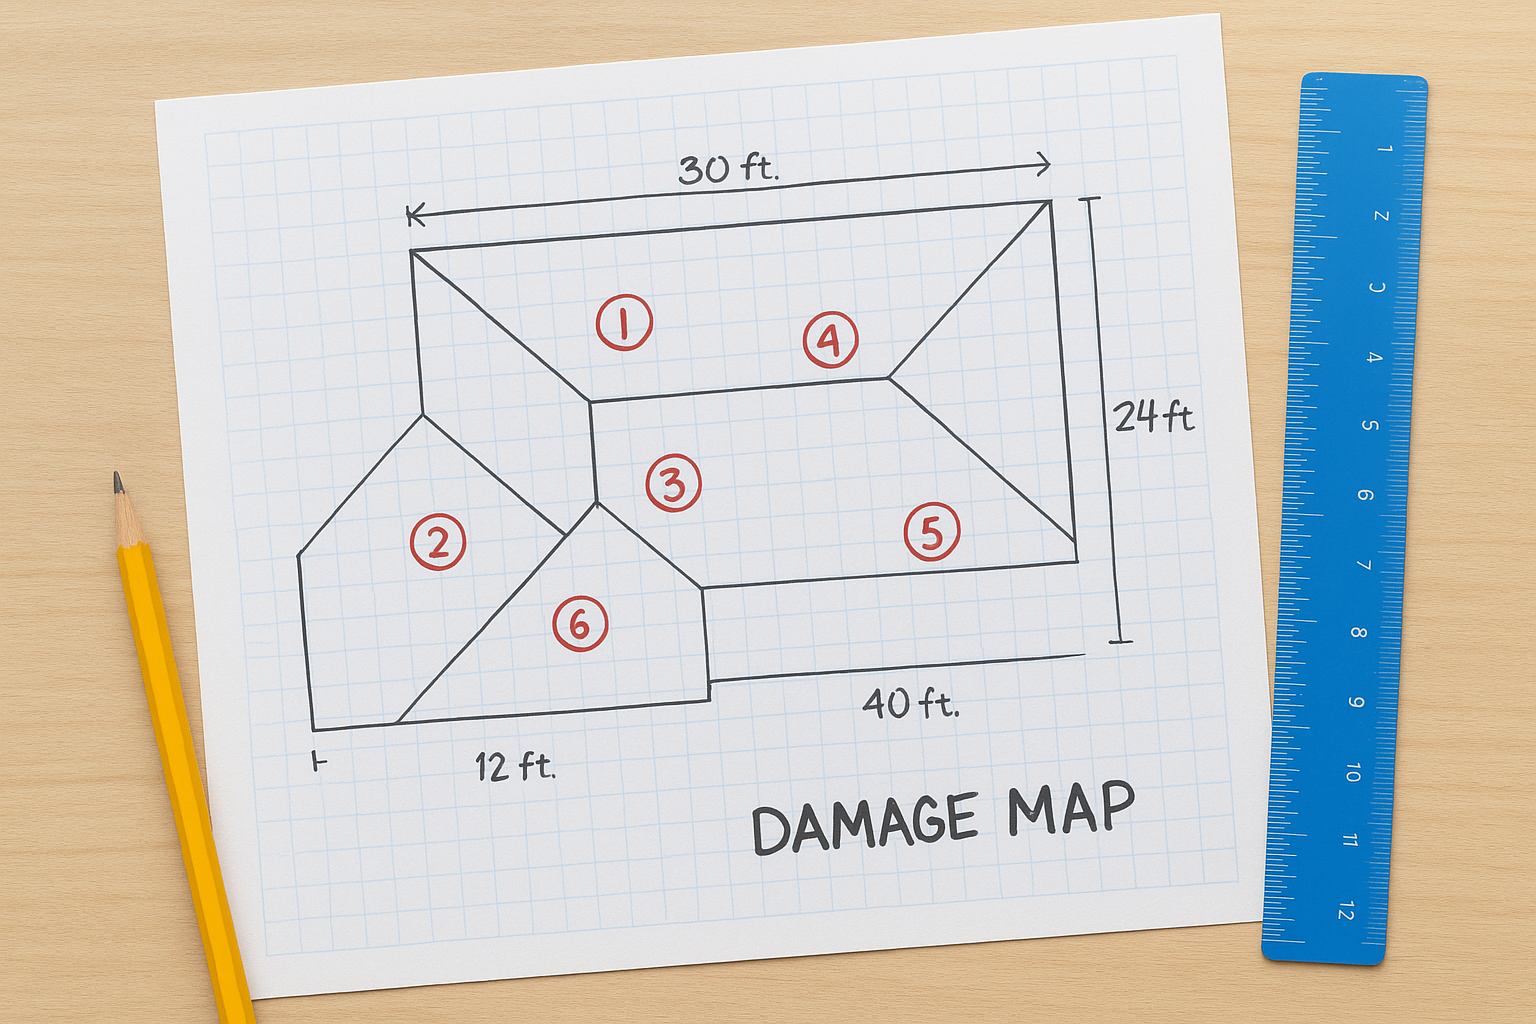
Measure and record the dimensions of damaged sections using your tape measure, noting the square footage affected in each zone. Document the distance from permanent reference points like chimneys or roof edges so adjusters can locate damage precisely during their inspection.
Organize your documentation package
Compile your evidence into a structured digital folder that includes subfolders for exterior photos, interior damage, attic inspection, and property-wide impacts. Create a master document that lists each photo filename with a brief description of what it shows and where the damage appears on your roof map. Include the storm date, your contact information, and your policy number at the top of this document for easy reference.
Back up your complete documentation package to cloud storage and a physical drive before submitting anything to your insurance company. Keep copies of all correspondence, claim forms, and adjuster reports in the same organized system so you maintain a complete record throughout your claim process.
Choose your next step and hire the right help
You’ve completed your roof inspection after hail and documented the damage, but now you face the critical decision of whether to file a claim, hire a contractor, or handle repairs yourself. Your choice depends on damage severity and your insurance coverage, but you should never attempt significant repairs without professional expertise. Most homeowners underestimate the complexity of roofing work and create worse problems through improper fixes that void warranties and violate building codes.
Decide if you need professional help
Contact a licensed roofing contractor if your inspection revealed any of these conditions: missing shingles, visible holes or penetrations, widespread granule loss across multiple roof sections, damaged flashing around chimneys or vents, or interior water stains. These issues require immediate attention because they compromise your roof’s waterproof barrier and will worsen with each rain event.
Professional roofing contractors bring specialized knowledge about insurance processes and can identify hidden damage that affects your claim value.
You can skip professional help if your inspection found only minor cosmetic issues like a few isolated dents in gutters or minimal granule loss on a small section. However, document these findings anyway because future storms may cause additional damage that connects to this event for insurance purposes.
Request detailed contractor estimates
Obtain written estimates from at least three licensed contractors before making any hiring decisions. Each estimate should include a complete scope of work that lists specific repairs, materials to be used (including manufacturer and grade), labor costs broken down by task, and a timeline for completion. Reject any contractor who provides only a verbal estimate or pressures you to sign immediately.
Ask each contractor these specific questions:
- How many years have you operated in this area?
- Can you provide references from recent hail damage clients?
- What warranties cover your workmanship and materials?
- Will you handle my insurance claim directly or assist with documentation?
- Do you subcontract work or use your own crews?
Compare estimates by total value and scope, not just price, because the cheapest bid often indicates cut corners or inferior materials that fail prematurely.
Verify credentials and insurance coverage
Check that every contractor you consider holds a valid state license and current general liability insurance with at least $1 million in coverage. Request their license number and verify it through your state’s contractor licensing board website. Ask for a certificate of insurance directly from their insurance carrier, not a copy they provide, because fraudulent certificates circulate frequently.
Confirm the contractor carries workers’ compensation insurance for all employees who will work on your property. Without this coverage, you become liable for any injuries that occur during your roof repairs, creating financial exposure that far exceeds your project cost.
Final checklist before you move on
Your roof inspection after hail should leave you with clear documentation and a solid action plan for protecting your home. Before you contact contractors or file insurance claims, verify you’ve completed every essential step that determines your next move.
Review this final checklist to confirm you covered all critical areas:
- Documented damage with time-stamped photos from ground level, interior spaces, and attic
- Created a roof damage map with measurements and location markers
- Collected physical evidence like hailstones or damaged shingle samples
- Checked your insurance policy for reporting deadlines and coverage details
- Obtained contact information for at least three licensed roofing contractors
- Verified your property shows consistent damage patterns across multiple surfaces
Storm damage requires expert assessment and professional repairs that protect your investment long-term. Contact Sunflowers Energy LLC for a free on-site inspection and estimate that covers both immediate repairs and potential solar upgrades to enhance your home’s resilience and energy efficiency.

2 Responses