Before you invest in solar panels, you need real numbers, not just a sales pitch. The PVWatts Calculator, built by the National Renewable Energy Laboratory (NREL), gives you a free, reliable estimate of how much energy a solar system can produce at your specific address and how much money it could save you.
At Sunflowers Energy LLC, we use PVWatts regularly when designing residential and commercial solar installations. It helps us, and our customers, set realistic expectations before a single panel goes on the roof. We believe informed homeowners make better decisions, which is why we’re walking you through exactly how this tool works.
This guide covers how to access the PVWatts Calculator, enter your system details step by step, interpret the results it generates, and use those numbers to evaluate whether solar makes financial sense for your property. Let’s get into it.
What PVWatts does and what you need
The PVWatts Calculator is a free web-based tool developed by NREL that models the energy output of a photovoltaic system based on your location, system configuration, and local weather data. It pulls from decades of solar irradiance records to estimate how many kilowatt-hours your panels would produce each month and each year. You don’t need an engineering background to use it, but understanding what goes into the model helps you get results you can actually rely on.
The more accurate the inputs you provide, the more useful the output becomes.
How PVWatts calculates solar output
PVWatts uses solar resource data from NASA and NREL’s own databases to simulate how sunlight hits your roof at your specific coordinates. It factors in your system size, panel type, tilt angle, azimuth (the direction your roof faces), and system losses such as shading, wiring inefficiency, and soiling. The calculator then multiplies those figures against a local electricity rate to estimate your annual bill savings in dollars.
What you need before you start
Before you open the tool, gather a few pieces of information so you’re not guessing partway through. Having accurate data upfront saves time and produces far better estimates.
- Your address or GPS coordinates so PVWatts can pull the correct solar resource data
- Your system size in kilowatts DC or at least a rough idea of how many panels you want
- Your roof’s tilt and orientation (the angle in degrees and the direction it faces)
- Your current electricity rate in cents per kilowatt-hour, found on your utility bill
- Your module type: standard, premium, or thin film
Step 1. Choose your location and solar data
Open the PVWatts Calculator at pvwatts.nrel.gov and type your full street address into the search bar on the home screen. The tool uses your address to pull solar irradiance data specific to your location, so accuracy here directly affects the reliability of every number that follows.
Confirm the map pin placement
Once the tool places a marker on the map, verify that the pin lands on your actual property and not on a neighboring address or a nearby intersection. If the pin is off, drag it to the correct rooftop location. Small geographic differences can shift your solar resource values, especially in areas with local shading from hills or buildings.

A misplaced pin is one of the most common reasons homeowners end up with inaccurate estimates.
Choose the right solar resource dataset
After confirming your location, PVWatts prompts you to select a solar resource dataset. In most cases, you should accept the default dataset the tool recommends, which is typically the highest-resolution option available for your area. If you see multiple options, choose the one with the most recent data year to reflect current climate conditions as closely as possible.
Step 2. Enter system size and setup details
Once you confirm your location, the pvwatts calculator takes you to the system info page where you enter your installation details. Every field here shapes the final output, so work through each one carefully rather than accepting defaults that may not match your roof.
System size and module type
Your DC system size is the total nameplate capacity of your panels in kilowatts. A standard residential installation falls between 4 kW and 10 kW, so if you’re comparing contractor quotes, enter each proposed system size separately to see how output changes. For module type, choose "Premium" for high-efficiency monocrystalline panels or "Standard" for conventional polycrystalline panels.
Switching from Standard to Premium module type typically adds 3 to 5 percent to your estimated annual output.
Tilt, azimuth, and system losses
Tilt is your roof’s angle in degrees from horizontal, and azimuth is the compass direction your panels face. Use the table below as a quick reference for entering these values accurately.
| Setting | Typical value | Notes |
|---|---|---|
| Tilt | 20 to 35 degrees | Match your actual roof pitch |
| Azimuth | 180 degrees | True south produces peak output |
| System losses | 14.08% | Keep the default unless your installer provides a site-specific figure |
Step 3. Read energy, bill value, and key metrics
After you click "Go to PVWatts Results," the tool generates a results page packed with numbers. The pvwatts calculator organizes these into a monthly table and a summary section at the top. Focus on three core outputs: energy production in kilowatt-hours, estimated bill savings in dollars, and the AC energy value.
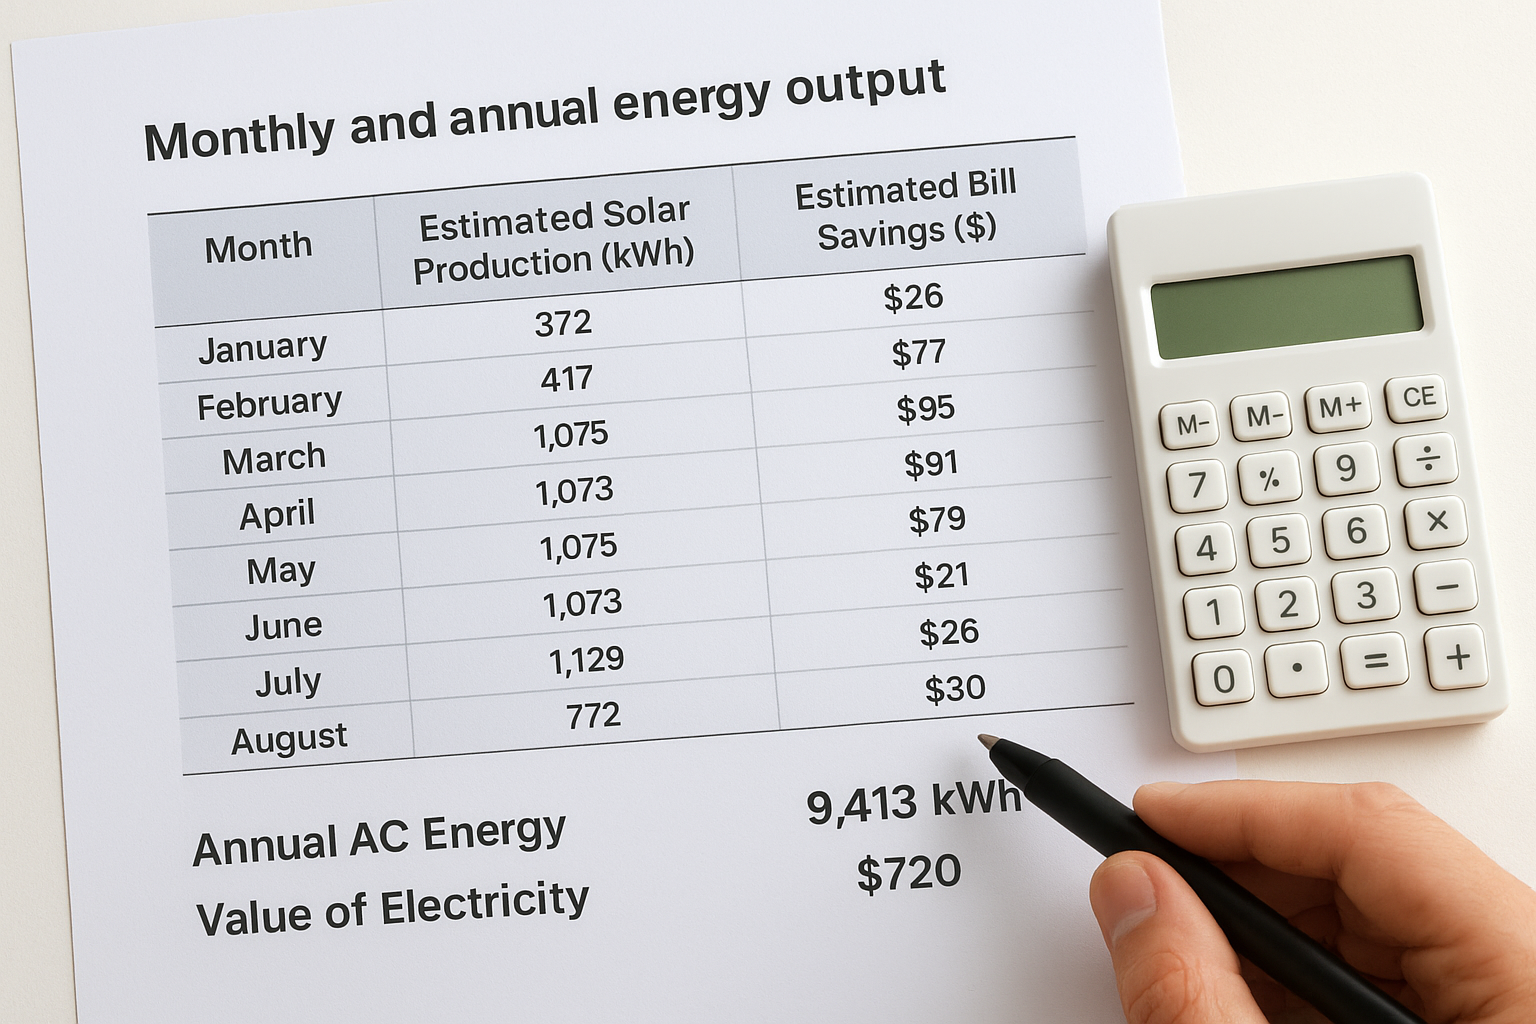
Monthly and annual energy output
The results table breaks your estimated solar production down by month, which matters because your panels produce significantly less in December than in June. Scan the monthly column to spot your lowest-production months and compare that against your typical winter electricity usage. Your annual AC energy total, shown at the top of the results, is the headline figure to use when comparing quotes from solar installers.
Use your annual production figure alongside your actual utility bill to calculate a realistic solar offset percentage before committing to a system size.
Bill savings and electricity value
The "Value of Electricity" row shows your estimated annual dollar savings based on the electricity rate you entered. If that rate is wrong, your savings estimate is wrong too. Pull your exact rate in cents per kWh from a recent utility bill and re-run the calculation if you accepted a default value earlier.
Improve accuracy and avoid common mistakes
The pvwatts calculator produces reliable estimates only when your inputs reflect reality. Most inflated or deflated results trace back to a handful of fixable mistakes that take under two minutes to correct before you re-run the tool.
Use your actual electricity rate
Many users leave the default electricity rate in place, which may not match what your utility actually charges. Pull a recent monthly bill and find the exact rate in cents per kWh, including any tiered rates or fees folded into the per-unit cost. If your utility charges different rates by season, use your summer rate for a conservative estimate since that is typically when solar offsets the most usage.
A rate that is off by even 3 cents per kWh can shift your annual savings estimate by hundreds of dollars.
Account for shading and real-world losses
PVWatts sets system losses at 14.08 percent by default, which works for most clean, unobstructed installations. If trees, a chimney, or neighboring buildings shade your roof for part of the day, increase that loss figure to 18 to 22 percent. Use the checklist below to audit your inputs before accepting results.
- Confirm the map pin sits on your exact rooftop
- Match tilt to your measured roof pitch
- Verify module type matches your planned panel brand
- Enter your real utility rate, not an estimate

Your next move after you run PVWatts
Running the pvwatts calculator gives you a solid baseline, but the numbers on your screen are only part of the picture. Use your annual AC energy output and estimated bill savings as a benchmark when you compare quotes from solar installers. If a contractor’s production estimate sits far above what PVWatts shows, ask them to explain the difference before you sign anything.
Getting from an estimate to a real installation requires a site visit that accounts for your exact roof condition, local permitting costs, shading specifics, and available incentives the tool cannot model on its own. At Sunflowers Energy LLC, we offer free on-site inspections and no-obligation estimates so you can move from a calculated projection to a real proposal backed by a detailed expert assessment of your specific roof and energy usage. Schedule your free solar consultation and find out exactly what solar can deliver for your home or business.

https://shorturl.fm/pCYi8
https://shorturl.fm/nX1W8