A small leak you ignore today can turn into a $15,000 problem by next year. Most roof failures don’t happen because of one big storm, they happen because minor issues pile up over months and years without anyone noticing. That’s exactly what a solid roof maintenance checklist can prevent. Regular inspections and simple upkeep tasks keep your roof doing its job: protecting everything underneath it.
At Sunflowers Energy LLC, we install and repair residential and commercial roofs across a wide range of materials, from asphalt shingles to TPO and PVC systems. We’ve seen firsthand how a few hours of preventive maintenance each year can add a decade to a roof’s lifespan. We’ve also seen what happens when it gets skipped. The difference is almost always cost, and it’s rarely close.
This guide breaks down seven practical, year-round steps you can follow to catch problems early, avoid expensive repairs, and keep your roof in solid shape regardless of the season. Whether you own a home or manage a commercial property, these steps apply to you. Let’s get into what actually matters on your roof, and when to check it.
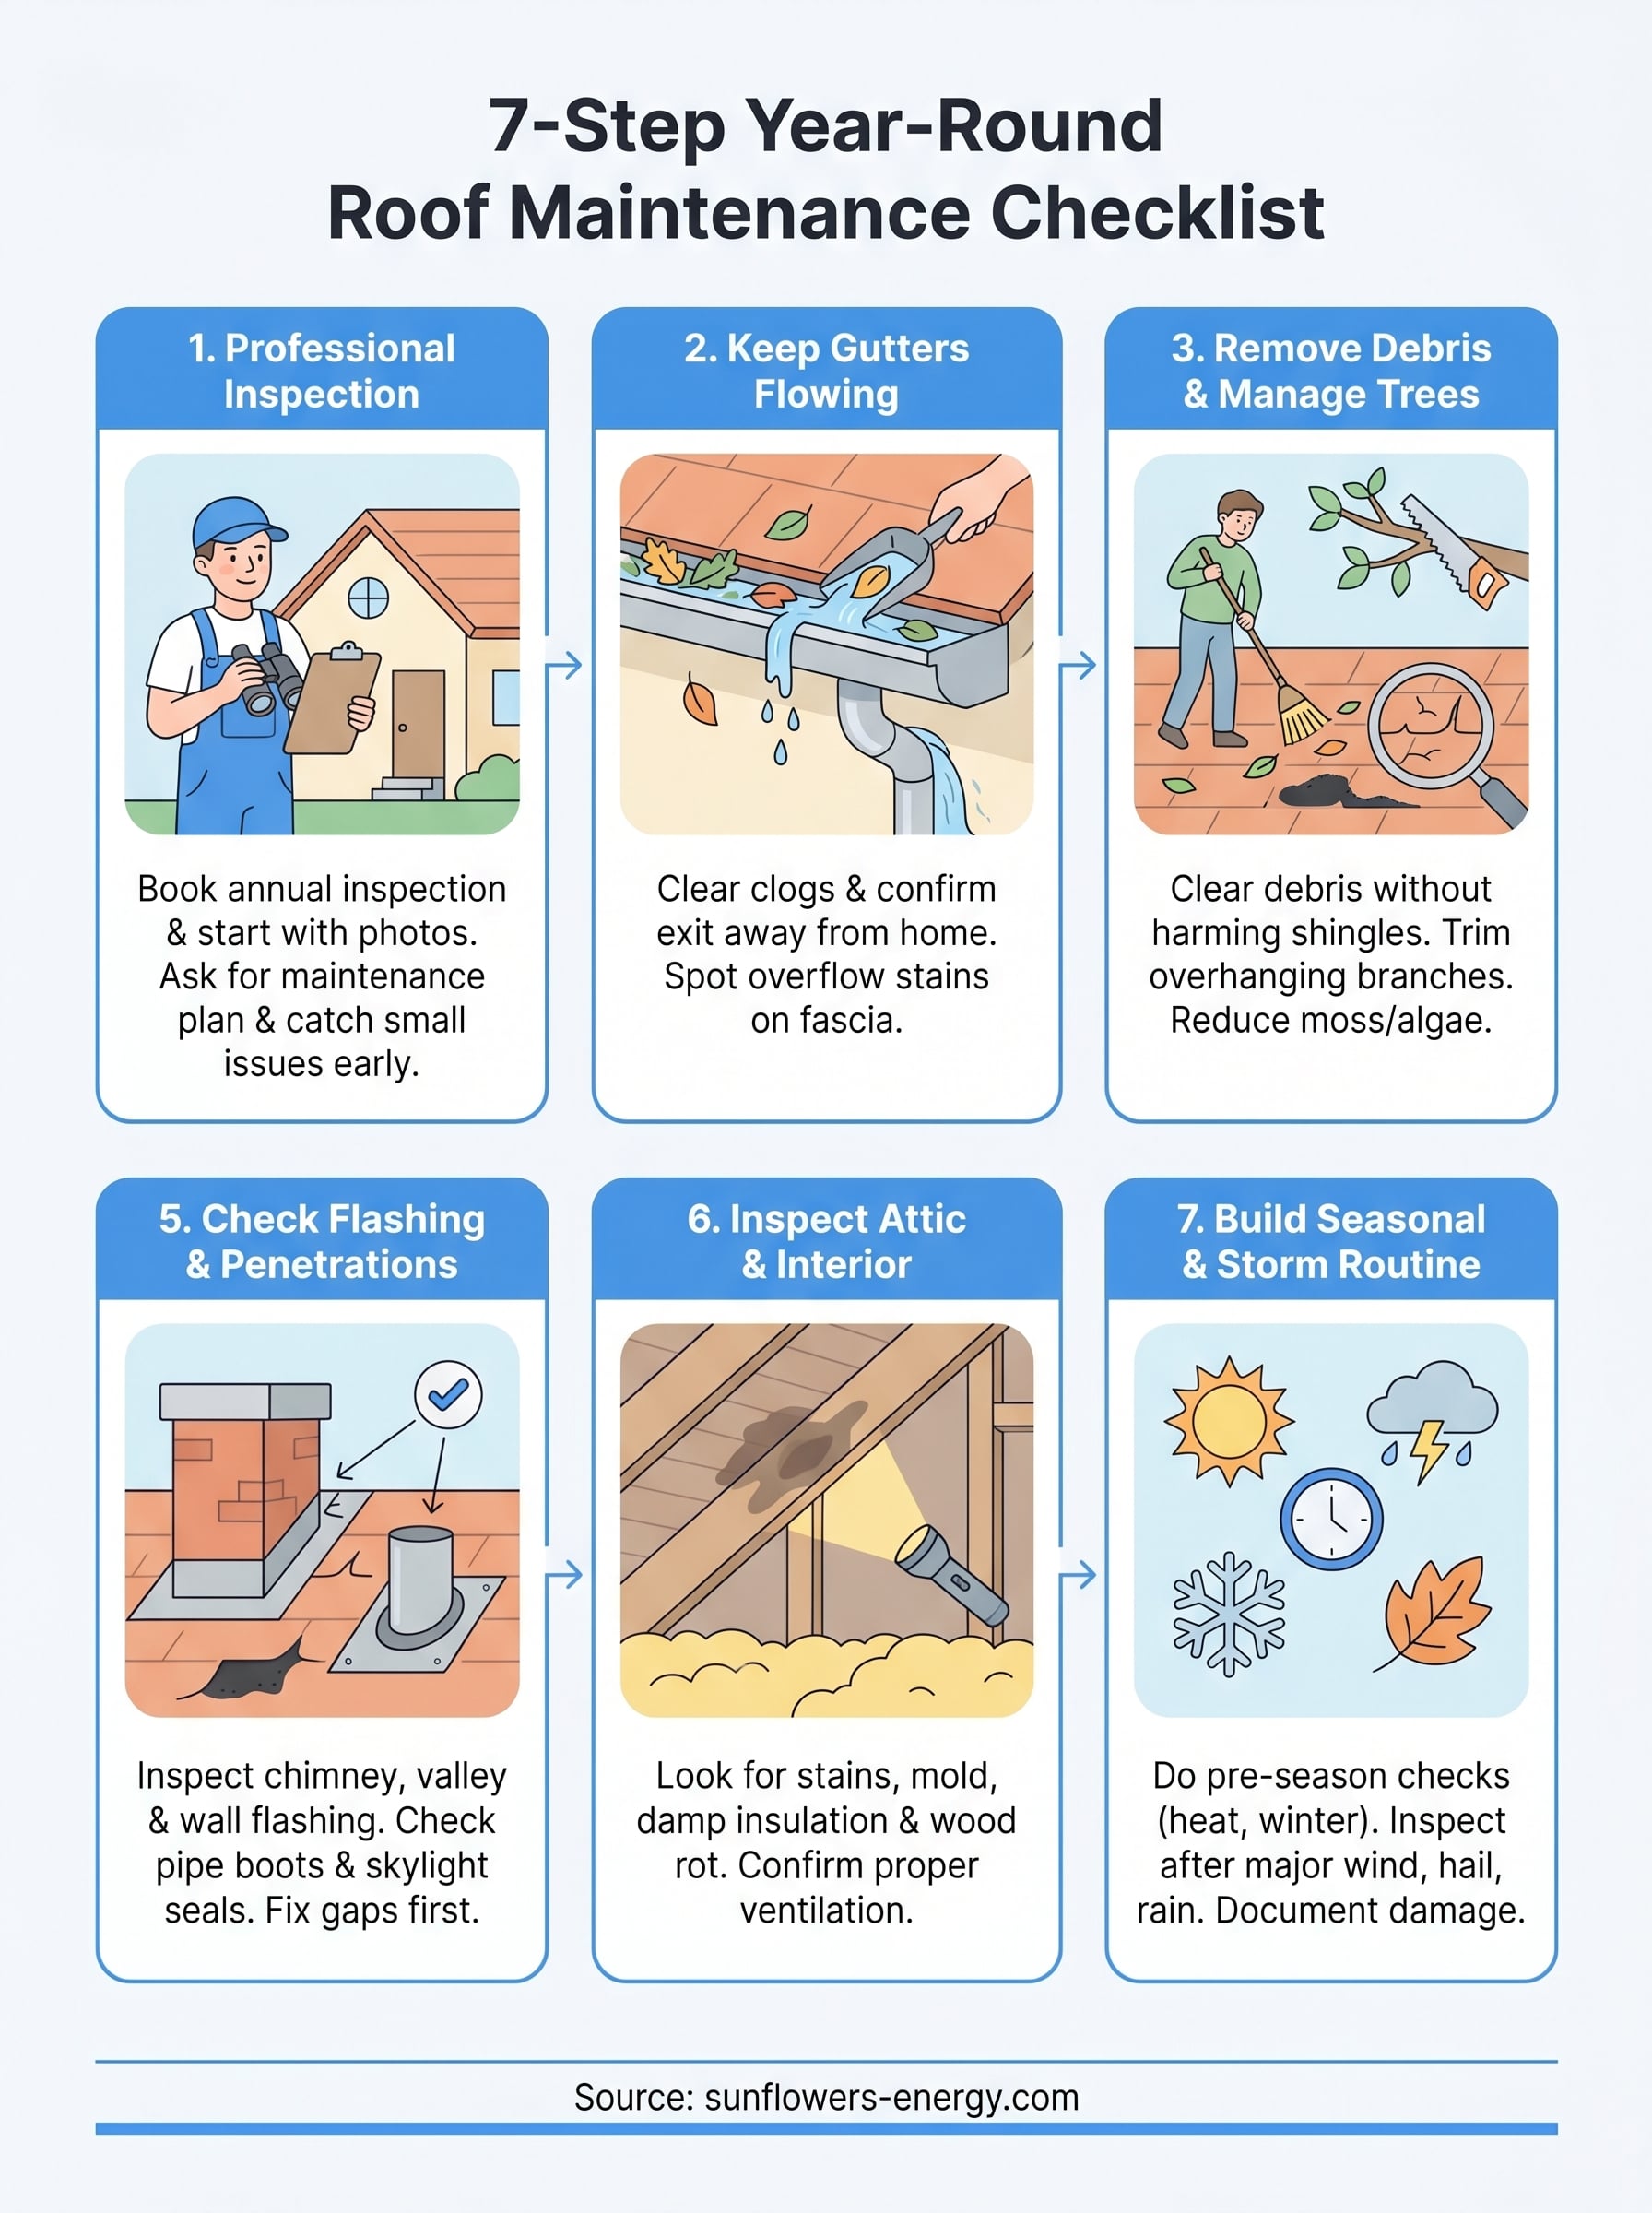
1. Book a professional roof inspection
Before you do anything else on your roof maintenance checklist, schedule a professional inspection. A trained inspector sees what you can’t from the ground, and that difference matters more than most homeowners realize. Getting one done annually gives you a clear picture of where your roof stands and what actually needs attention.
Start with a baseline inspection and photos
Your first professional inspection sets the reference point for everything that follows. The inspector should document current conditions with photos, noting the age and wear of materials, the state of flashing, and any areas already showing stress. Without this baseline, you’re guessing whether a problem is new or has been there for years.
A documented inspection with photos is your single best tool for tracking roof condition over time and supporting any future insurance claims.
Ask for a simple maintenance plan you can follow
A professional inspection should give you more than just a report. Ask the inspector to walk you through what needs attention now, what can wait, and what you should check yourself between visits. A clear, prioritized list is far more useful than a general summary, and most qualified contractors will provide one if you ask directly.
Use the inspection to catch small issues early
Small problems cost far less to fix when found early. A cracked pipe boot seal that costs $150 to repair today can lead to rotted decking and mold remediation that runs into the thousands if water gets in over a full season. Your inspector should flag these minor vulnerabilities before they escalate, which is the core reason annual inspections pay for themselves.
Know when Sunflowers Energy LLC makes sense
If you own a home or commercial property, Sunflowers Energy LLC offers free on-site inspections with no obligation. That means you get a professional assessment of your roof’s condition at no cost, along with a clear picture of any repairs needed. For commercial properties with TPO, PVC, or rubber roofing, our team understands the specific failure points those systems develop over time and can flag them before they turn into full membrane replacements.
2. Keep gutters and downspouts flowing
Gutters do one job: move water off your roof and away from your foundation. When they clog or pull away from the fascia, water backs up under shingles and soaks into your decking without any visible sign until the damage is already done. Keeping gutters clean is one of the simplest tasks on your roof maintenance checklist, and it protects more than just the roof.
Clear clogs and confirm water exits away from the home
Pull debris by hand or with a scoop, then run a hose from the far end toward the downspout to confirm flow. Water should exit at least three to four feet from your foundation. If a downspout drains directly against the house, add a plastic extender to redirect it.
Spot gutter problems that can back water under shingles
Look for standing water inside the gutter channel after rain clears. This signals a sag or low spot preventing drainage. When water sits long enough, it wicks under your starter strip and begins breaking down the roof deck from below.
A gutter that looks clear from the ground can still hold a hidden clog at the downspout elbow, so always check the outlet directly.
Check for fascia rot, loose hangers, and overflow stains
Rotted fascia boards and loose hanger screws are signs water has been overflowing for a while. Press the fascia wood to test for soft spots and look for dark staining on the siding directly below the gutter line.
Set a schedule based on trees and storm frequency
If mature trees overhang your roof, clean gutters at least twice a year: once after spring pollen and seed drop, and once after fall leaf drop. Add an extra pass after any storm that deposits significant debris on the roof surface.
3. Remove roof debris and manage nearby trees
Debris sitting on your roof traps moisture, accelerates shingle breakdown, and invites moss and algae to take hold. This step on your roof maintenance checklist is straightforward, but doing it the wrong way can cause as much damage as ignoring it entirely.
Clear leaves, sticks, and organic buildup without harming shingles
Use a soft-bristle roof broom or a leaf blower to push debris toward the eaves, not a metal rake that strips granules. Work from the ridge down in short, gentle strokes so you move material off the surface without dragging it across shingles.
Wet leaves and pine needles hold moisture against shingles for days after a storm. That sustained moisture breaks down the granule coating and speeds up the aging process across your entire roof surface.
Trim branches that scrape shingles and dump debris
Any branch hanging within six feet of your roofline is a liability. Scraping branches wear away granules every time the wind moves them, and overhanging limbs drop a constant stream of organic debris that feeds moss growth.
Trim branches back far enough that they clear the roof completely, not just stop touching it during calm weather.
Reduce moss and algae conditions before they spread
Moss and algae thrive in shade and moisture, so removing overhanging branches directly cuts the conditions they need. If you spot green or black streaking, apply a zinc or copper-based roof treatment following the product label before it spreads further.
Avoid roof-traffic mistakes that cause granule loss
Walking on shingles unnecessarily knocks granules loose and compresses the mat underneath. If you need a closer look, stay on a ladder at a safe angle and use binoculars rather than stepping onto the surface.
4. Inspect the roof surface for wear and damage
The roof surface takes the brunt of every storm, UV cycle, and temperature swing your region throws at it. Adding a surface inspection to your roof maintenance checklist twice a year gives you the chance to catch material breakdown before it turns into a water entry point.
Check shingles or membrane for visible damage
Scan the entire roof surface from the ground with binoculars before stepping on a ladder. On asphalt shingles, look for dark patches, lifted edges, or bare spots where granules have worn through. On commercial membranes like TPO or PVC, watch for bubbling, seam separation, or punctures.
Your best angle for spotting surface problems is from the ground at a low viewing angle during morning or late-afternoon light, when shadows make irregularities easier to see.
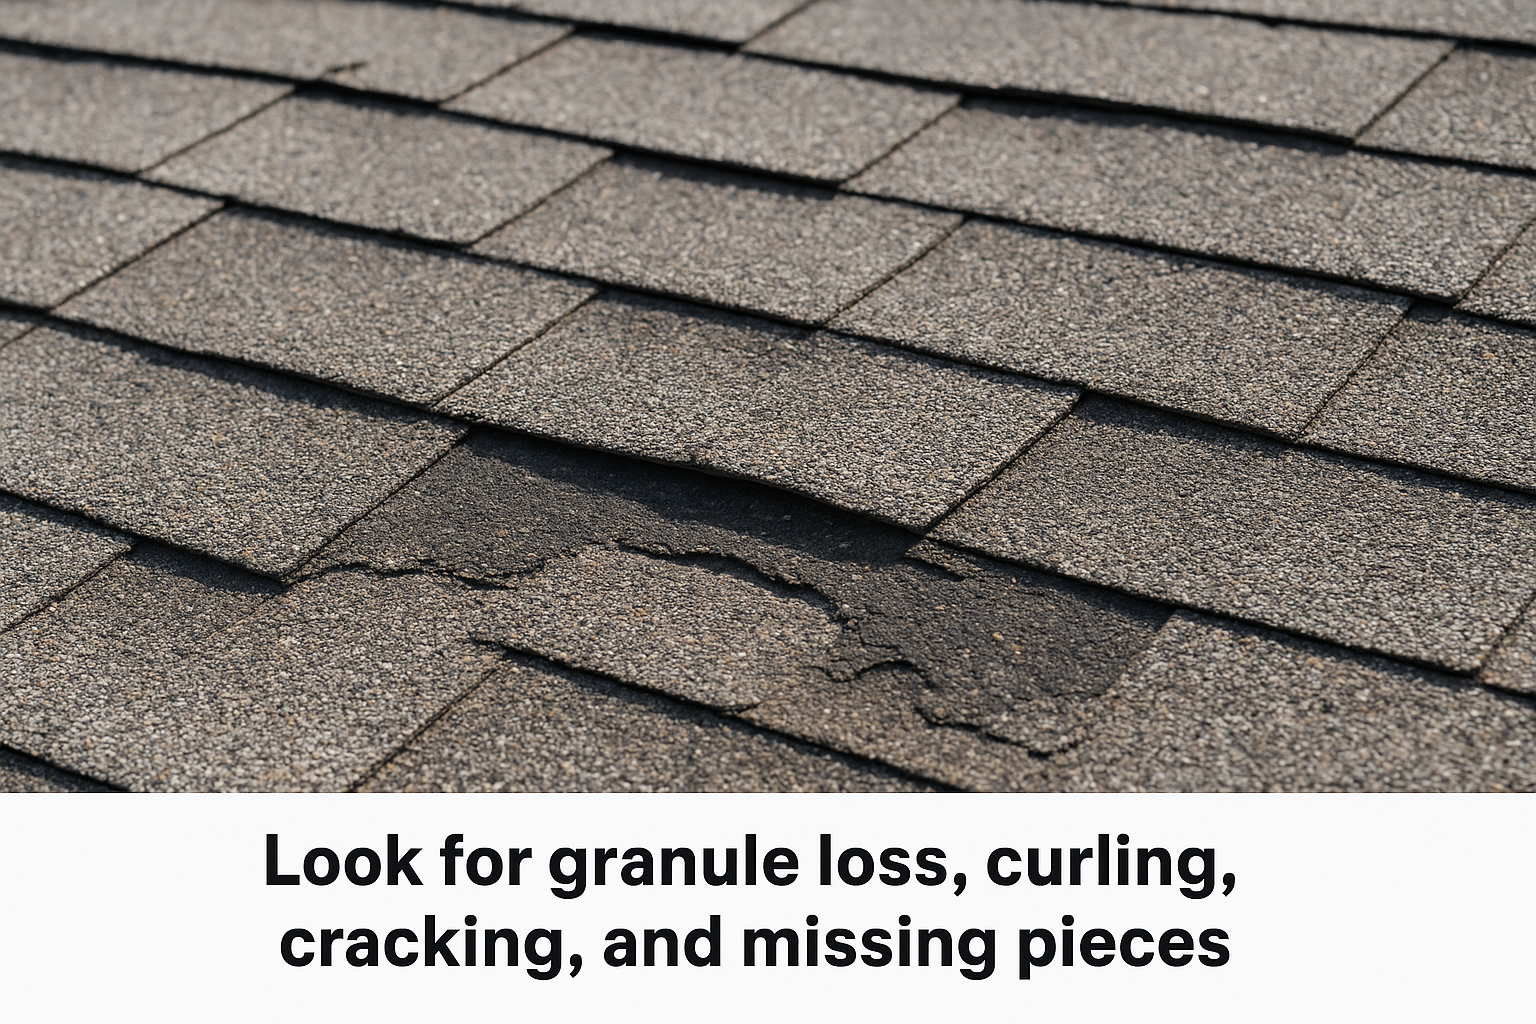
Look for granule loss, curling, cracking, and missing pieces
Granule loss shows up as exposed black asphalt mat in patches, and in large volumes of granules collecting in your gutters. Curling shingles at the edges indicate the mat has dried out and lost flexibility, which means the shingle no longer lies flat and can lift in wind.
Watch for ponding water on low-slope areas
On flat or low-slope commercial roofs, standing water that stays longer than 48 hours after rain signals a drainage problem. Ponding accelerates membrane degradation and adds structural load.
Separate cosmetic issues from leak risks
Surface staining and minor weathering are cosmetic and don’t require immediate repair. Cracked seams, missing shingles, and torn membranes are active leak risks that need prompt attention regardless of weather conditions.
5. Check flashing and all roof penetrations
Flashing is the metal or rubber material that seals every place where your roof meets a wall, chimney, or pipe. These transition points are where most leaks start, and they belong on every solid roof maintenance checklist because they fail faster than the surrounding roofing material.
Inspect chimney, valley, and wall flashing for gaps and rust
Run your eyes along every metal strip where the roof meets a vertical surface. Chimney flashing separates at the corners first, and valley flashing can develop small rust spots that grow into open gaps over a single winter. Press gently on the metal edges to check for movement, which signals the fasteners or sealant beneath have let go.
Check pipe boots, vent stacks, and skylight seals
Rubber pipe boots crack and shrink as they age, leaving a gap around the pipe where water runs straight through. Check each vent stack boot for splitting along the collar, and run your fingers along skylight frame perimeters to feel for dried-out or missing sealant.
A failed pipe boot is one of the most common causes of active attic leaks and one of the cheapest repairs to make when caught early.
Identify signs of failed sealant and exposed fasteners
Look for white or gray dried caulk that has pulled away from the surface it was sealing. Exposed screw heads without caps or sealant on commercial roofs let water in at every fastener.
Prioritize repairs that stop water intrusion first
Not every flashing issue needs same-week attention, but any gap that lets water reach the decking moves to the top of your repair list immediately. Fix active water entry points before cosmetic issues to get the most protection from each repair dollar you spend.
6. Inspect the attic and interior for early leak clues
Your attic is the first place water lands after it breaches the roof, which makes it the most reliable early warning system on your entire property. Adding an attic walkthrough to your roof maintenance checklist twice a year takes about 15 minutes and catches problems long before they show up on your ceiling.
Look for stains, mold, damp insulation, and wood rot
Bring a flashlight and scan the underside of the roof deck and rafters for brown water stains, dark mold patches, and soft or discolored wood. Damp insulation compresses and loses its R-value, so press it lightly to check for moisture that hasn’t dried out between rain events.
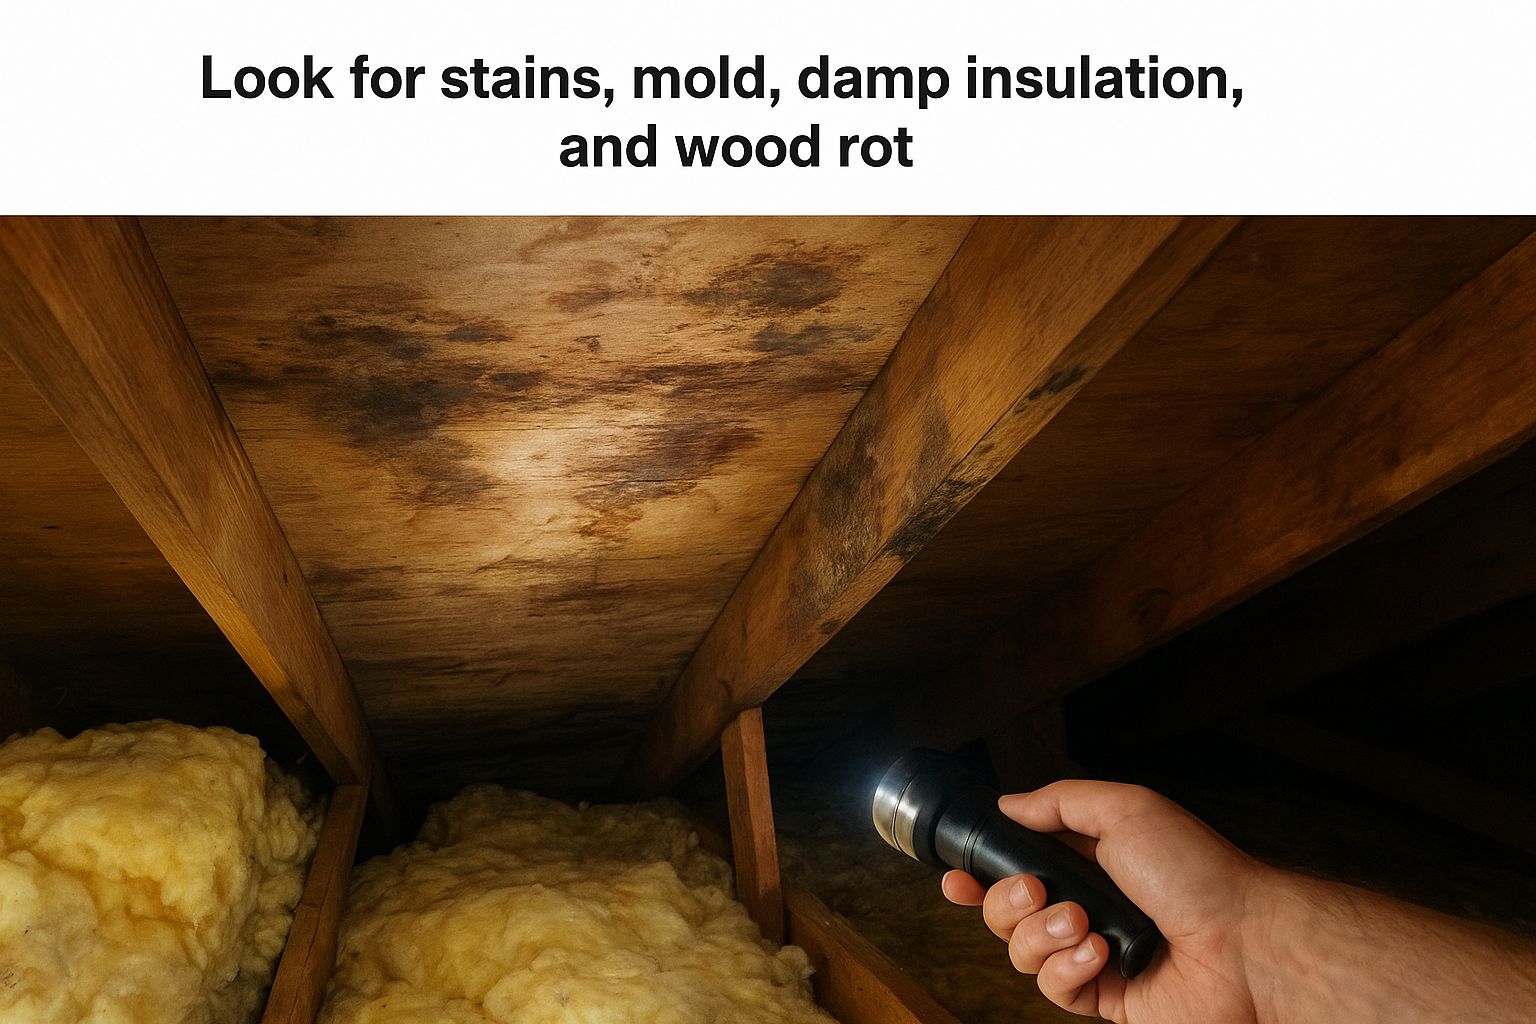
Water stains on rafters tell you the leak has been active long enough to run and dry multiple times, which means the entry point has been open for a while.
Confirm ventilation stays open and balanced
Check that soffit vents are not blocked by insulation pushed against the eaves, and that ridge vents or gable vents are unobstructed. Poor airflow traps heat and moisture against the deck, which accelerates sheathing deterioration from the inside regardless of how the exterior looks.
Check bathroom and dryer vents for proper outdoor exhaust
Confirm that bathroom exhaust fans duct to the outside, not into the attic cavity. Dryer vents should also exit through the wall or roof, and the duct connection should be secure and free of lint buildup.
Connect interior symptoms to likely roof entry points
Water rarely drips straight down, it travels along rafters and sheathing before dropping. Trace any stain back toward the ridge to find the actual entry point rather than repairing only where the water lands.
7. Build a seasonal and storm-response routine
The final piece of your roof maintenance checklist is turning all of these individual steps into a repeatable schedule. A routine tied to seasons and weather events keeps you proactive instead of reactive, and it takes far less time than dealing with the damage that builds up when nothing gets checked.
Do pre-season checks before heat, hail, and winter weather
Run a surface and gutter inspection before summer heat peaks, before hail season in spring, and before the first hard freeze of fall. Each season puts different stress on roofing materials, so timing your checks to match those transitions gives you the best chance to fix vulnerabilities before conditions make them worse.
Inspect after major wind, hail, or heavy rain
After any storm with winds above 50 mph, confirmed hail, or several inches of rain, do a ground-level scan within 24 hours. Look for missing shingles, debris piles, and visible dents on metal components. Don’t wait for a ceiling stain to confirm damage.
Hail damage often looks minor from the ground but causes enough granule loss to shorten your roof’s lifespan by years if left unaddressed.
Prevent ice dams with ventilation and insulation checks
Ice dams form when heat escaping from the attic melts snow on the roof, which then refreezes at the cold eaves. Confirm your attic insulation covers the floor evenly and soffit vents stay clear going into winter.
Document damage for repairs and insurance conversations
After each inspection and storm, take dated photos of any new damage you spot. A clear photo record strengthens your position during insurance claim conversations and helps your contractor confirm the scope of needed repairs without guesswork.
Next steps
Working through this roof maintenance checklist once or twice a year keeps small problems from growing into expensive repairs. Each of the seven steps builds on the others: clean gutters protect your deck, trimmed trees reduce debris load, and attic checks confirm your surface inspections are catching the right things. Staying consistent with the schedule matters more than doing any single step perfectly.
Your roof protects everything you own, and the cost of neglecting it almost always exceeds the cost of staying on top of it. If your last professional inspection was more than a year ago, or if you spotted warning signs while reading this guide, now is the right time to act. Sunflowers Energy LLC offers free on-site inspections for both residential and commercial properties, so you get a professional assessment with no obligation attached. Schedule your free roof inspection and find out exactly where your roof stands before the next storm hits.
