Gutters do more than direct rainwater away from your house, they protect your roof, siding, foundation, and landscaping from costly water damage. If you’re wondering how to install gutters on a house yourself, the good news is that it’s a very doable weekend project. With the right materials, basic tools, and a bit of patience, you can save hundreds of dollars on professional installation.
At Sunflowers Energy LLC, we spend every day on rooftops, installing and repairing residential roofs, fitting solar panel systems, and making sure homes stay protected from the elements. That hands-on experience has taught us exactly how critical a properly functioning gutter system is to the longevity of your roof and the overall health of your home. A brand-new roof without good gutters is like locking your front door but leaving the windows wide open.
This guide walks you through the entire process from start to finish: choosing the right gutter materials, measuring and planning your layout, cutting and assembling sections, and securing everything in place with the correct slope for drainage. We’ll also cover common mistakes that lead to leaks and sagging, plus tips to make the job easier if you’re working solo. Whether you’re replacing old, damaged gutters or installing a system on a new build, you’ll have everything you need to get it done right.
Before you start: plan, materials, and safety
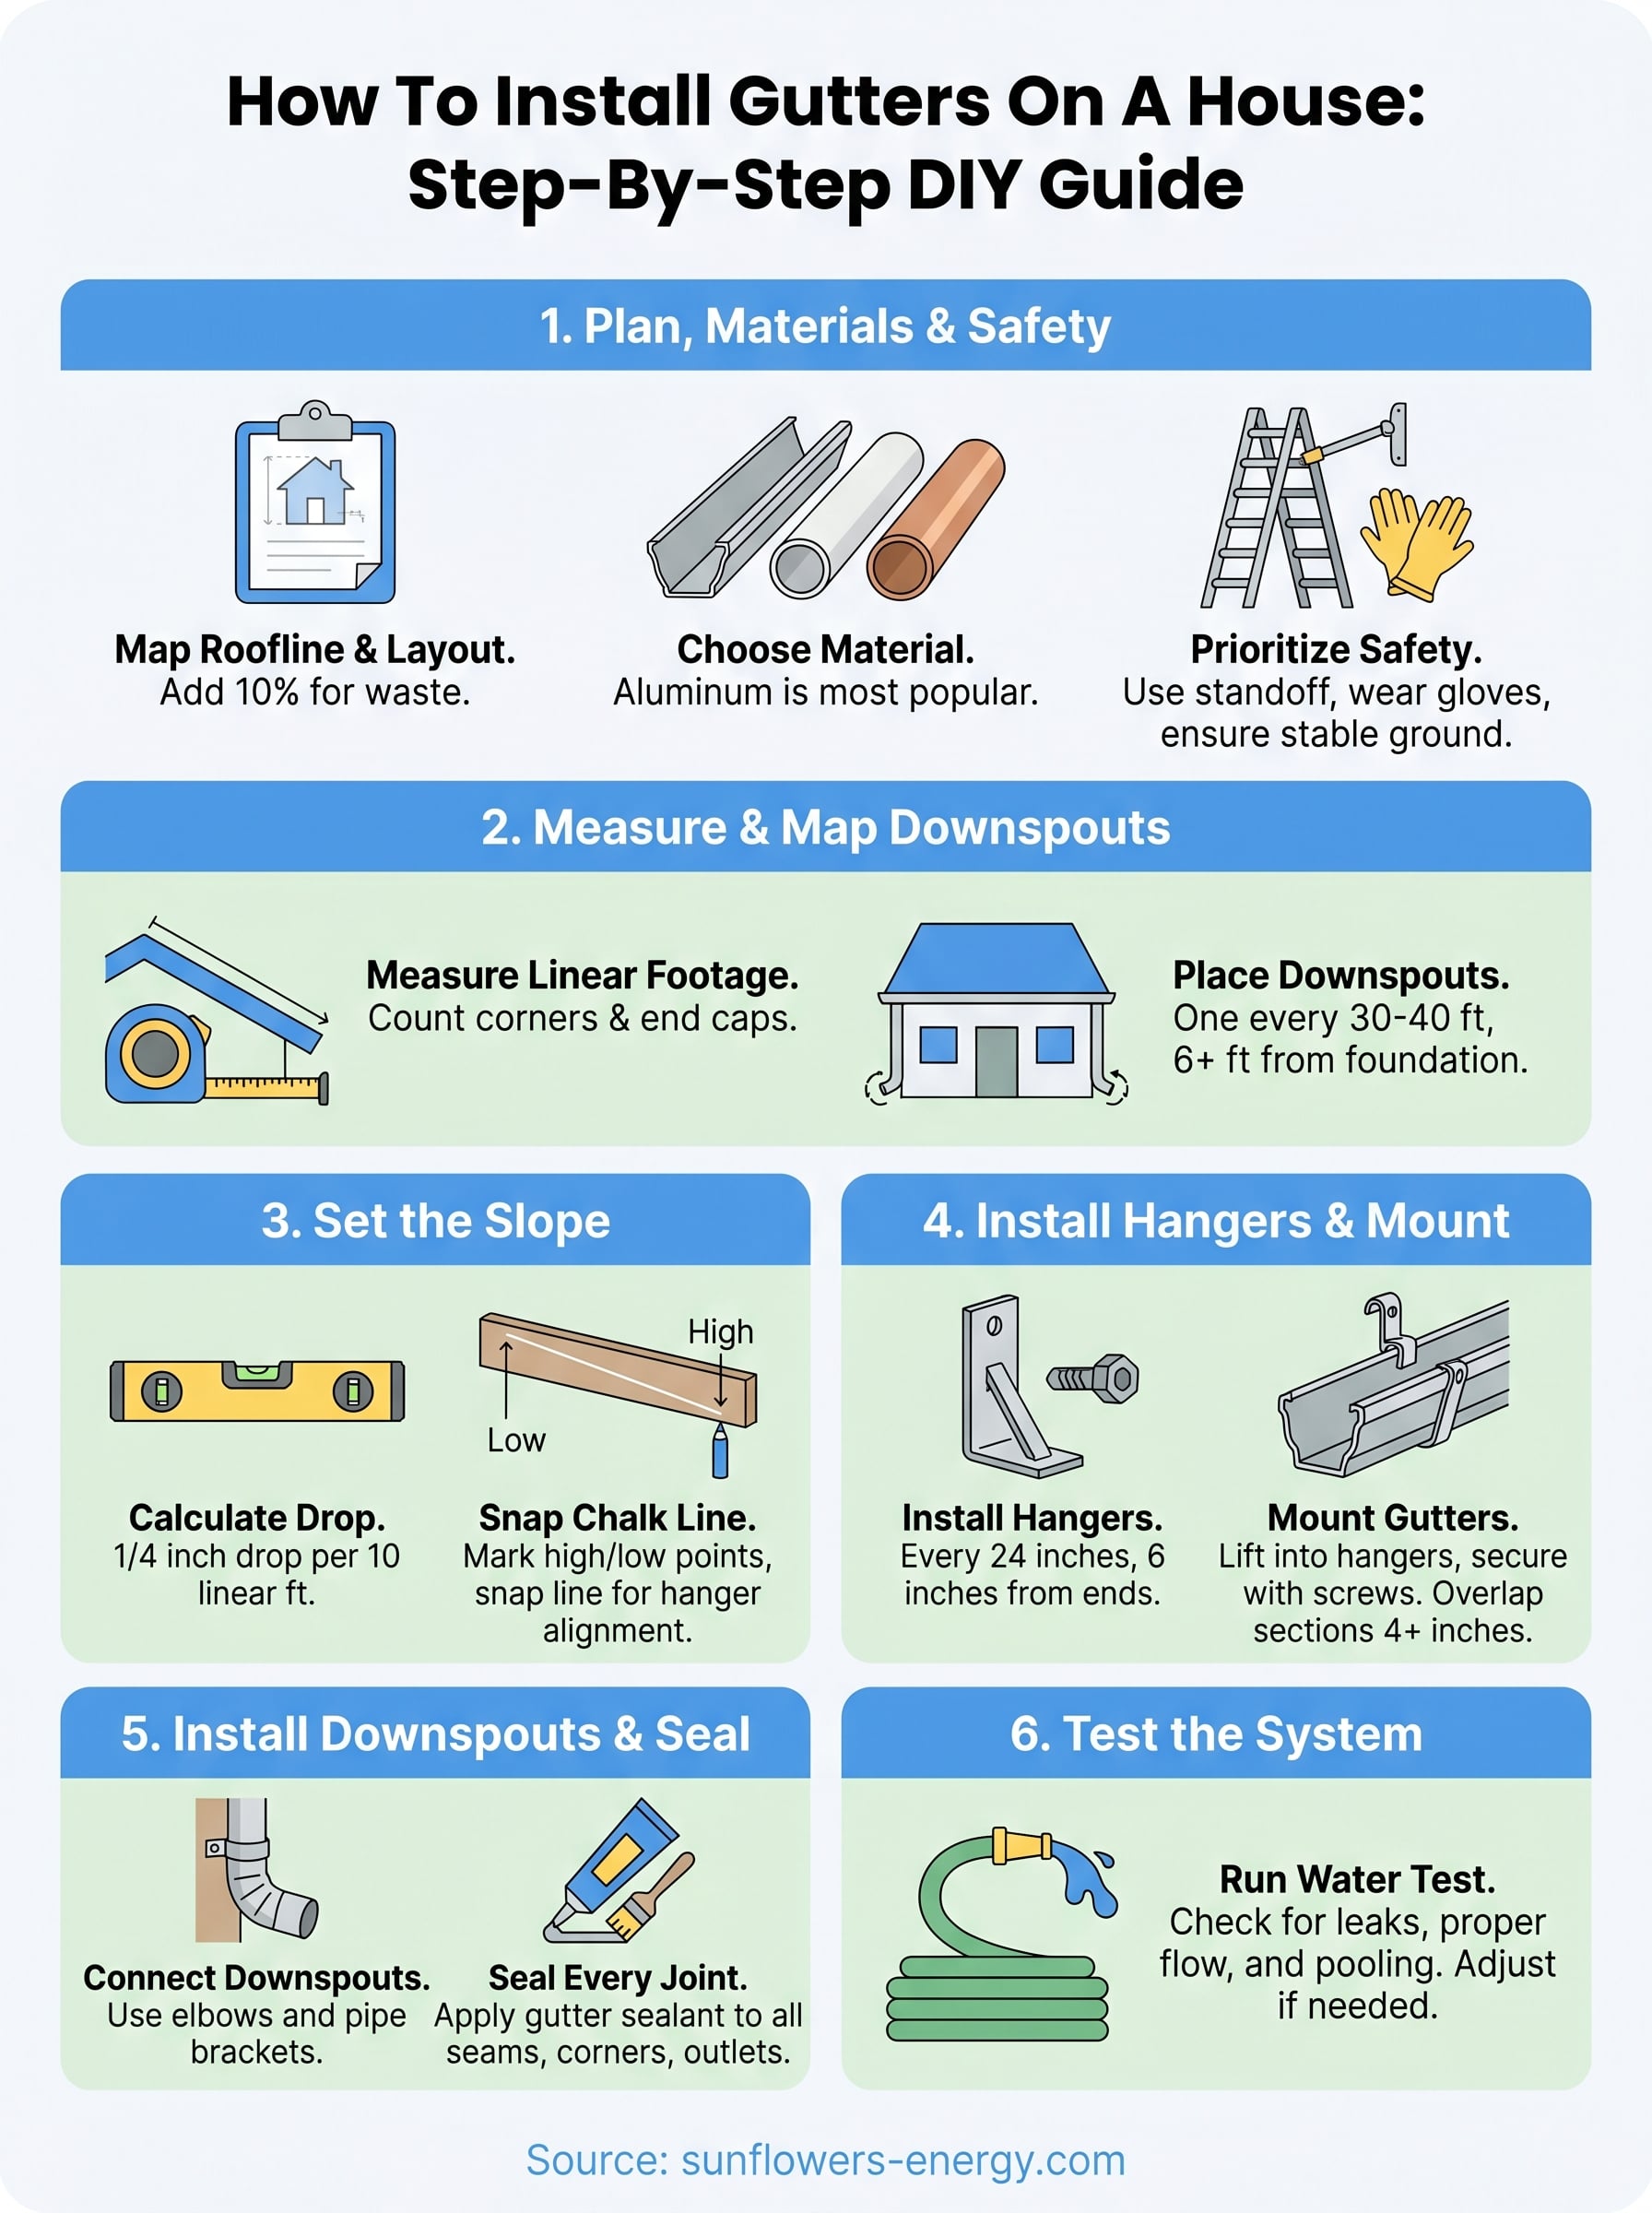
Jumping straight into cutting and hanging gutters without a solid plan is how most DIY gutter projects end up with leaks, sagging sections, or downspouts placed in the wrong spots. Before you pick up a single tool, take time to understand your home’s roofline layout and decide on the right materials for your climate and budget. A little preparation upfront saves you hours of rework and keeps the finished system draining properly for years.
Choose your gutter material
The material you pick directly affects durability, maintenance requirements, and total project cost. Aluminum is the most popular choice for residential homes because it resists rust, comes in long seamless runs, and performs well in most climates. Vinyl gutters cost less upfront but become brittle in freezing temperatures and tend to sag over time. Steel and copper are both more durable options, though copper is expensive and better suited to premium or historic homes.
Here’s a quick comparison to help you choose:
| Material | Cost (per foot) | Lifespan | Best For |
|---|---|---|---|
| Vinyl | $1-$2 | 10-20 years | Mild climates, tight budgets |
| Aluminum | $3-$6 | 20-30 years | Most residential homes |
| Steel | $4-$8 | 20-30 years | Heavy snow and ice regions |
| Copper | $15-$25 | 50+ years | Premium or high-end installs |
For most homeowners, 5-inch K-style aluminum gutters strike the best balance between price, performance, and availability.
Tools and supplies checklist
Before you tackle how to install gutters on a house, gather every tool and supply you need so you’re not making multiple hardware store runs mid-project. Missing a key item halfway through can leave your fascia exposed if rain hits overnight.
You’ll need:
- Tape measure and chalk line for measuring runs and marking slope
- Hacksaw or aviation snips for cutting gutter sections
- Drill with hex-head screws
- Gutter hangers (one every 24 inches along each run)
- End caps, inside/outside corners, and slip joint connectors
- Downspout outlets, elbows, and pipe brackets
- Gutter sealant (silicone or gutter-specific caulk)
- Safety ladder with a standoff arm
- Work gloves and safety glasses
Safety before you climb
Working at height is the most serious risk in any gutter project. Always place your ladder on firm, level ground and use a standoff arm to keep it away from the fascia, so you’re not leaning directly on the surface you’re trying to fasten gutters to. Never overreach to either side; take the extra minute to move the ladder instead.
Wear slip-resistant footwear and heavy work gloves every time you go up. Cut aluminum edges are surprisingly sharp and will slice through skin quickly. If your home is two stories or your roofline has a steep pitch, seriously consider hiring a professional for those sections.
No amount of money saved on labor is worth a fall from a poorly positioned ladder or an unstable work setup.
Step 1. Measure runs and map downspout locations
Getting accurate measurements before you buy a single piece of gutter is what separates a clean installation from one that leaves you short on materials mid-job. Walk around your home and identify every roofline edge that needs a gutter run, noting where each run starts and ends. Grab a notepad and sketch a simple top-down outline of your house so you can record measurements as you go.
Measure total gutter footage
Use a tape measure to record the linear footage of each run along your fascia board. Add 10 percent to your total as a buffer for cuts and mistakes. On a typical single-story ranch home, for example, you might measure four separate runs totaling 160 linear feet, so you would purchase material for roughly 175 to 180 feet to be safe.
While you measure, count every inside and outside corner, since each one requires a special corner piece. Also note how many end caps you will need; each run gets one at the far end where the gutter terminates.
Place downspouts in the right spots
Downspout placement is just as important as gutter length when you are figuring out how to install gutters on a house. A general rule is one downspout for every 30 to 40 feet of gutter run. Mark each downspout location on your sketch so you can purchase the correct number of outlets, elbows, and downspout sections before you start cutting anything.
Always position downspouts where water can discharge at least 6 feet away from your foundation, ideally toward a sloped yard or into an underground drain extension.
Plan downspouts at the lowest point of each gutter run, which you will establish in the next step when you set the slope. If a run has a corner, placing the downspout at that corner outlet can serve two runs at once and cut down on the total number of downspouts your system needs.
Step 2. Set the slope and snap layout lines
Once you have your measurements and downspout locations mapped out, the next task is establishing the correct slope so water flows consistently toward each downspout outlet. Skipping this step or eyeballing the angle leads to standing water in your gutters, which accelerates rust in metal gutters and causes vinyl sections to sag under the added weight.
Calculate the correct slope
The standard rule for gutter slope is 1/4 inch of drop for every 10 linear feet of gutter run. On a 40-foot run, that works out to a total drop of 1 inch from the high end to the low end where the downspout sits. Longer runs need more total drop, but the ratio stays the same.
Use this reference to plan your drop before you snap any lines:
| Run Length | Total Drop Required |
|---|---|
| 20 feet | 1/2 inch |
| 30 feet | 3/4 inch |
| 40 feet | 1 inch |
| 50 feet | 1-1/4 inches |
| 60 feet | 1-1/2 inches |
If a run exceeds 40 feet, split it into two sections that each slope toward a downspout at opposite ends to keep water moving efficiently across the entire span.
Mark the high and low points and snap the line
Start by marking your high point at the peak end of each run, roughly 1 inch below the roof drip edge so shingles shed water directly into the gutter. Drive a small nail at that mark. Then measure down from that nail using your calculated drop figure, and drive a second nail at the low downspout end of the run.
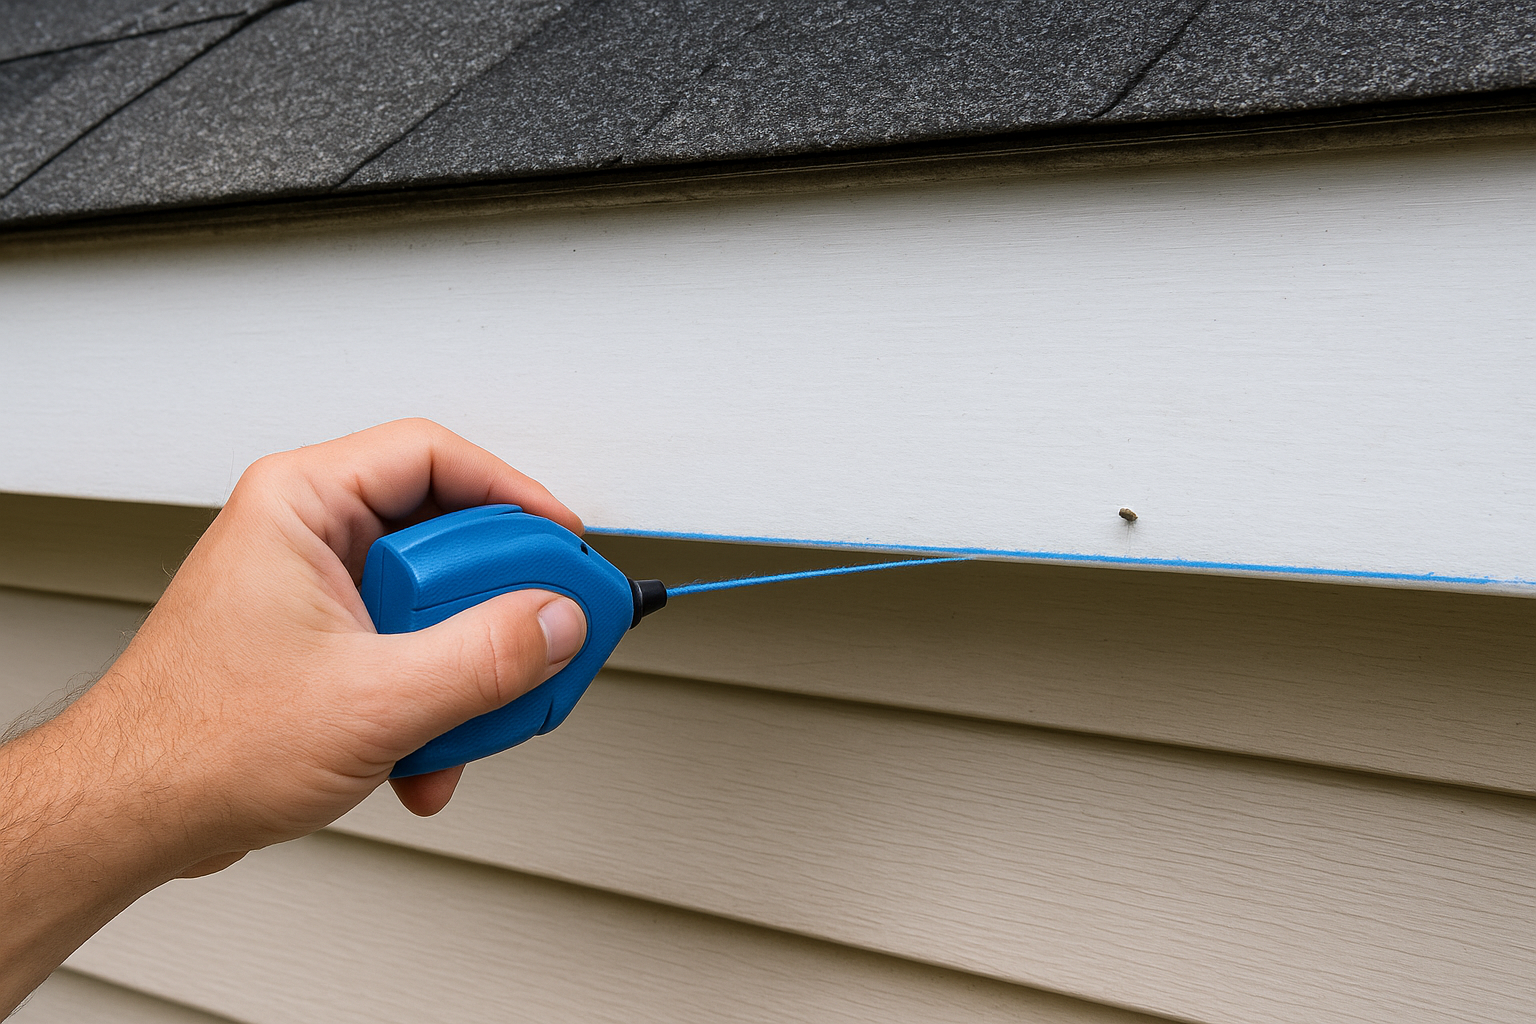
Stretch a chalk line between the two nails, pull it taut, and snap it firmly against the fascia. This line becomes your alignment guide for every hanger you install, and taking this step is what makes learning how to install gutters on a house so much more accurate. Check the line with a level to confirm the slope runs toward the downspout before moving on.
Step 3. Install hangers and mount the gutters
With your chalk line snapped and slope confirmed, you’re ready to start fastening hardware to the fascia. Hangers are the structural backbone of your entire gutter system, so installing them at the correct spacing and height determines whether your gutters hold their slope and shape through years of heavy rain and ice loading.
Attach the hangers to the fascia
Hidden bracket hangers with hex-head screws are the most reliable fastener type for residential gutter installations because they grip directly into the fascia board and resist pullout far better than old-style spike-and-ferrule systems. Position your first hanger 6 inches from each end of the run to prevent the gutter from pulling away at the corners, then space additional hangers every 24 inches along your chalk line.
Drive 2.5-inch or longer hex screws through the fascia and into the rafter tail behind it rather than stopping in the fascia alone. Reaching the rafter tail gives you a much stronger anchor point, which matters most during heavy snow loads or strong wind-driven rain.
Always pre-drill pilot holes in cold or dry weather to avoid splitting older fascia boards when you drive screws.
Lift and lock the gutters into place
Once your hangers run along the chalk line, slide each gutter section into the open brackets and snap the front lip over the hanger’s locking tab. Work from the high end of the run toward the downspout outlet so you control alignment as you go. Keeping each section pressed firmly against the fascia while you lock it in is one of the details that makes learning how to install gutters on a house much cleaner in practice.

Where two gutter sections meet, overlap them by at least 4 inches and use a slip joint connector to bridge the seam. Apply gutter-specific silicone sealant inside the connector before you lock it down so the joint is watertight from the start. Skipping the connector, even on short overlaps, allows the seam to flex with temperature changes and open a gap over time.
Step 4. Install downspouts, seal joints, and test
With your gutters locked into their hangers and running at the correct slope, the final phase of learning how to install gutters on a house comes down to connecting your downspouts, sealing every joint, and confirming the whole system drains the way it should. Rushing through this last step is where many DIYers introduce leaks they won’t notice until the next heavy rain.
Connect the downspout outlets and elbows
Start by snapping your downspout outlet into the hole you marked during planning. Most outlets press fit into the gutter and lock with sheet metal screws on each side. Apply a bead of gutter sealant around the inside rim of the outlet before you fasten it so water cannot seep between the outlet flange and the gutter bottom.
From the outlet, attach two elbows to angle the downspout pipe flush against your home’s exterior wall. The exact angle depends on how far the gutter overhangs your siding. Typical installations use a pair of A-style elbows (75-degree) to bring the pipe from the outlet straight back to the wall, then run the vertical pipe down to a final elbow at the base that redirects water away from your foundation.
- Secure the downspout pipe to the wall using pipe brackets every 4 to 6 feet
- Drive screws into wall studs or masonry anchors rather than siding alone
- At the base elbow, extend the discharge point at least 6 feet from your foundation
Seal every joint and run the water test
Go back along every connection point on the entire run: end caps, slip connectors, corners, and outlet rims. Apply a thin bead of gutter sealant along each interior seam and smooth it with a finger or small brush so there are no gaps or air pockets.
Let the sealant cure for the time listed on the product label before you run your water test, or you risk washing uncured sealant out of the joints.
Once the sealant is set, run a garden hose at the high end of each gutter run and watch the water travel toward the downspout. Look for pooling, drips at seams, or water spilling over the gutter lip. If you spot a low spot that collects water, loosen the nearest hanger, adjust the gutter angle slightly, and re-tighten before re-testing.
Quick recap
Now you know exactly how to install gutters on a house from the ground up. You planned your layout, measured every run, mapped downspout locations, set the correct slope, installed hangers at the right spacing, and sealed every joint before running a water test. Each of those steps works together, and skipping any one of them is where most DIY gutter jobs develop problems down the road.
Gutters are only one piece of a fully protected home. Your roof, fascia, and drainage system all need to work together to keep water from causing serious structural damage over time. If your roof has missing shingles, soft spots, or storm damage, no amount of properly hung gutters will prevent water from getting in where it should not.
The team at Sunflowers Energy LLC offers free on-site inspections so you can find out exactly what condition your roof is in before small issues turn into expensive repairs.

https://shorturl.fm/pCYi8
https://shorturl.fm/8VTNt