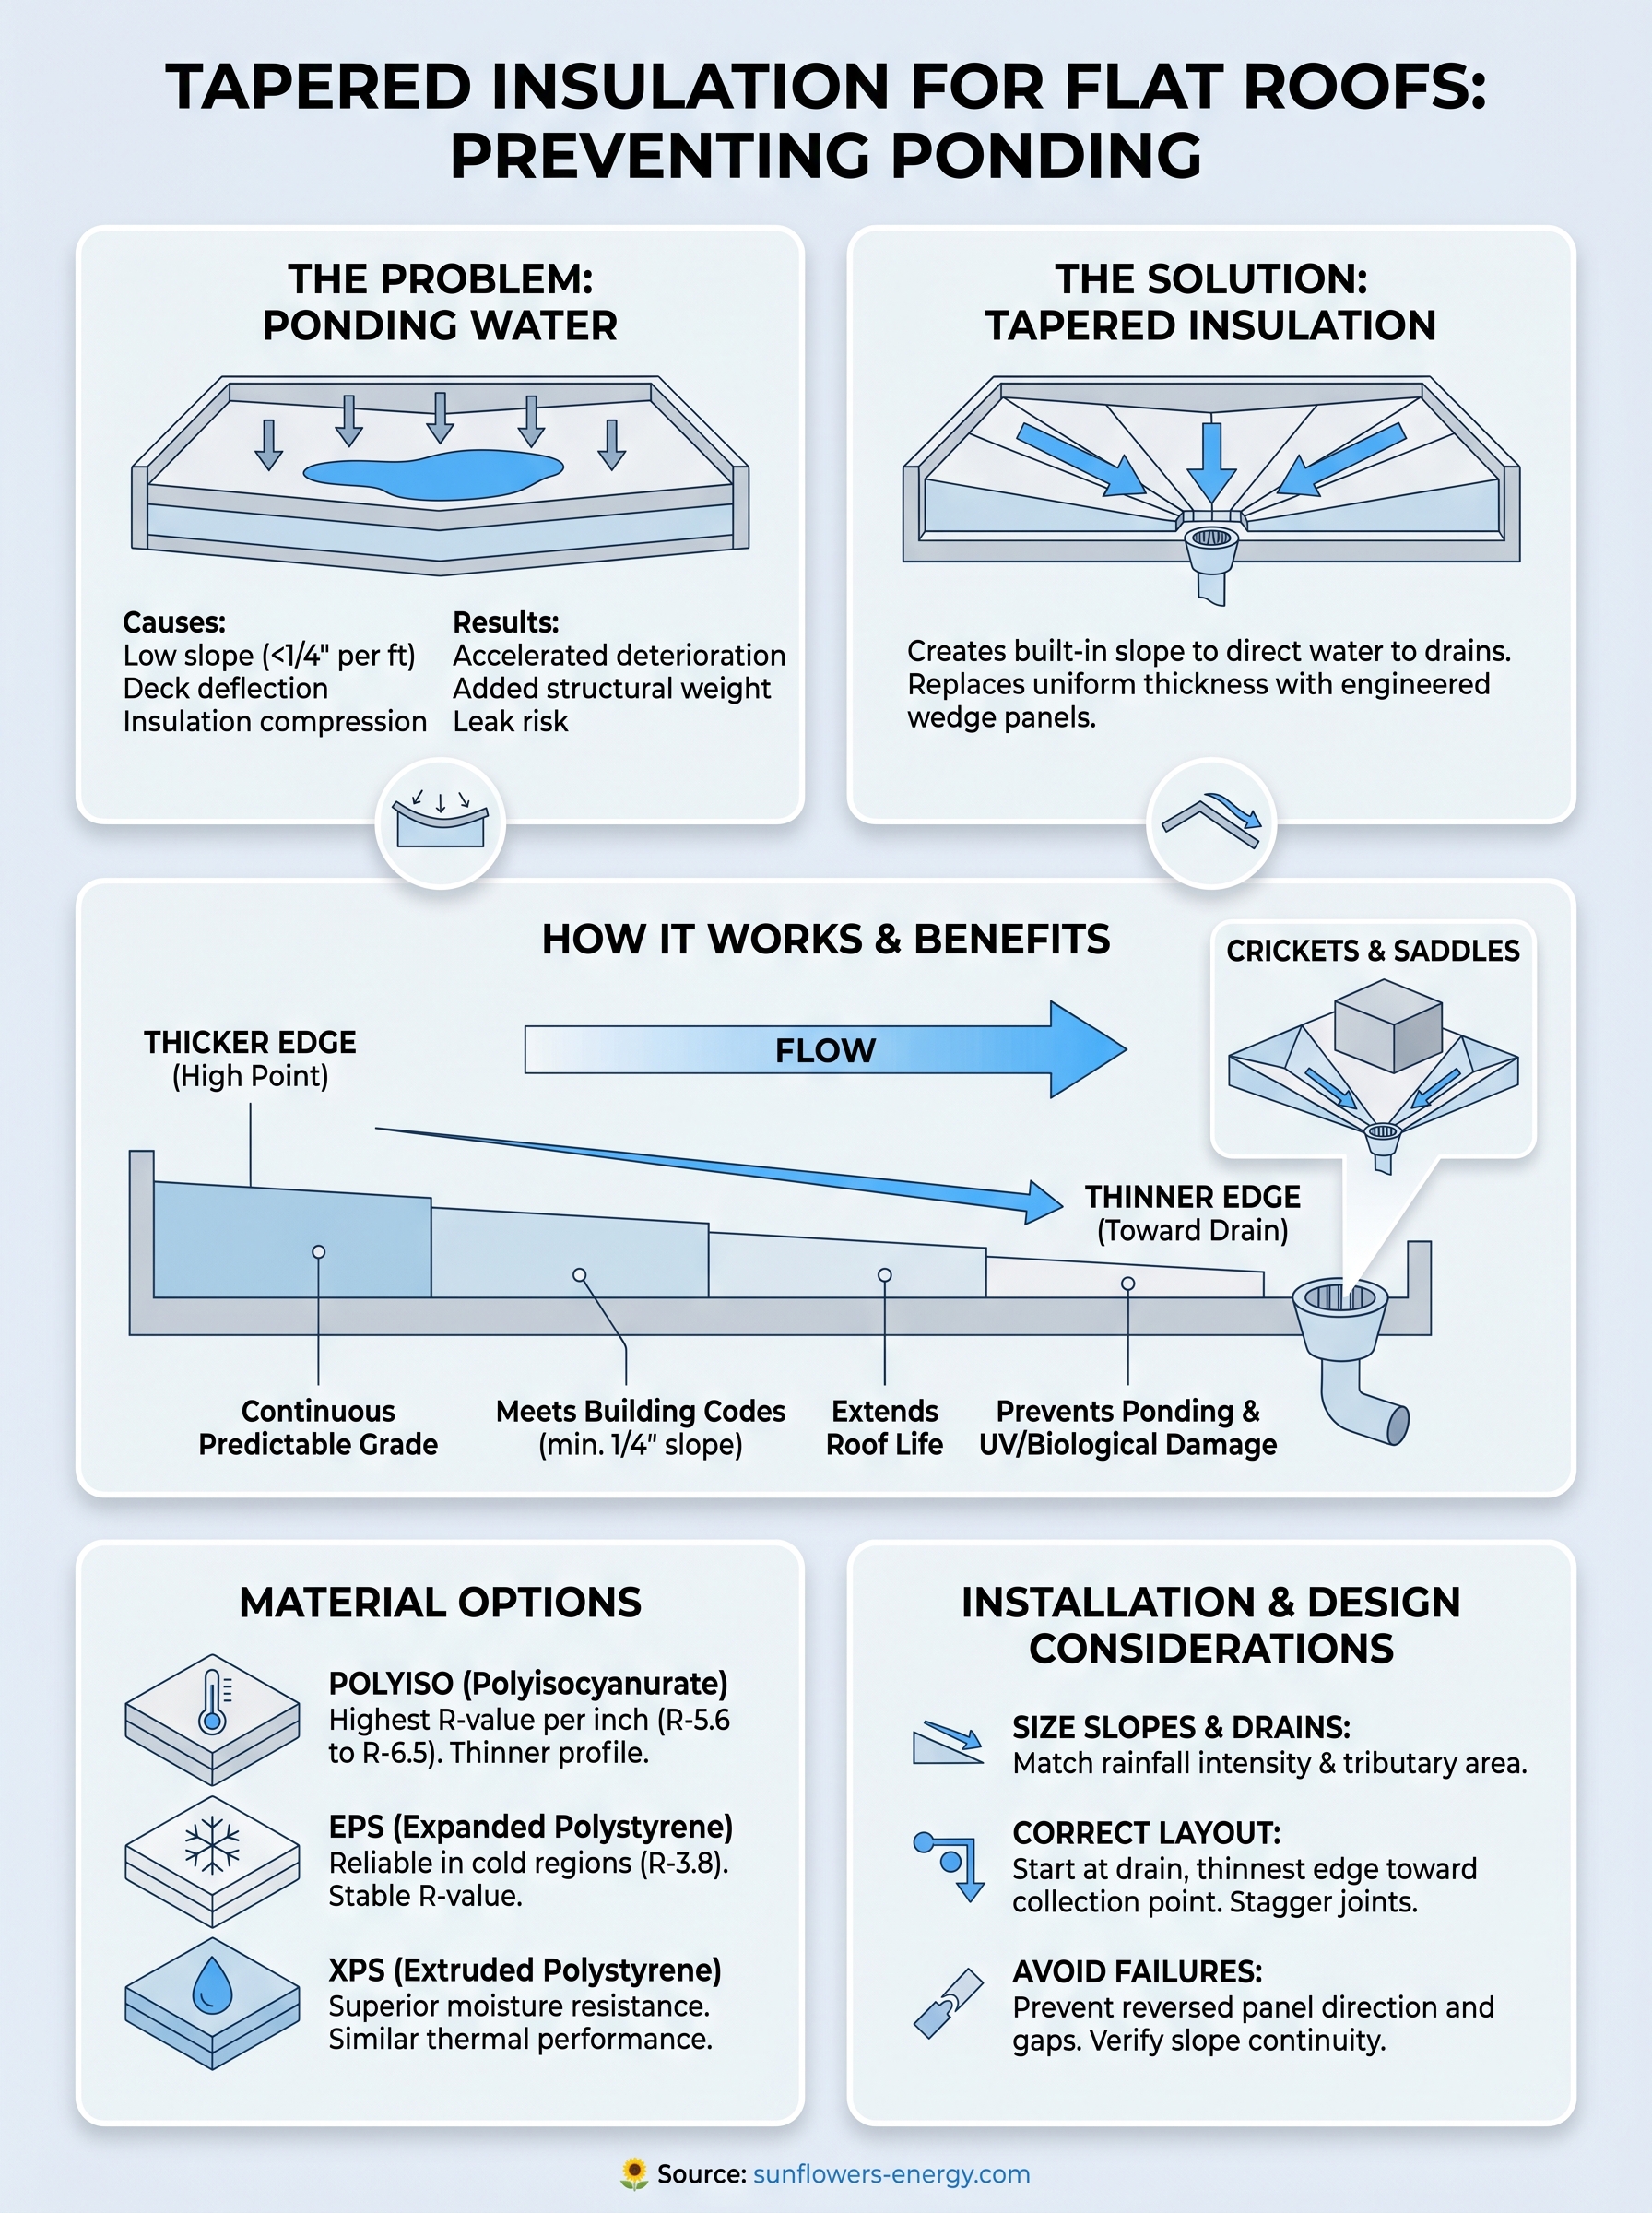
Flat roofs don’t drain themselves. Without a built-in slope, rainwater collects in low spots and just sits there, a problem known as ponding. Left unchecked, ponding water accelerates membrane deterioration, adds structural weight, and eventually leads to leaks that are expensive to fix. The solution isn’t complicated, but it is specific: tapered insulation for flat roofs creates the slope that the roof structure itself lacks, directing water toward drains, scuppers, or gutters.
At Sunflowers Energy LLC, we install and repair commercial roofing systems, TPO, PVC, rubber, and tapered insulation is a core part of how we build flat roofs that actually perform long-term. We’ve seen firsthand what happens when buildings skip this step, and it’s never pretty. Proper drainage design isn’t optional; it’s the difference between a roof that lasts decades and one that fails years ahead of schedule.
This article breaks down how tapered insulation works, the materials and configurations available, and what to consider when specifying it for your building. Whether you’re planning a new roof or troubleshooting drainage issues on an existing one, this is the technical foundation you need to make a sound decision.
Why ponding happens on flat roofs
Flat roofs aren’t truly flat, and that distinction matters. Building codes and roofing industry standards require a minimum slope of 1/4 inch per foot to move water toward drains reliably. The structural deck, whether steel, concrete, or wood framing, doesn’t provide that slope on its own. Over time, structural members deflect under load, insulation compresses, and buildings settle, all of which create low spots that trap water. When that water has nowhere to go, it ponds.
The structural mechanics behind standing water
The physics are straightforward but worth understanding before you spec any roofing system. Water weighs approximately 5.2 pounds per square foot per inch of depth, so even a shallow puddle adds real load to the roof deck. That extra weight causes further deflection, which deepens the low spot, which holds more water the next time it rains. Each storm makes the problem slightly worse.
Ponding doesn’t just sit on a roof; it accelerates every failure mode the membrane is already vulnerable to.
UV degradation, freeze-thaw cycles, and biological growth all intensify when standing water is a regular condition. Algae and moss thrive in persistent moisture, and freeze-thaw expansion physically stresses seams and membrane edges. A membrane rated for 20 years in normal conditions can fail significantly ahead of schedule when ponding goes unaddressed.
Why the structure alone can’t solve it
Most commercial buildings use steel decking or concrete as the structural substrate. Neither material inherently provides a drainable slope without deliberate planning during the design phase. Historically, contractors relied on drain placement and slight structural camber to manage water, but those methods leave too much margin for error and offer no correction after installation.
Field-cutting rigid insulation boards to create slope was an improvement over relying on structure alone, but it was labor-intensive and produced inconsistent results across large roof areas. That’s the specific problem tapered insulation systems were engineered to solve: a precise, calculable slope built directly into the insulation layer before the membrane is ever applied.
How tapered insulation moves water to drains
Tapered insulation for flat roofs works by replacing uniform-thickness boards with wedge-shaped panels engineered to a specific slope. Instead of relying on structural camber or drain placement to carry water off the roof, the insulation itself creates a continuous, predictable grade from the high point of the roof down to each drain or scupper. Every panel in the system contributes to that grade, so water follows a defined path every time it rains.
How the panels are laid out
Manufacturers cut tapered panels to a standard slope of 1/8 inch per foot or 1/4 inch per foot, with the thicker edge at the high point and the thinner edge pointing toward the drain. You typically start the layout at the drain and work outward, so each successive panel steps up in thickness as it moves away from the collection point. Transition boards and saddle pieces handle the corners where two drainage planes meet.
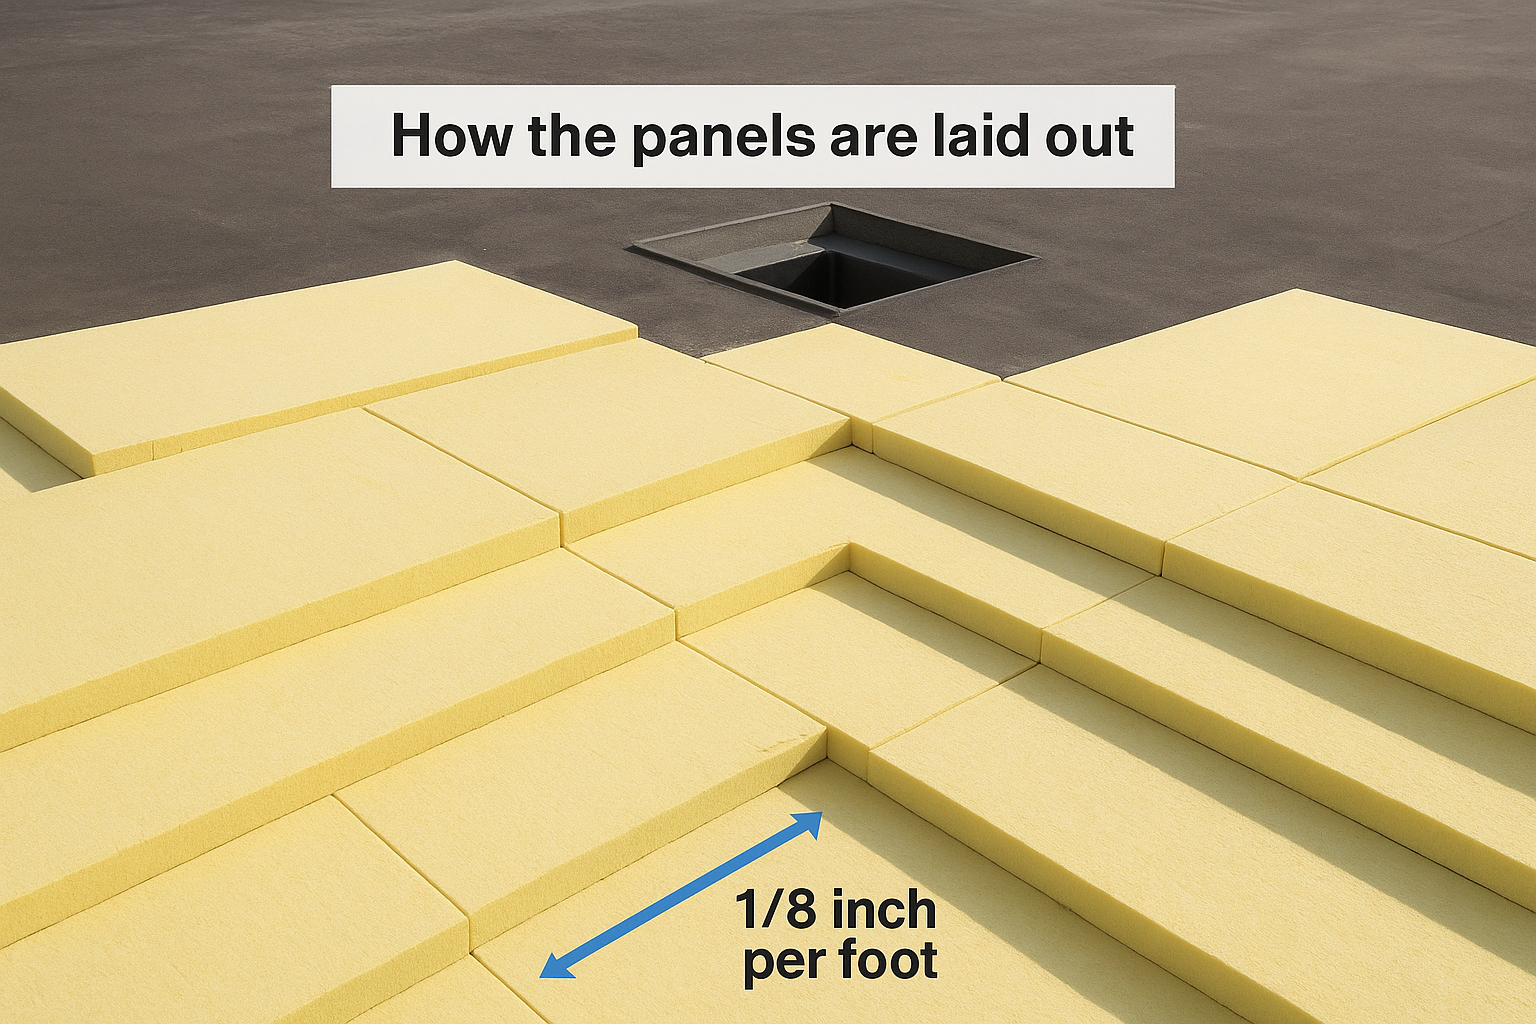
The layout determines everything: an error in panel direction reverses your slope and sends water away from the drain instead of toward it.
Ridge and valley configurations direct water from multiple roof sections into a single collection point, reducing the number of drains required and simplifying the membrane installation above.
How to size slopes, drains, and crickets
Getting sizing right starts with two inputs: roof area and design rainfall intensity for your location. Local building codes, including the International Plumbing Code, define drainage capacity requirements based on storm events specific to your region. From there, you work backward: confirm the tributary area feeding each drain, then verify your tapered insulation for flat roofs delivers enough slope to move that water volume before it ponds.
Slope and drain spacing
Most designers target a minimum slope of 1/4 inch per foot, though 1/8 inch per foot is code-acceptable where structural constraints apply. The key relationship to keep in mind is distance: the farther a drain sits from the roof’s high point, the more cumulative panel height your tapered system must build up to sustain that grade across the entire run.
Spacing drains too far apart creates long, nearly flat runs where water slows down and ponding risk increases with every rainstorm.
Sizing drains correctly matters as much as slope. Undersized drains back up during heavy rain events, which overwhelms even a precisely designed tapered system and leaves water sitting exactly where you don’t want it. Always size drain capacity to match your tributary area at the design storm flow rate, not just average rainfall.
Crickets and saddle placement
Crickets are triangular insulation forms installed directly upslope of rooftop equipment, curbs, and parapets to redirect water around obstacles. Without them, water accumulates against every penetration, creating concentrated ponding at the base of each piece of equipment.
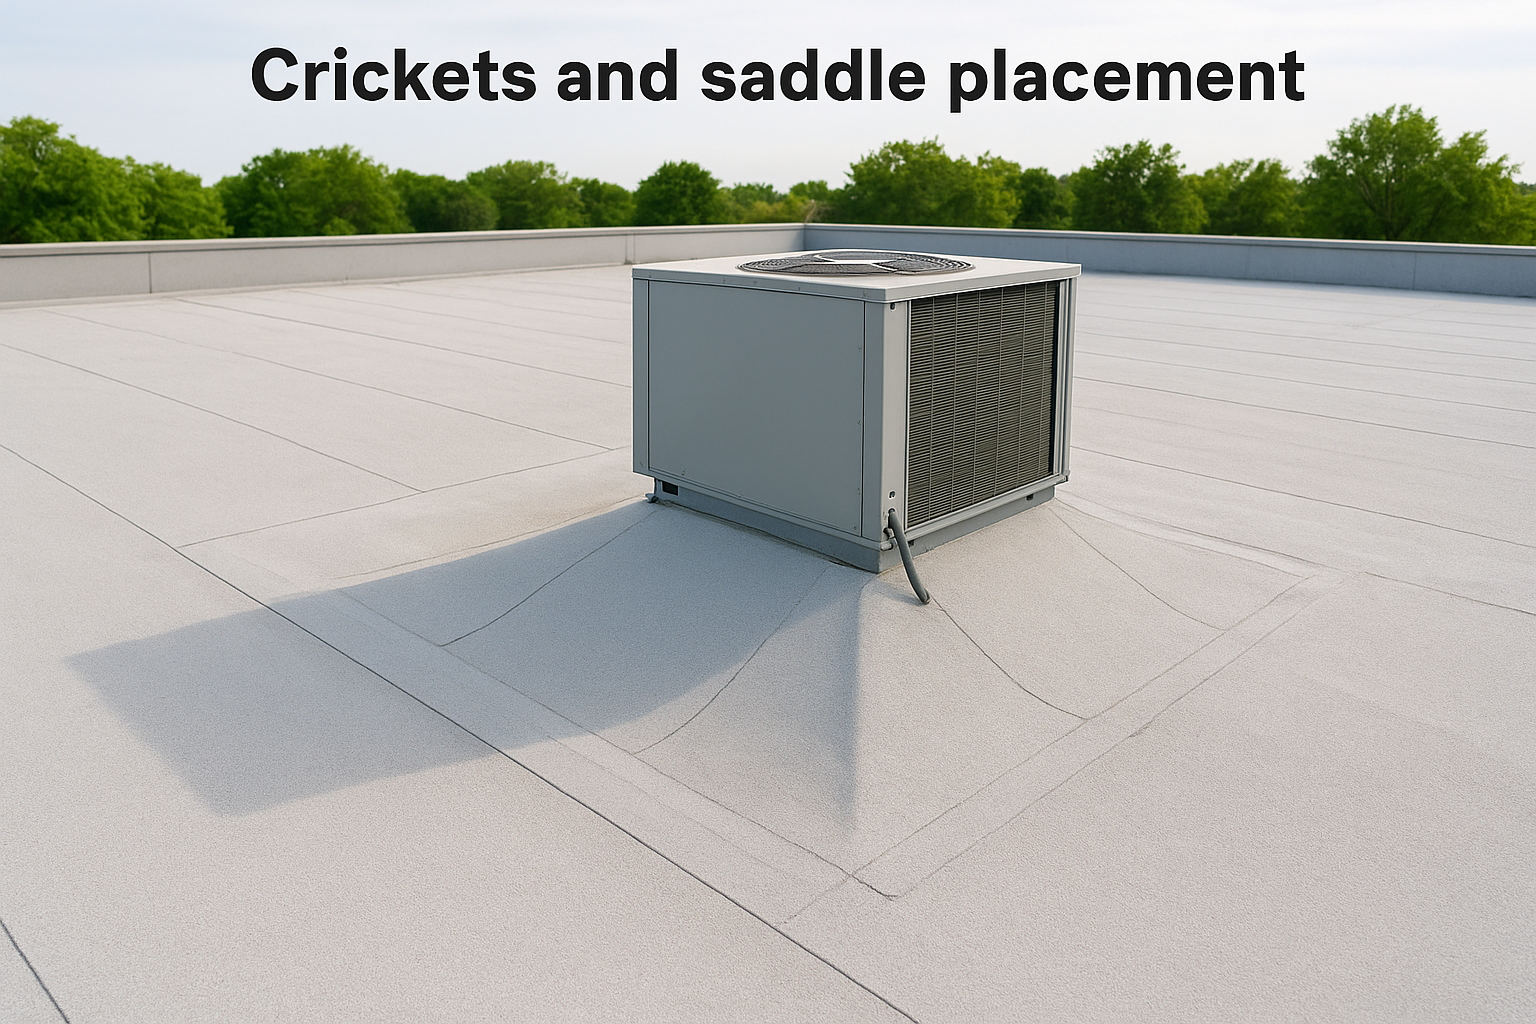
Size each cricket so its peak rises clearly above the surrounding field slope, giving water a continuous downhill path rather than a flat shelf that pools against membrane edges and equipment bases.
Material options and thermal performance basics
Most tapered insulation for flat roofs uses one of three core materials: polyisocyanurate (polyiso), expanded polystyrene (EPS), or extruded polystyrene (XPS). Each carries a different R-value per inch, compressive strength, and moisture resistance profile, so the right choice depends on your roof assembly, climate zone, and budget.
Polyisocyanurate
Polyiso is the most common choice in commercial roofing because it delivers the highest R-value per inch of any foam board insulation, typically R-5.6 to R-6.5 per inch at standard conditions. That means you can hit your target thermal performance at a thinner overall profile, which matters when you’re stacking a tapered system on top of an existing deck with limited height clearance.
Polyiso’s R-value drops in sustained cold temperatures, so factor in climate-adjusted values when specifying for northern climates.
EPS and XPS options
EPS runs roughly R-3.8 per inch and holds its stated R-value across a wider temperature range than polyiso, making it a reliable choice in colder regions. XPS performs similarly but provides superior resistance to moisture absorption, which is a meaningful advantage in roof assemblies where vapor drive or occasional wet conditions are a concern. Both materials are available in tapered configurations from major manufacturers, though polyiso still dominates the commercial flat roof market due to its thermal efficiency at thickness.
Your design team should confirm that the selected material meets the compressive strength requirements for foot traffic and rooftop equipment loads before finalizing the specification.
Installation overview and failure points to avoid
Installing tapered insulation for flat roofs follows a defined sequence that starts before any panels touch the deck. Verify that the deck is clean, dry, and structurally sound first. Any deflection, soft spots, or debris left underneath the insulation layer will compromise the slope geometry you worked to calculate, and no membrane will fix a drainage problem that originates in the substrate.
Laying panels correctly
Start layout at the drain and work outward, placing the thinnest edge of each panel toward the collection point. Stagger all board joints to prevent continuous seams that create thermal bridging and structural weak points in the membrane above. Mechanically fasten or fully adhere each panel according to the manufacturer’s wind uplift requirement for your specific zone before the membrane crew starts work.
Failure points that cause callbacks
Reversed panel direction is the most common installation error, and it sends water away from the drain rather than toward it, creating an intentional low spot that ponds immediately after the first rain. Leaving gaps between adjacent panels is nearly as damaging, since water infiltrates through the insulation layer and reaches the deck long before the membrane shows any visible sign of failure.
Skipping a slope verification after panels are set is how contractors discover drainage problems only after the first rainstorm soaks the building.
Check slope continuity with a level and tape measure at multiple points across the finished field, and confirm all drain sumps sit at the lowest elevation in each drainage plane before the membrane is applied.
Next steps for your flat roof
Tapered insulation for flat roofs isn’t a detail you work out after construction starts. Slope, drain location, and insulation material all need to be locked in during the design phase so the entire assembly performs together from day one. If you’re planning a new commercial roof or troubleshooting persistent ponding on an existing one, start with a professional assessment of your current drainage layout and deck condition before selecting any materials or systems.
Working with a roofing contractor who understands how insulation slope, drain capacity, and membrane selection interact will save you significant cost and trouble down the road. A thorough on-site inspection gives you the specific numbers you need, including drainage area calculations, slope verification, and material recommendations suited to your building and climate zone. Reach out to the team at Sunflowers Energy LLC to schedule your inspection and get a no-obligation estimate for your flat roof project.
