Most roof leaks don’t start in the middle of a shingle field. They start at the edges, joints, and transitions, the exact spots where roof flashing is supposed to keep water out. When flashing fails or was never installed correctly, water finds its way under shingles, into walls, and through ceilings. It’s one of the most common roofing problems we see at Sunflowers Energy LLC, and it’s almost always preventable with the right materials and installation.
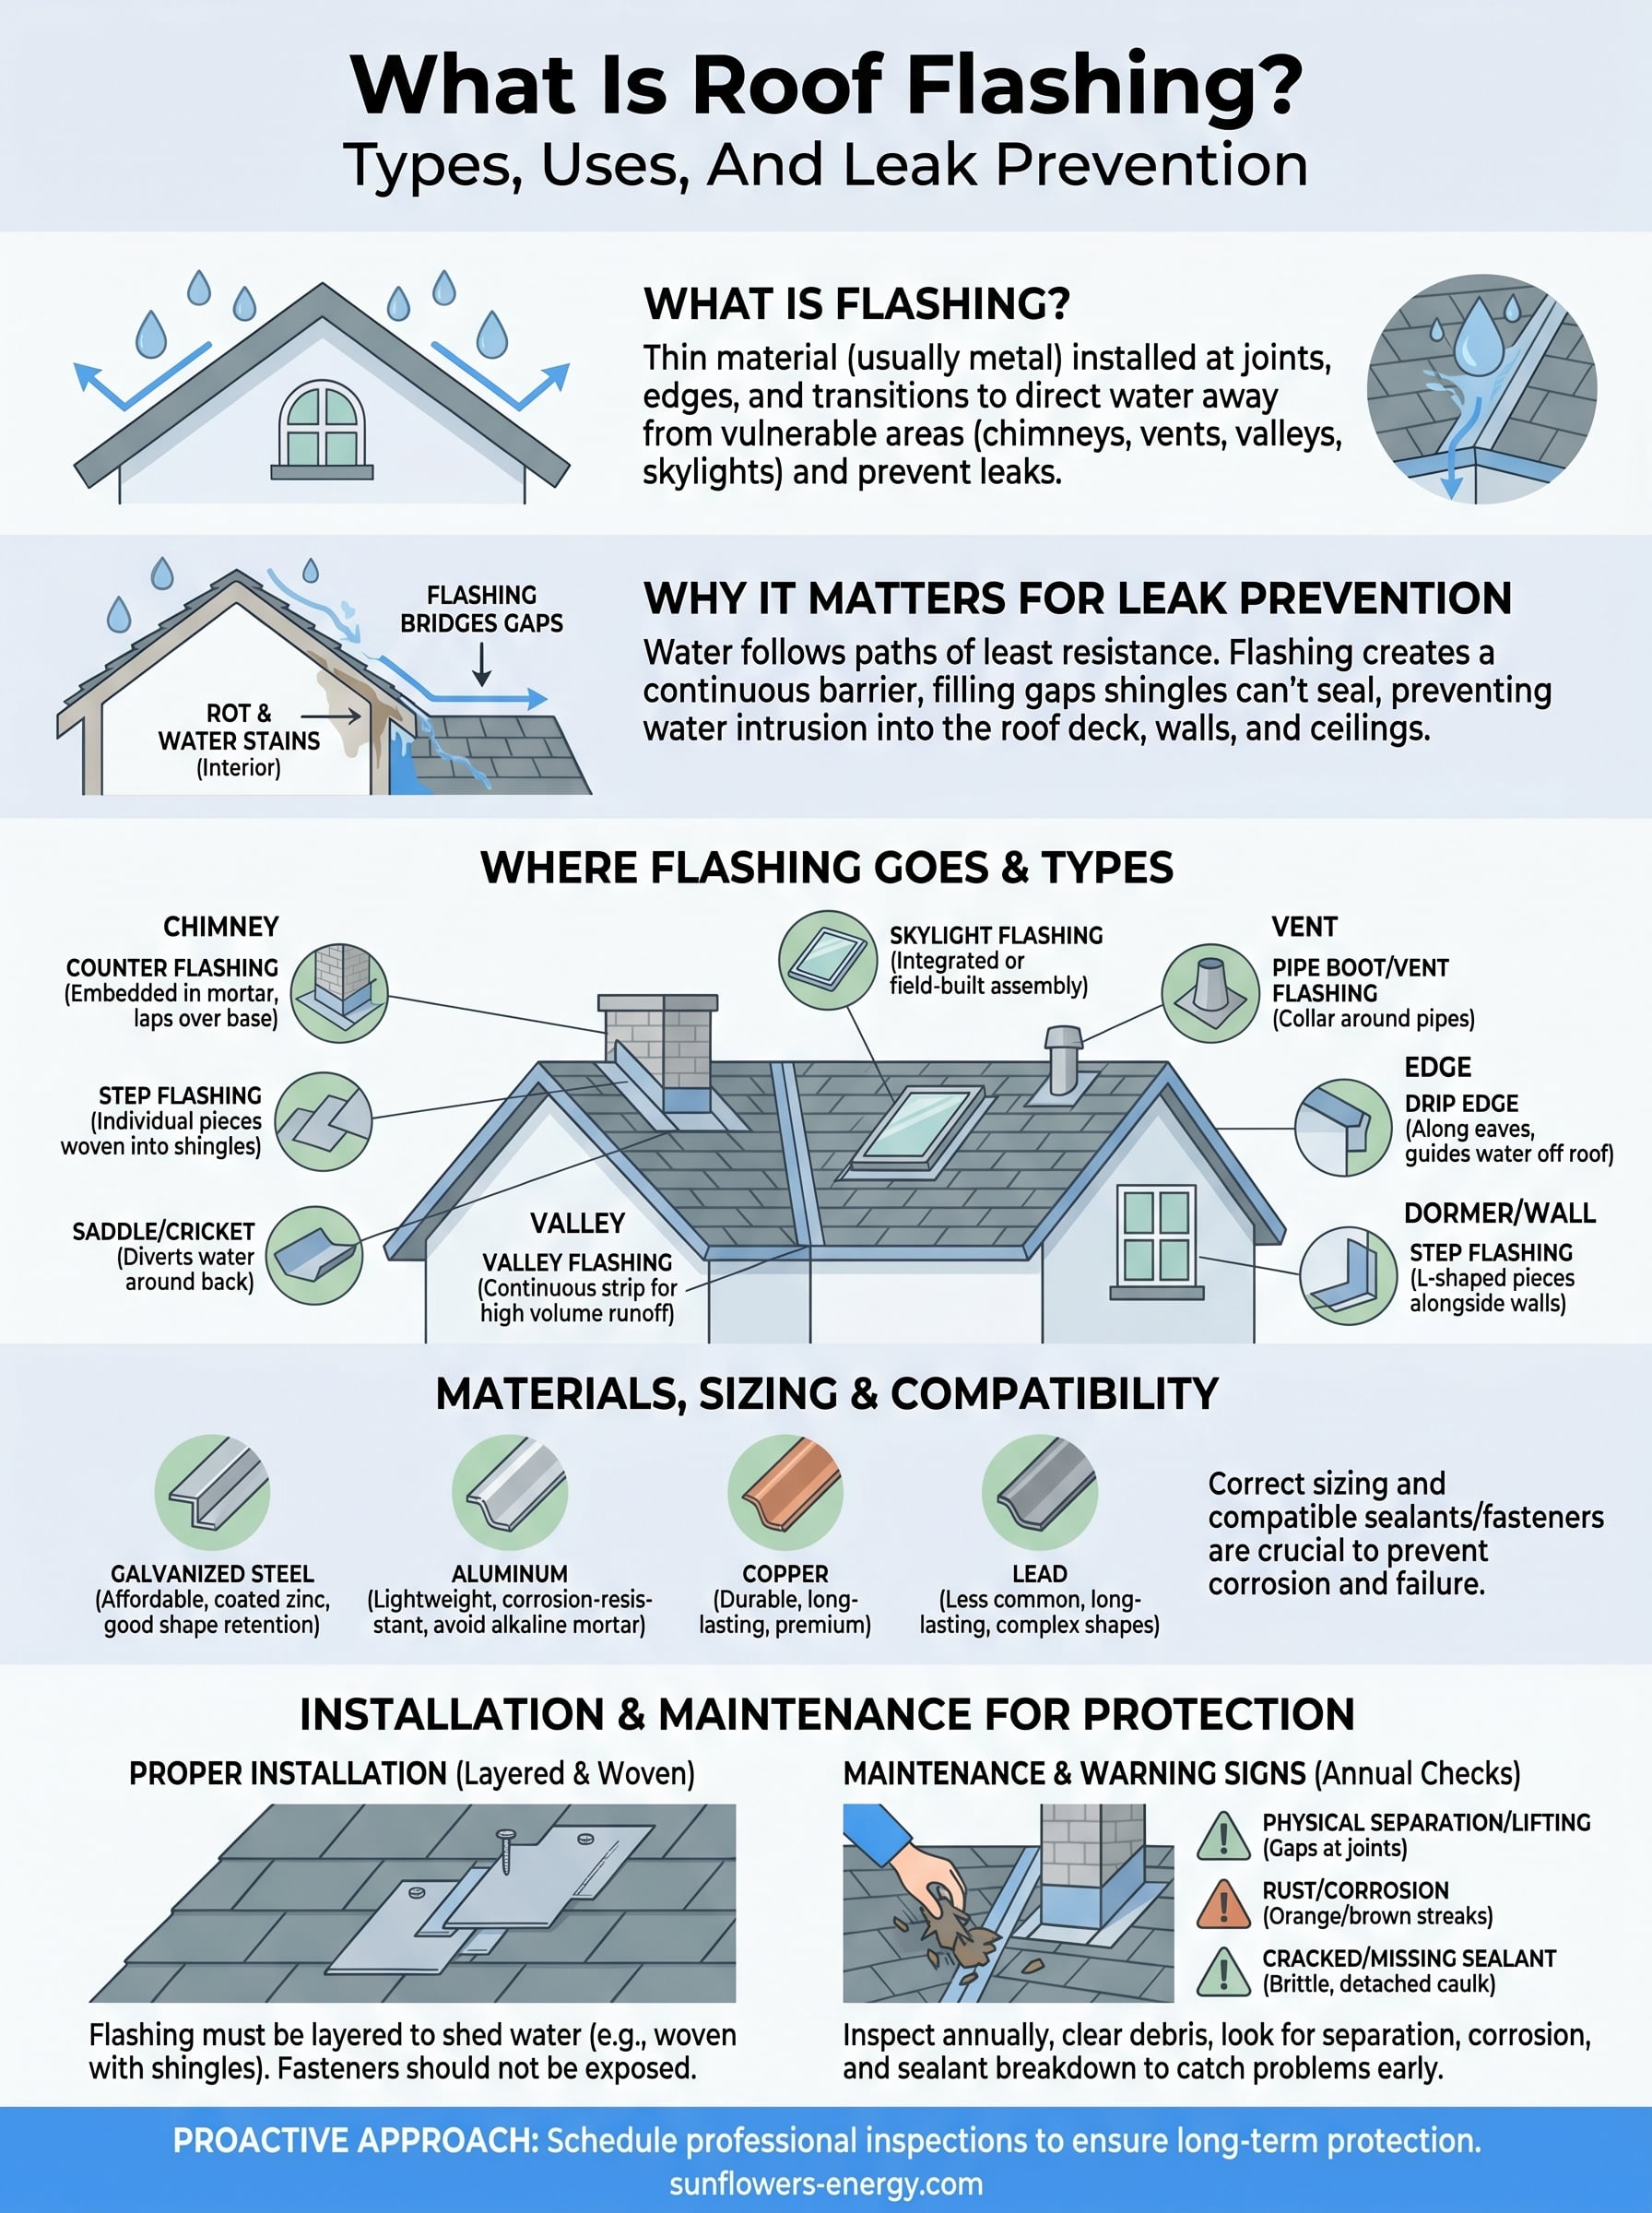
Flashing is a thin layer of material, typically metal, that directs water away from vulnerable areas like chimneys, vents, valleys, and skylights. It’s not glamorous, but it’s arguably the most critical waterproofing component on your roof. Without it, even a brand-new roof is at risk.
This article breaks down exactly what roof flashing is, the different types you’ll find on residential and commercial roofs, the materials used, and how proper flashing prevents leaks before they start. Whether you’re dealing with storm damage or planning a new installation, understanding flashing gives you a real advantage when evaluating your roof’s condition.
Why roof flashing matters for leak prevention
To understand what is roof flashing and why it matters, you need to think about how water actually moves across your roof. Rain doesn’t just fall straight down and run off cleanly. It follows the path of least resistance, and roof penetrations, transitions, and edges are exactly where gravity and wind push water into gaps your shingles alone can’t seal. Flashing fills those gaps by creating a continuous barrier that redirects water onto the shingle surface and away from the underlying structure.
How water finds its way in
Your roof is not a single, flat surface. It has chimneys, vent pipes, skylights, and valleys where two roof planes meet. Each of these features interrupts the smooth flow of water, and without flashing, every one of them is a potential entry point. When water gets underneath shingles, it moves laterally through capillary action, meaning it can travel sideways and even slightly uphill under the right conditions, spreading the damage far beyond the original gap.
Even a gap of a few millimeters at a chimney base or vent boot can allow enough water intrusion over a single rainy season to rot the underlying roof deck.
Shingles are designed to shed water, not to seal joints. They overlap each other to move water downward, but they cannot conform tightly around a chimney or pipe. That’s the gap flashing is specifically engineered to bridge, using a rigid material that laps over the shingle on one side and seals against the vertical surface on the other. Without that precise overlap and seal, water runs directly into the joint every time it rains.
The real cost of failed flashing
When flashing fails, the damage rarely stays contained to the roof surface. Water infiltrates the roof deck, which is typically plywood or oriented strand board, and once that substrate gets wet repeatedly, it begins to soften and rot. From there, water moves into the attic, soaks insulation, and eventually shows up as stains on your ceilings or walls. By the time you see visible damage inside your home, the repair bill is almost always much larger than it would have been if the flashing issue had been caught early.
Water damage claims are among the most common residential property insurance claims filed each year in the United States. Many of them trace back to preventable flashing failures rather than catastrophic events like a fallen tree. Routine flashing problems, including corrosion, separation from sealant, and improper original installation, are slow failures that build over time. You can go months or even years without noticing anything wrong while water quietly compromises your roof structure underneath.
From a cost perspective, repairing or replacing flashing during a routine inspection or re-roofing job is far less expensive than fixing the structural damage that results from ignoring it. A proactive approach to flashing maintenance protects not just your roof, but your ceilings, walls, insulation, and the long-term integrity of your home. Knowing what flashing does puts you in a much stronger position when a contractor is evaluating your roof or recommending repairs, because you can ask the right questions and evaluate the answers with confidence.
Where roof flashing goes and common types
Understanding what is roof flashing means knowing exactly where it belongs on a roof. Flashing doesn’t go across your entire roof surface, but it does go at every point where a vertical surface meets a sloped one, or where two roof planes intersect. These are the spots where your shingles physically cannot create a watertight seal on their own, and leaving any one of them unprotected gives water a direct path into your home.
High-risk spots on your roof
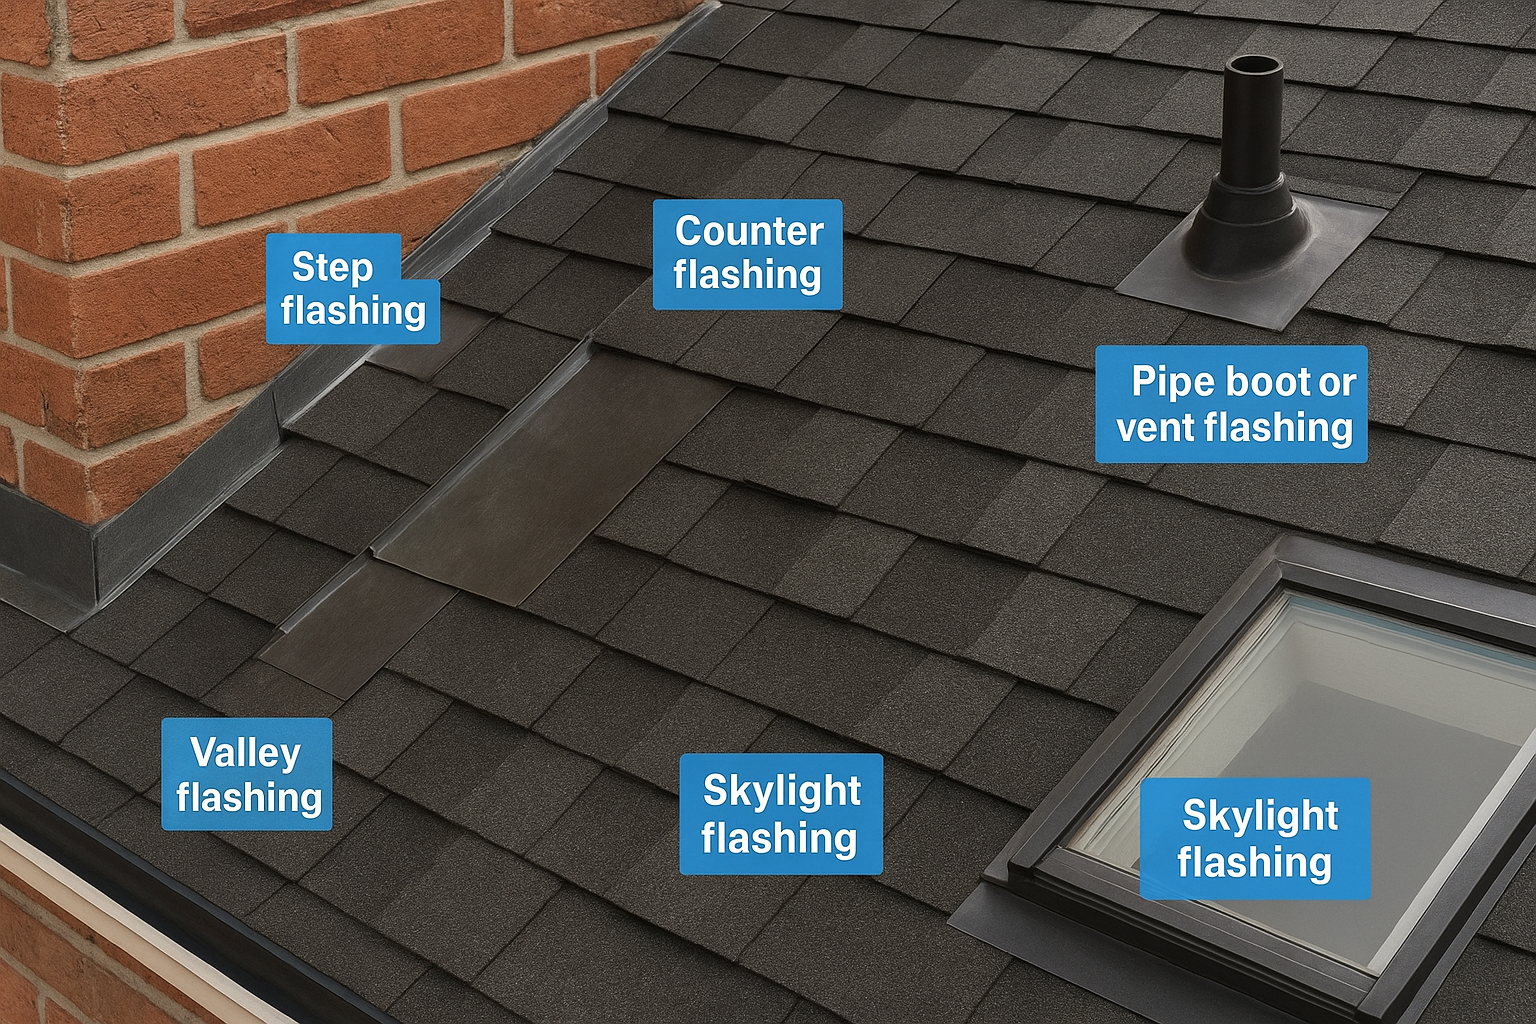
The most common locations for flashing include chimneys, roof valleys, skylights, vent pipes, dormers, and the perimeter edges where your roof meets a vertical wall. Each of these areas carries its own specific risk. A chimney, for example, has four sides that all need flashing, and the back of the chimney typically requires a special piece called a saddle or cricket that diverts water around the structure rather than letting it pool against the base.
Valleys, where two sloping roof sections meet, channel a large volume of runoff during heavy rain. Without properly installed valley flashing, that concentrated flow can force water under the shingles along the seam and into the deck below. Dormer walls and sidewalls present a similar challenge, because water runs vertically down the wall surface before hitting the roof plane, and step flashing along that junction is what keeps it from bleeding underneath.
The types of flashing you’ll find
Different locations call for different flashing configurations, and knowing the main types helps you ask better questions when a contractor evaluates your roof. Each type is designed for a specific geometry, and using the wrong type, or skipping one entirely, is a common cause of recurring leaks.
The terminology can vary by region, but the function of every type stays the same: redirect water onto the shingle surface and away from any joint or penetration.
Here are the main types found on residential roofs:
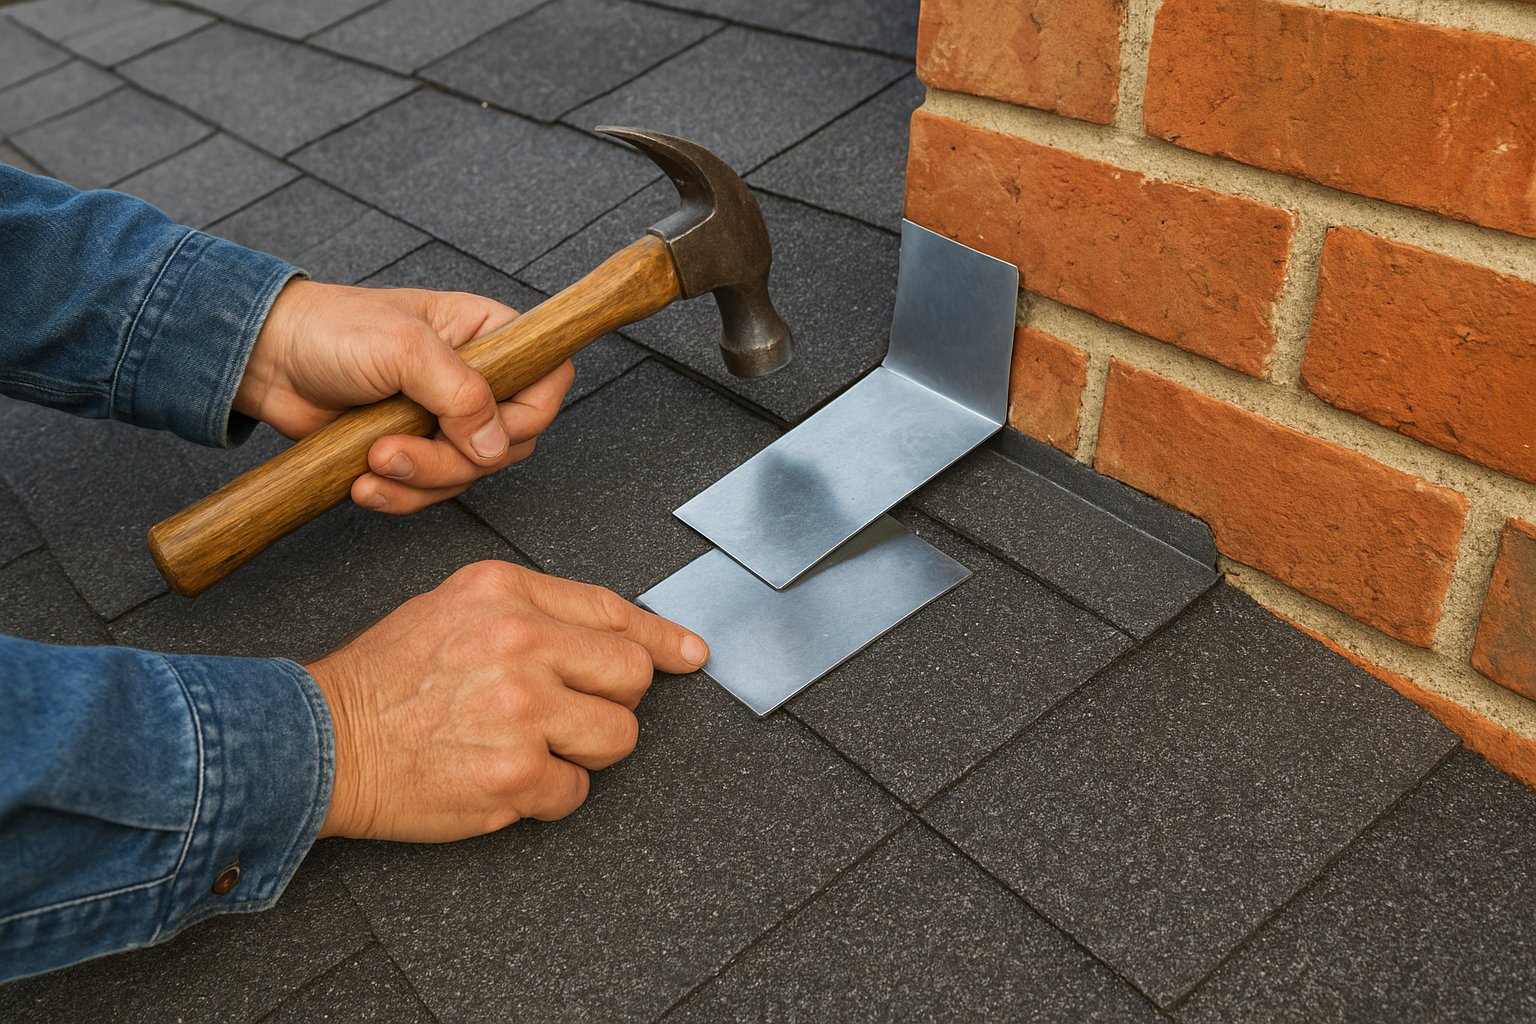
- Step flashing: Individual L-shaped pieces installed one course at a time alongside dormers and walls
- Counter flashing: A second layer embedded in mortar joints at chimneys that laps over the base flashing below
- Valley flashing: A continuous strip running the full length of a valley to handle high water volume
- Drip edge: A metal edge along eaves and rakes that guides water off the roof and away from the fascia
- Pipe boot or vent flashing: A collar that seals around plumbing stacks and vent pipes
- Skylight flashing: A factory-integrated or field-built assembly that seals all four sides of a skylight frame
Roof flashing materials, sizing, and compatibility
Once you understand what is roof flashing and where it goes, the next question is what it’s made of. Not all flashing materials perform the same way, and choosing the wrong material for your roof type or climate can cause the flashing to corrode, separate, or fail prematurely. The material you use also needs to be chemically and mechanically compatible with the surrounding shingles, sealants, and fasteners, or you’ll create new problems while trying to solve old ones.
Common flashing materials and their trade-offs
The most widely used flashing material in residential roofing is galvanized steel, which is carbon steel coated with a layer of zinc to resist rust. It’s affordable, widely available, and holds its shape well across a range of roof geometries. Aluminum flashing is a lighter alternative that resists corrosion naturally, but it’s softer than steel and can react chemically with concrete, mortar, or pressure-treated wood, which accelerates deterioration at the contact points.
If your home has a chimney built with alkaline mortar, aluminum flashing is not a compatible choice without a protective barrier between the two materials.
Copper flashing sits at the top end of the quality spectrum. It’s extremely durable and can last 50 years or more when installed correctly, which makes it a strong long-term investment for high-end homes. Lead flashing is another long-lasting option still used in some older restoration work and around complex chimney geometry, though its use has declined due to environmental and health concerns.
Sizing and compatibility with your roof system
Flashing dimensions matter as much as the material itself. Standard step flashing pieces are typically 4 inches wide by 8 inches tall, sized so each piece overlaps the one below it by at least 2 inches when installed alongside a wall. Valley flashing runs wider, often 16 to 24 inches, to handle the concentrated runoff that moves through that channel during heavy rain without backing up under the edges.
Compatibility goes beyond just the metal type. The sealant you apply at joints needs to bond with both the flashing material and the adjacent surface without breaking down from UV exposure or thermal expansion and contraction. Butyl-based sealants are a reliable choice for most metal flashing applications, while self-adhering membrane tape works well for sealing laps and edges before the top flashing layer gets installed.
Installation basics and maintenance that keeps it working
Understanding what is roof flashing is only half the equation. How flashing gets installed and how you maintain it afterward determines whether it actually keeps water out for the life of your roof. Even high-quality copper or galvanized steel flashing will fail if it’s fastened incorrectly, sealed with the wrong product, or left unchecked for years.
Getting installation right from the start
Proper flashing installation follows a layering sequence that works with how water flows down your roof. Step flashing must be woven into the shingle courses one piece at a time so each L-shaped segment sits on top of the shingle below it and under the one above it. Skipping that weave and running a continuous strip along the wall instead is a shortcut that creates a channel for water rather than closing one.
Fasteners also need careful placement. Nails should anchor the flashing to the roof deck or wall, but their locations must not penetrate any area that will be exposed to weather. Driving a nail through the face of step flashing creates a hole that collects water every time it rains. Sealant plays a supporting role, not the primary one. Relying entirely on caulk to hold flashing in place instead of mechanical fasteners is one of the fastest paths to a failed installation.
Sealant fills small gaps and bonds laps, but it cannot substitute for correctly sized, physically secured flashing.
Maintaining flashing so it keeps working
Once installed, flashing needs periodic attention to stay effective. Inspecting your flashing at least once a year, ideally in the fall before heavy rain and freeze-thaw cycles begin, gives you a chance to catch small problems before they become expensive ones. Look for cracked or missing sealant at joints, separation at the base of vent boots, and any visible lifting or buckling along step flashing runs.
Removing debris from valleys and off flashing surfaces matters just as much as visual inspections. Leaves and dirt that pile up against flashing edges hold moisture against the metal, which accelerates corrosion and breaks down sealant bonds over time. That combination shortens the working life of your flashing considerably, so clearing debris during your annual inspection is one of the simplest and most effective maintenance steps you can take.
Common roof flashing failures and how to spot them
Knowing what is roof flashing is useful, but recognizing when it’s failing is what actually protects your home. Flashing failures rarely announce themselves loudly. Most develop slowly over years, and by the time you notice a water stain on your ceiling, the underlying damage is already significant. Learning to spot the early warning signs lets you catch problems while the fix is still a relatively minor repair rather than a full structural remediation.
Physical separation and lifting
The most visible type of flashing failure is physical separation, where the flashing pulls away from the surface it’s supposed to seal against. This happens most often at chimney bases and along dormer walls, where thermal expansion and contraction from seasonal temperature swings gradually work the flashing loose from its anchor points. You’ll see it as a visible gap between the metal edge and the masonry or siding surface it should press tightly against.
Once flashing separates even slightly, every rainfall drives water directly into that gap and under your roof deck.
Lifting along valley flashing is another sign to watch for. If the edges of the metal strip curl upward rather than lying flat against the shingles, water running down that channel can push underneath the lip instead of flowing straight off the roof. Check valleys after high winds since that’s when uplift forces are strongest and you’re most likely to catch new separation early.
Corrosion and sealant breakdown
Rust on galvanized steel flashing signals that the zinc protective coating has worn through and the base metal is exposed. You’ll often spot this as orange or brown streaking on the flashing surface or on the shingles just below it. Corrosion tends to start at cut edges and fastener holes first, so those are the specific spots worth examining closely during your annual inspection.
Cracked, dried, or missing sealant at joints is equally serious. Butyl and urethane sealants break down over time from UV exposure and thermal movement, shrinking away from the surfaces they bonded to. Run a visual check along every joint where flashing meets a vertical surface, and press gently on any sealant bead that looks discolored or brittle. If it crumbles or separates cleanly from the substrate, it needs to be removed and replaced before the next rainy season.
Next steps to protect your roof
Now that you understand what is roof flashing and how every component works together to keep water out, the most useful next step is a professional inspection that covers your flashing specifically, not just your shingles. Most homeowners only think about flashing after they already have a leak, but catching a separation at your chimney base or a corroded vent boot before rain season saves you a significant amount of money and structural headache.
Your roof is one of the most important investments your home has, and flashing is the detail that holds the whole waterproofing system together. If you’re seeing any of the warning signs covered in this article, or you simply haven’t had your roof evaluated in a few years, the team at Sunflowers Energy LLC can walk through your entire roof system with you. Schedule a free roof inspection with Sunflowers Energy LLC and get a clear picture of where your roof stands today.

https://shorturl.fm/ay7xG
I enjoy how this post combines simple ideas with a friendly tone that keeps the overall discussion feeling natural.
Всё для дома