A water stain on your ceiling is never a welcome sight. The tricky part? The spot where water shows up inside your home is rarely where the actual problem starts. Knowing how to find a roof leak at its source, not just where it drips, is the difference between a quick fix and months of growing damage behind your walls and decking.
The good news is that most homeowners can narrow down the source of a leak with a systematic approach, some basic tools, and a little patience. You don’t always need to call in a crew right away, though some leaks do require professional help, especially when storm damage or hard-to-reach areas are involved. At Sunflowers Energy LLC, we handle roof repairs and inspections across residential and commercial properties daily, so we know exactly where leaks like to hide.
This guide walks you through each step: inspecting your attic, examining your roof’s exterior, running a water test, and deciding when it’s time to bring in a pro. Let’s pinpoint that leak before it turns into a bigger, costlier problem.
Before you start: safety and what you need
Before you climb into your attic or step onto your roof, take a few minutes to set yourself up properly. Rushing onto a wet or steep roof is one of the fastest ways to turn a leak inspection into an emergency. A little preparation keeps you safe, saves you unnecessary trips back inside for forgotten tools, and makes the whole inspection far more efficient.
Stay safe on and around your roof
Work on your roof only in dry, calm conditions. Wet shingles are slippery, and wind makes footing unpredictable. If you’re inspecting from the attic, bring a bright headlamp rather than relying on your phone flashlight, since you’ll need both hands free. Never step directly on ceiling drywall in the attic; step only on the joists to avoid falling through.
If your roof pitch is steep or you feel uncertain at any point, stop and call a professional rather than risk a fall.
What to gather before you start
Collecting your tools before you begin saves time and reduces back-and-forth trips. Here’s everything you should have ready:
- Flashlight or headlamp (hands-free is best)
- Binoculars for checking the roof from the ground safely
- Garden hose with a nozzle for the water test in a later step
- Chalk or painter’s tape to mark suspected areas
- Camera or phone to photograph everything you find
- Rubber-soled shoes with solid grip if you go on the roof
- Notepad to track stain locations, moisture, and damage
Knowing how to find a roof leak starts with being systematic, not just chasing the obvious drip point. Document every detail you spot, including stain location, discoloration on wood, and the direction water appears to travel. That record will save you time and give any roofing contractor a clear starting point without covering the same ground twice.
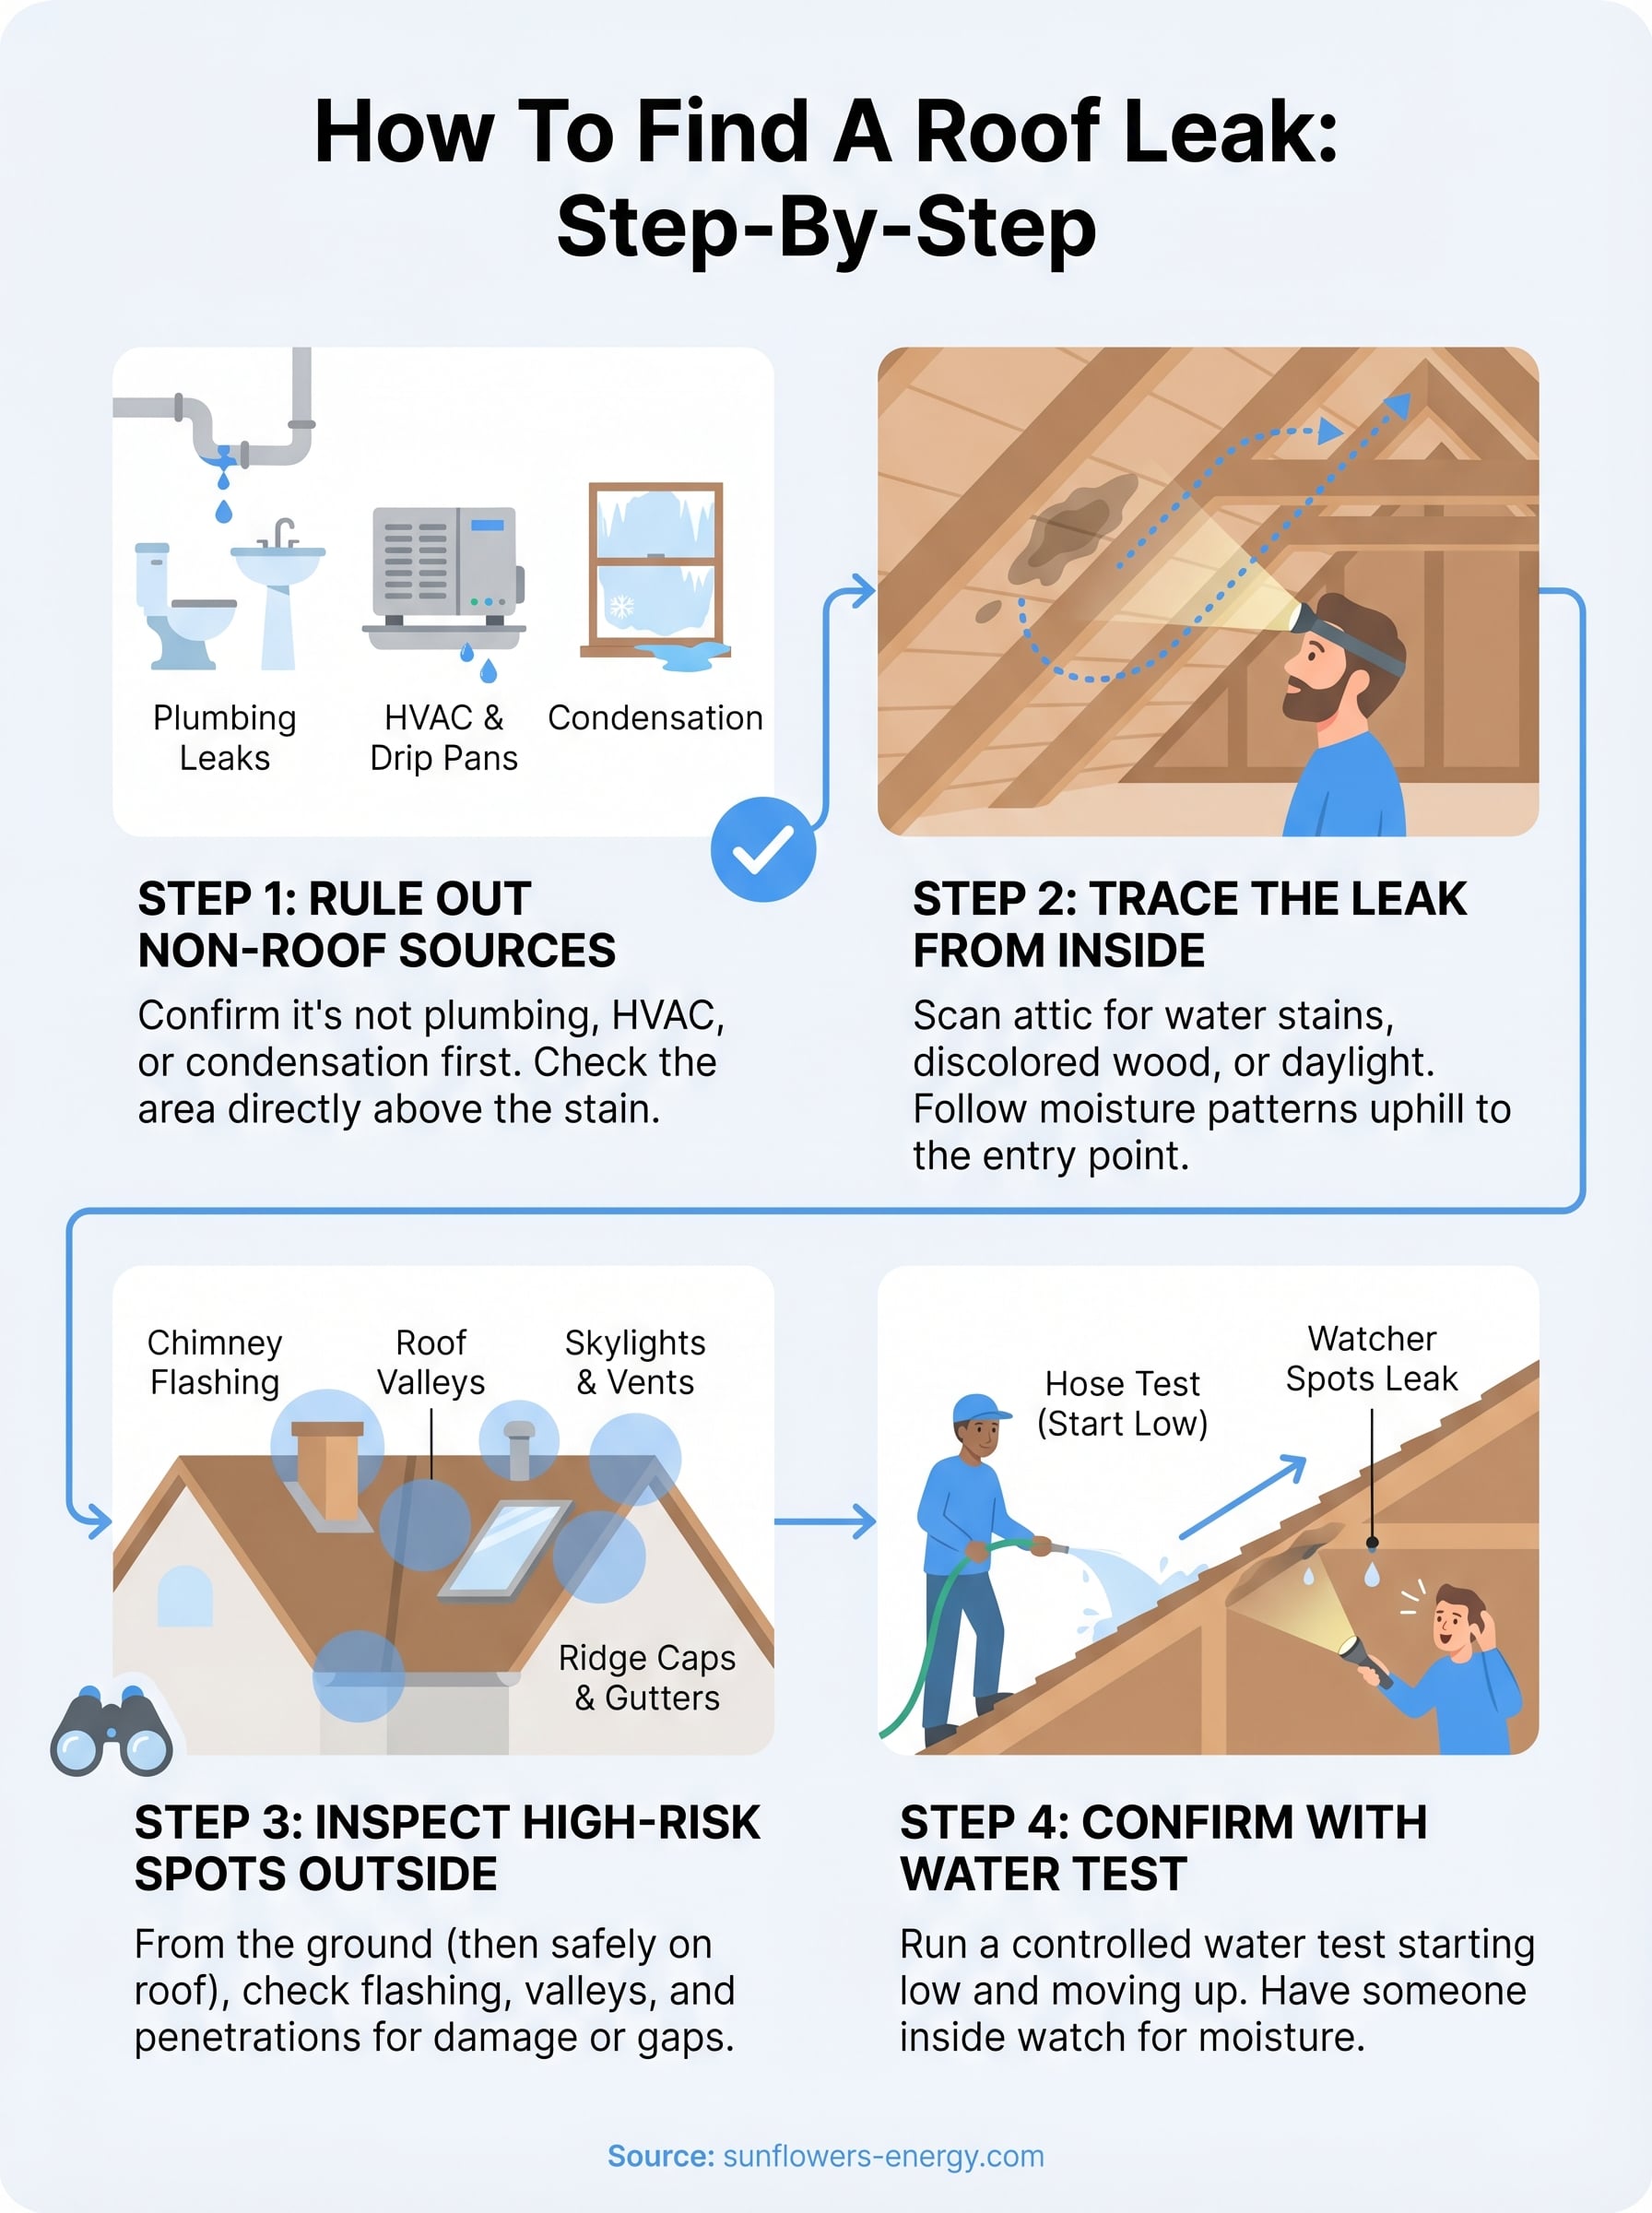
Step 1. Rule out plumbing, HVAC, and condensation
Before you head to the attic or climb on the roof, confirm the water is actually coming from the roof at all. Plumbing leaks, HVAC drip pans, and condensation can mimic roof leaks almost perfectly, and chasing the wrong source wastes hours of your time and potentially hundreds of dollars.
Check the most common non-roof culprits
Start by looking at what sits directly above the stain. If a bathroom, laundry room, or HVAC unit is overhead, test those systems first. Run water in the sink or shower for a few minutes and watch the stain for new moisture. Check your HVAC drain pan for overflow or clogs, and look for frost or condensation on cold pipes that could drip when temperatures shift.
If the stain only appears in winter or during stretches of high humidity, condensation is often the real culprit, not a roof leak.
Knowing how to find a roof leak starts with eliminating these common inside sources first. A plumbing or HVAC fix costs far less than unnecessary roofing work. Mark the exact edge of the stain with chalk or tape before you move on, so you can easily track whether it grows or stays the same size.
Step 2. Trace the leak from the inside
Once you’ve ruled out plumbing and HVAC as the source, head to your attic with your headlamp and camera. The attic is where you’ll find the clearest physical evidence of a roof leak before water ever reaches your living space. Move carefully, stepping only on joists, and scan the underside of the roof decking from one end to the other.
What to look for in the attic
Water rarely travels straight down. It follows the slope of the decking or a rafter and drips at a lower point, sometimes several feet away from the actual entry point. Look for dark water stains, soft or discolored wood, mold growth, or daylight showing through the decking. Mark each suspicious area with chalk and photograph it before moving on.
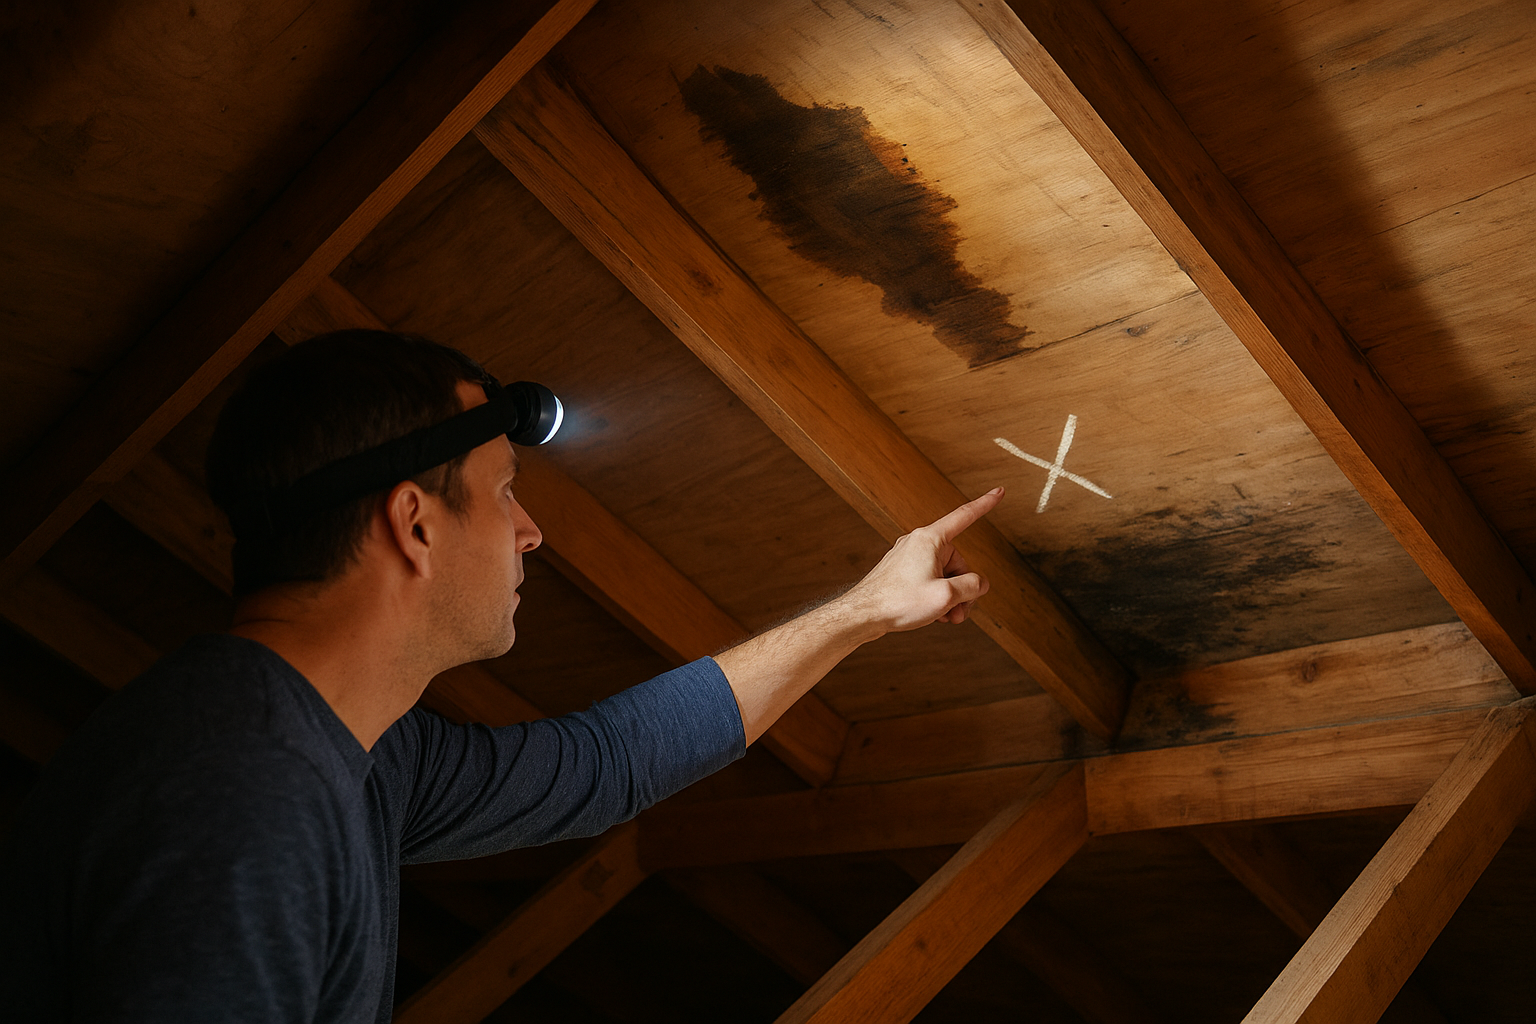
Trace any stain or wet streak uphill along the rafter toward the roof peak, since that direction leads you closer to where water actually entered.
Knowing how to find a roof leak from inside means tracking moisture patterns, not just the lowest drip point. Measure the distance from the stain to a fixed reference point like a gable wall, so you can match it to the correct spot when you inspect the exterior.
Step 3. Inspect the roof outside and common leak spots
With your attic measurements in hand, take those reference points outside and locate the corresponding area on the roof’s exterior. Start from the ground using binoculars to scan the surface before climbing up. This initial ground-level check helps you spot obvious damage like missing shingles, lifted flashing, or debris buildup in valleys without the risk of walking on areas you don’t need to touch.
Focus on the highest-risk spots first
Knowing how to find a roof leak on the exterior means concentrating on specific structural transition points rather than scanning every square foot of shingles. These are the highest-risk areas where water most reliably finds a path inside:

- Flashing around chimneys, skylights, and vent pipes
- Roof valleys where two slopes meet and channel heavy water flow
- Ridge caps at the peak of the roof
- Gutters and fascia where debris traps standing water against the edge
Pay close attention to any flashing that appears lifted, cracked, or missing sealant, since these spots account for the majority of residential roof leaks.
Once you identify a suspect area, photograph it clearly and mark the surrounding shingles with chalk so you can return to the exact location during the water test.
Step 4. Confirm the source with a controlled water test
Once you’ve identified a suspect area on the exterior, a controlled water test is the most reliable way to confirm you’ve found the actual entry point. Knowing how to find a roof leak with certainty means recreating the conditions that expose it, and a garden hose does that job effectively without waiting on the weather.
How to run the test correctly
Start low on the roof and work upward in small sections. Have a second person inside the attic watching for moisture while you run the hose. Soak each section for two to three minutes before moving higher, giving water enough time to travel through any gap and appear inside.
Keep your hose aimed at one isolated area at a time, since wetting the entire roof at once makes it nearly impossible to pinpoint the source.
Reading the results
When your inside helper spots moisture, stop moving the hose immediately and call out the location. Photograph both the exterior spot you were soaking and the interior drip point before the water dries.
If no leak appears after testing all suspect zones, recheck your attic measurements and repeat the process one section higher up the slope. A leak that resists a water test often means wind-driven rain is entering at an angle a hose cannot replicate, so flag that detail for your contractor.
Quick wrap-up
Knowing how to find a roof leak comes down to working through the problem in order: rule out plumbing and HVAC first, trace moisture patterns in the attic, inspect the high-risk spots on the exterior, and confirm your findings with a controlled water test. Each step builds on the last, so skipping ahead usually sends you in circles and costs more time than doing it right from the start.
Most leaks have a clear source once you look for it systematically. Flashing, valleys, and roof penetrations are responsible for the vast majority of residential water intrusion, so keep your focus there when you inspect outside.
If your inspection turns up significant damage, missing flashing, or a leak you can’t isolate, bring in a professional before the problem grows. The team at Sunflowers Energy LLC provides free on-site roof inspections and handles everything from minor repairs to full replacements.

One Response