Deciding to install solar panels on roof surfaces is one of the smartest investments a homeowner can make, but the actual process raises a lot of questions. What type of mounting system do you need? Is your roof even suitable? And how do the panels actually get secured up there without causing leaks or structural problems down the road?
At Sunflowers Energy LLC, we handle both roofing and solar installations, which gives us a perspective most solar-only companies simply don’t have. We see firsthand how roof condition, material type, and structural integrity directly affect whether a solar installation succeeds or fails. That dual expertise is exactly why we put this guide together, to give you a clear, honest look at what the mounting process involves from start to finish, so you can make informed decisions before any work begins.
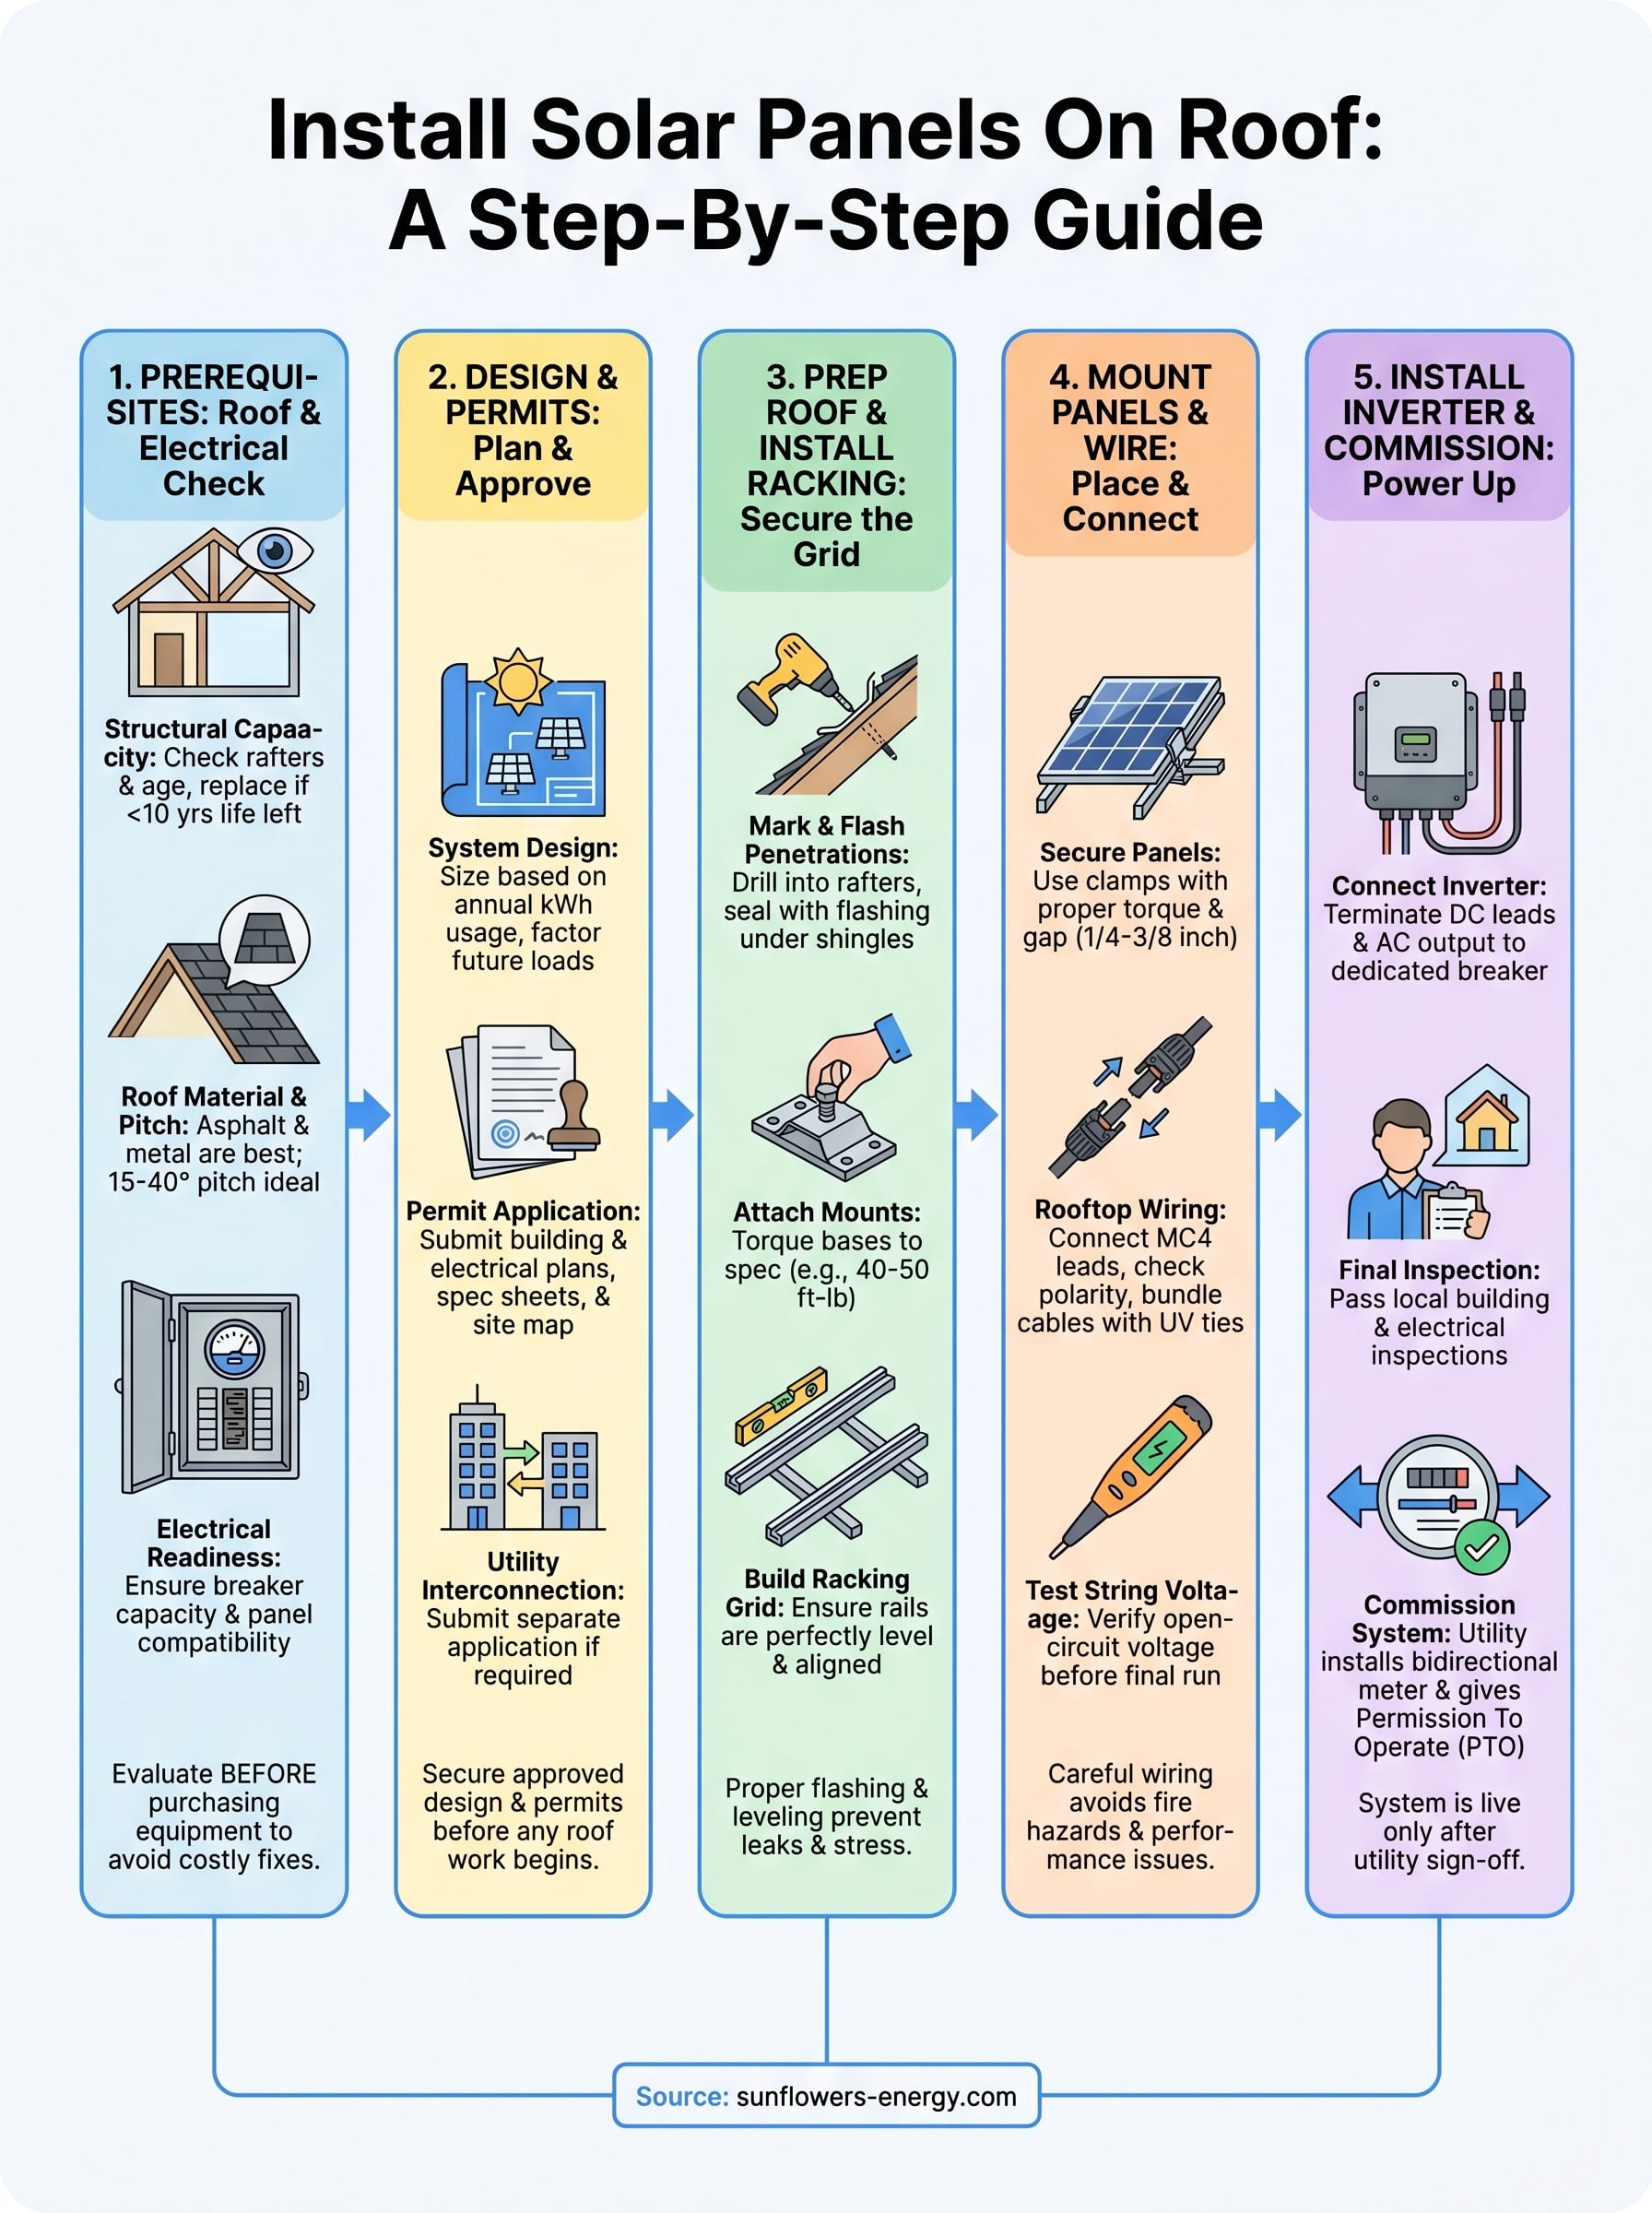
This guide walks you through each stage of a rooftop solar panel installation: evaluating your roof’s readiness, choosing the right mounting hardware, preparing the surface, securing the racking system, placing and wiring the panels, and passing final inspections. We’ll also cover common mistakes that lead to costly repairs and the key factors that determine whether your roof is a good candidate in the first place. Whether you plan to hire a professional crew or just want to understand the process before getting a quote, you’ll finish this article with a solid grasp of how rooftop solar mounting actually works.
Roof and electrical prerequisites
Before you invest a dollar in equipment, you need to confirm your roof and electrical system can actually support a solar installation. Solar panels typically add 2 to 4 pounds per square foot, and they need a surface that will last at least as long as the panels themselves, usually 25 to 30 years. Skipping this evaluation is one of the most common mistakes homeowners make, and it can force an expensive panel removal and reinstall when the roof needs replacement a few years later.
Structural capacity and roof age
Your attic framing is the first thing a qualified installer or structural engineer will examine. Standard residential rafters spaced 16 to 24 inches apart can generally handle the added load of a solar array, but older homes sometimes have undersized lumber or previous modifications that reduce load tolerance significantly. If your roof is more than 15 years old, have a roofer assess its remaining lifespan before you sign a solar contract.
If your roof has less than 10 years of useful life remaining, replace it before you install solar panels. Pulling panels off mid-system life costs more in labor than doing the roof first.
Visible signs that raise structural red flags include sagging ridge lines, soft spots when walking the surface, or areas where previous repairs were done improperly. A structural engineer can review your framing and issue a stamp of approval, which many local jurisdictions require as part of the permit application anyway.
Roof material and pitch
Asphalt shingles are the most compatible roofing material for solar mounting because standard lag bolt and flashing hardware attaches cleanly to them. Metal roofs are also excellent candidates and allow clamp-based mounting that avoids surface penetrations entirely. Materials like wood shake, slate, and clay tile require specialized hardware and significantly more labor because standard racking components are not rated for those surfaces.
Here is a quick-reference breakdown of common roof types and their mounting compatibility:
| Roof Material | Mounting Compatibility | Notes |
|---|---|---|
| Asphalt shingle | Excellent | Standard lag bolts + flashing |
| Standing seam metal | Excellent | Clamp mounts, no penetrations |
| Corrugated metal | Good | Requires seam clamps or penetrations |
| Clay/concrete tile | Moderate | Tile hooks required, higher labor cost |
| Wood shake | Poor | Fire risk, permits often denied |
| Slate | Poor | Brittle, needs specialized hardware |
Roof pitch also matters for both energy production and installer safety. Slopes between 15 and 40 degrees (roughly a 3:12 to 9:12 pitch) work well for most racking systems. Flat or very low-slope roofs need ballasted or tilted mounting frames to achieve an effective angle toward the sun, which adds cost and increases the weight load on the structure.
Electrical panel readiness
Your home’s main electrical panel needs enough available breaker capacity to handle the solar system’s output before any grid-tied installation can proceed. Most residential solar systems feed between 5 and 10 kilowatts back through the panel, and older 100-amp service panels often lack the breaker space or ampacity to accommodate that without an upgrade. A licensed electrician will evaluate your current service amperage, the number of open breaker slots, and whether your panel manufacturer appears on the approved list for solar interconnection in your area. Many utilities reject interconnection applications for panels from discontinued manufacturers, so confirming compatibility early prevents delays once you move into the permitting stage.
Step 1. Design the system and handle permits
Before anyone climbs on your roof, you need a complete system design on paper and the right permits in hand. Skipping or rushing this step causes project delays and can result in a system that underperforms or fails inspection. This is also the stage where you lock in panel count, inverter type, and racking layout, all of which affect every physical task that follows.
Size the system for your energy use
Start by pulling 12 months of electricity bills to find your average monthly kilowatt-hour consumption. Divide your annual usage by 1,200 to get a rough kilowatt estimate for a south-facing array in a mid-latitude U.S. location. For example, a household using 12,000 kWh per year needs approximately a 10 kW system before accounting for shading, roof orientation, or panel efficiency ratings.
Your installer will model this in design software using your roof’s exact dimensions, slope, azimuth, and any shading from trees or neighboring structures. The output is a production estimate that tells you how many kilowatt-hours the system will generate annually, which you compare against your consumption to confirm the design makes sense before purchasing equipment.
A system sized only for current usage leaves no room for future loads like an electric vehicle charger or a heat pump, so factor in planned additions during the design phase.
Submit your permit application
Most jurisdictions require a building permit and a separate electrical permit before you can install solar panels on roof surfaces. Your permit package typically includes a site plan showing panel placement, a structural letter from an engineer confirming your roof can handle the load, equipment spec sheets for panels and inverters, and a single-line electrical diagram.
Submit everything to your local building department and your utility simultaneously if your utility requires a separate interconnection application for net metering. Processing times vary widely, from one week in streamlined markets to eight weeks in more complex jurisdictions. Use this checklist to confirm your application packet is complete before submission:
- Completed permit application form
- Site plan with panel layout and dimensions
- Structural engineering letter (if required locally)
- Panel and inverter specification sheets
- Single-line electrical diagram
- Utility interconnection application (if separate from building permit)
Tracking each submission date keeps the project on schedule and gives you a reference point if you need to follow up with reviewers.
Step 2. Prepare the roof and install the racking
With permits approved, the physical work begins. This stage sets the foundation for the entire system, because poorly placed mounts or improper flashing are the primary cause of post-installation roof leaks. Every penetration into your roof surface must be sealed correctly, and the racking grid must be level and aligned before you can install solar panels on roof surfaces securely.
Mark and flash the penetration points
Your installer starts by snapping chalk lines across the roof to map out the exact location of each mounting point based on the approved site plan. Each point gets drilled into a rafter, not just the sheathing, because a rafter-anchored lag bolt carries the full weight of the panel and racking assembly. Using a stud finder or rafter tape from the attic confirms rafter positions before any holes are made.

Drilling into sheathing alone instead of a rafter is one of the most dangerous installation shortcuts and can cause the entire array to shift under wind load.
Once each hole is drilled, installers apply roofing-grade sealant inside the hole before inserting the lag bolt, then layer a purpose-built flashing piece over the mount base so water sheds away from the penetration. On asphalt shingle roofs, the upper edge of the flashing slides under the shingle above it, creating a weatherproof seal that does not rely on caulk alone.
Attach the mounts and build the racking grid
With all mount bases flashed and torqued to spec (typically 40 to 50 foot-pounds for standard 5/16-inch lag bolts), installers slide the rail clamps onto each base and begin running the aluminum rails horizontally across the roof. Rail spacing depends on your panel dimensions, and each rail must sit level within 1/8 inch across its entire run to prevent panel warping or racking stress over time.
Follow this sequence to keep the racking installation organized and accurate:
- Confirm all mount bases are level individually before attaching rails
- Snap a horizontal reference line across the row of mounts
- Attach rail splices where two sections meet, offsetting each splice from the mount below it
- Tighten all rail clamps to the manufacturer’s specified torque
- Run a full level check along each rail before moving to the next row
Completing these checks row by row prevents small alignment errors from compounding as the grid grows across the roof surface.
Step 3. Mount panels and complete rooftop wiring
With the racking grid level, verified, and torqued, you can finally place the solar panels on the rails and begin securing them. This is the most visible part of the installation, but the wiring work that follows is equally important. Sloppy connections or poorly routed cables at this stage create fire hazards and reduce system output over time.
Secure panels to the racking rails
Each solar panel attaches to the rails using mid-clamps between adjacent panels and end-clamps at the outer edges of each row. Before you tighten any clamp, slide the panel into its approximate position and confirm it aligns with the row beside it. A uniform gap of 1/4 to 3/8 inch between adjacent panels allows for thermal expansion without placing stress on the frame corners. Once the position is confirmed, torque all clamps to the manufacturer’s specification, which is typically 12 to 15 foot-pounds for standard aluminum hardware.
Never over-torque clamps on the panel frame. Cracking the anodized aluminum edge compromises the frame seal and voids most panel warranties.
Work across each row from one end to the other rather than jumping between rows. This approach keeps panel alignment consistent and prevents you from disturbing already-secured panels when you install solar panels on roof sections near the edges.
Run and connect the rooftop wiring
Solar panels ship with pre-attached MC4 connector leads on both positive and negative terminals. Your job at this stage is to route those leads through the racking rails and connect them according to the series or parallel string configuration specified in your approved design drawings. Use the following sequence to keep the wiring phase organized:
- Feed each panel’s positive and negative leads toward the designated home run conduit location
- Bundle cables with UV-rated zip ties at every rail crossing point to prevent wind-induced chafing
- Connect panels in each string using MC4 male-to-female pairings, confirming polarity matches before each connection snaps closed
- Cap any unused MC4 connectors with weatherproof MC4 caps to prevent moisture ingress
- Label each string lead clearly at the conduit entry point with the string number and polarity
Once all string wiring is complete, use a non-contact voltage tester to confirm each string is producing open-circuit voltage before running leads down to the inverter location.
Step 4. Install inverter connections and commission
With all string leads labeled and routed down from the roof, you’re now ready to connect the array to the inverter and bring the system to life. This step bridges the DC power your panels generate with the AC power your home uses, and it also includes the final inspection and utility sign-off that legally authorizes you to run the system. Rushing through these connections is not an option; incorrect polarity or loose terminals at the inverter can damage equipment and create serious safety hazards.
Treat the string leads as live circuits from the moment panels are exposed to sunlight. Always cover the panels with an opaque tarp before touching the DC input terminals on the inverter.
Connect the string leads to the inverter
Your labeled string leads enter the inverter through a dedicated DC input conduit, usually running from a rooftop junction box down the exterior wall to the inverter mounting location. Each inverter brand has a slightly different terminal block layout, so pull up the manufacturer’s wiring diagram before you touch any conductors. Strip each lead to the specified length, typically 8 to 10 millimeters of bare conductor, then insert each wire into its corresponding terminal and tighten to the torque value printed in the manual. Use the following checklist to confirm the DC side is wired correctly before you flip any disconnect:
- Verify positive and negative polarity on each string input using a multimeter
- Confirm all terminal screws are torqued to manufacturer spec
- Check that the DC disconnect switch is in the OFF position
- Secure all conduit fittings and weatherproof any exterior junction boxes
- Confirm string open-circuit voltage matches your design calculations
Once the DC side checks out, connect the AC output wiring from the inverter to the dedicated breaker you added in your main panel during the electrical rough-in phase.
Commission the system and pass inspection
Your local inspector will visit to verify that everything from the racking torque marks to the electrical connections matches the approved permit drawings. Have your installation manual, torque wrench records, and as-built site plan ready on-site. After the inspector signs off, you submit the final documents to your utility to activate net metering. The utility then installs a bidirectional meter and provides written permission to operate, which is the last official step before you install solar panels on roof surfaces and start generating real savings.
Next steps
You now have a complete picture of what it takes to install solar panels on roof surfaces correctly, from verifying structural capacity and securing permits to torquing racking hardware and commissioning the inverter. Every step in this process depends on the one before it, which means cutting corners early creates problems that compound throughout the entire project. The difference between a system that performs for 30 years and one that develops leaks or wiring faults within five years often comes down to how carefully each phase was executed.
Your best next move is to get a professional assessment of your roof and electrical system before you commit to any equipment purchases. At Sunflowers Energy LLC, we combine roofing and solar expertise under one roof, so we evaluate both systems together and catch compatibility issues before they become costly problems. Schedule your free on-site inspection and estimate today and get a clear, honest picture of what your specific home actually needs.

https://shorturl.fm/Gln75
https://shorturl.fm/3HnVQ