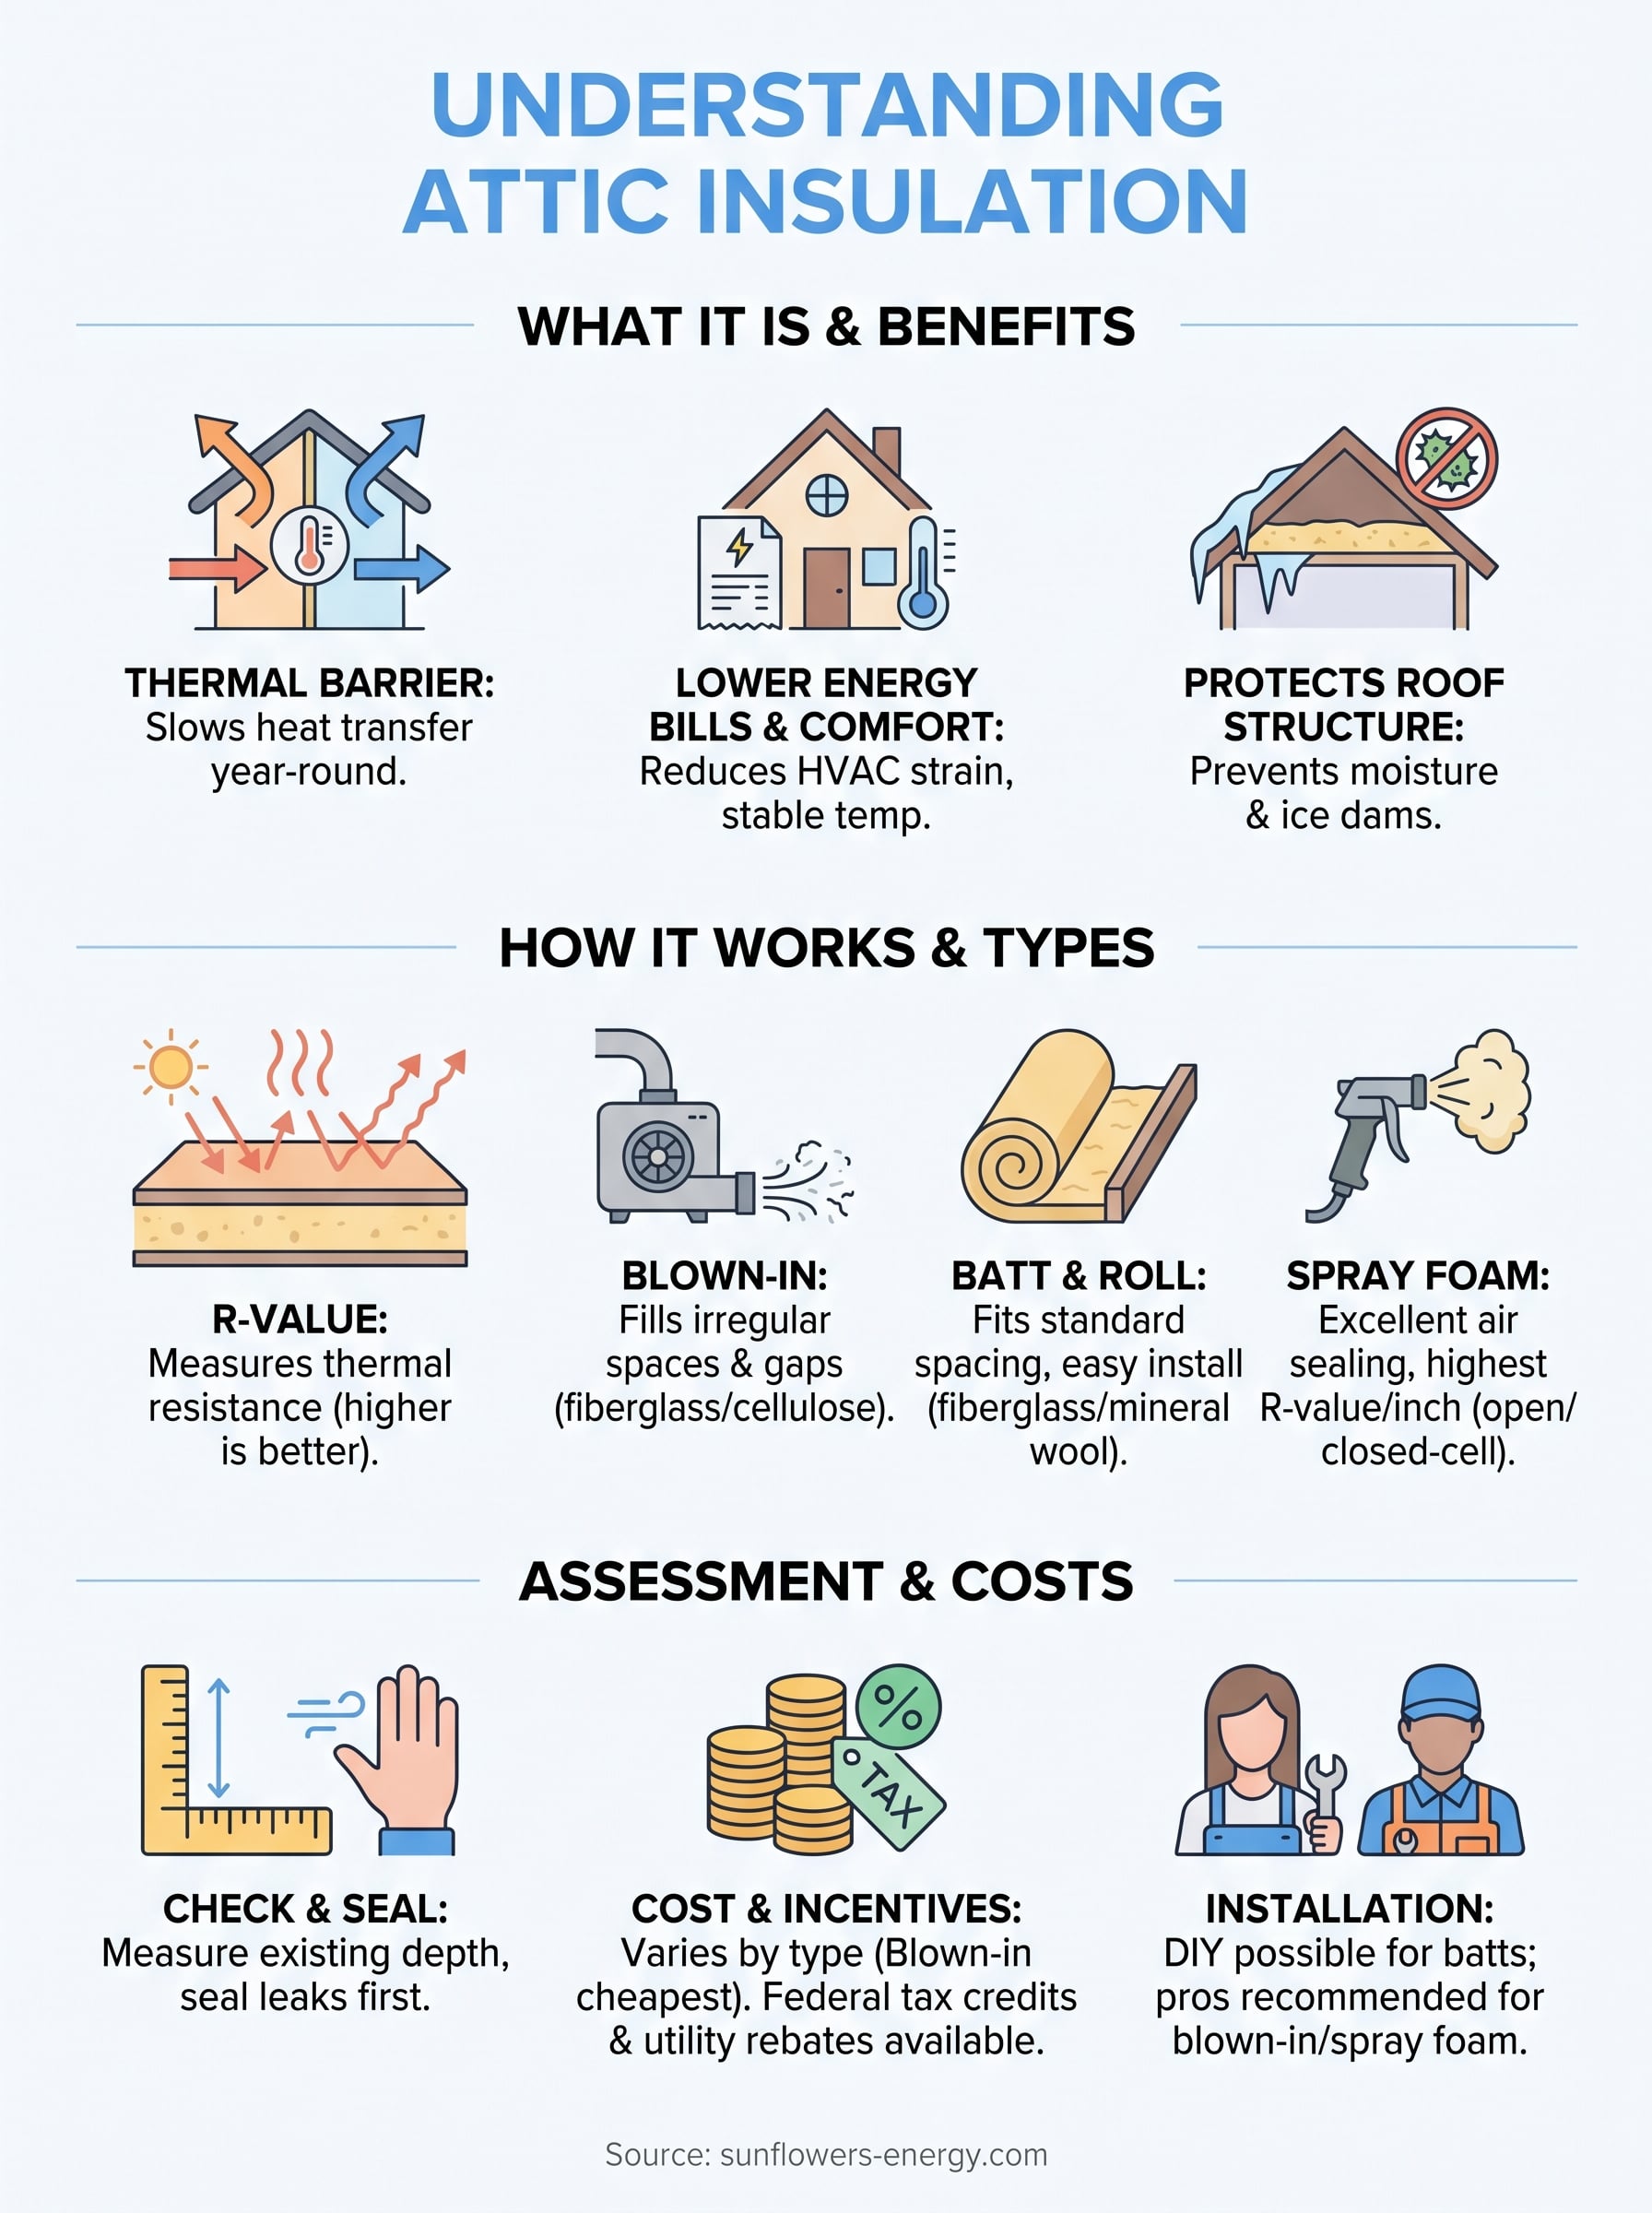
Your roof does more than keep rain out, it’s the first line of defense against heat loss and energy waste. But the roof alone isn’t enough. Right beneath it, your attic plays a critical role in how comfortable and energy-efficient your home actually is. So what is attic insulation, and why should every homeowner care about it? It’s a thermal barrier installed in your attic space that slows the transfer of heat between your living areas and the outside air.
Without adequate insulation, heated air escapes through your attic in winter and hot air floods in during summer. The result? Your HVAC system works overtime, and your energy bills climb month after month. Proper attic insulation directly reduces that strain, keeping your home at a stable, comfortable temperature year-round while protecting the structure beneath your roof from moisture problems and premature wear.
At Sunflowers Energy LLC, we see the effects of poor attic insulation every time we’re up on a roof. As a roofing and solar energy company, we know that a well-insulated attic works hand-in-hand with a solid roof and an efficient solar panel system to maximize your home’s performance. This article covers the different types of attic insulation, their R-values, costs, and the real-world benefits of getting it right, so you can make an informed decision before your next upgrade.
Why attic insulation matters for comfort and roof health
Your attic sits between your living space and the outside world, and without a solid thermal barrier in place, that gap works against you every season. Heat naturally moves toward cooler areas, which means in winter, warmth from inside your home rises and escapes through the attic floor and roof deck. In summer, the process reverses and radiant heat from your hot roof can drive attic temperatures above 130°F, pushing that heat down into your living areas. The result is a home that costs more to heat and cool, and a roof structure that takes a beating from the inside.
How heat movement damages your home’s structure
When hot, humid air from your living spaces meets the cold underside of your roof deck in winter, moisture condenses on wood framing and sheathing. Over time, this repeated cycle leads to mold growth, wood rot, and structural weakening that shortens the life of your roof significantly. A well-insulated and properly ventilated attic keeps temperature differentials in check so moisture never gets the chance to build up where it can cause real damage.
The same thermal protection that keeps you comfortable also keeps your roof in better shape year after year. If a roofing contractor has ever pointed out soft spots or darkened sheathing during an inspection, poor attic insulation was likely part of the cause. Protecting your roof deck from moisture intrusion on the inside is just as important as maintaining the shingles on the outside.
A damaged roof deck from moisture buildup can add thousands of dollars to what would otherwise be a straightforward roof replacement.
What ice dams tell you about your insulation
In cold climates, ice dams form when heat escaping through a poorly insulated attic warms the roof deck, causing snow near the peak to melt and then refreeze at the colder eaves. This ice buildup forces water under your shingles, leading to leaks, interior water damage, and damaged gutters and fascia boards. The fix isn’t more caulk or better gutters. It’s keeping your attic cold enough in winter so the roof deck stays at a uniform temperature from peak to eave.
Ice dams are a visible warning sign that something is wrong with your attic’s thermal performance. Once you understand what is attic insulation designed to do, the connection becomes clear: it separates your warm living space from the cold roof surface so heat can’t sneak up and create uneven melting patterns across your roof.
Energy costs and HVAC load
Your heating and cooling system bears the cost when your attic isn’t doing its job. An under-insulated attic forces your HVAC system to run longer cycles to maintain your set temperature, which increases wear on the equipment and drives up your monthly utility bills. According to the U.S. Department of Energy, properly insulating your attic can reduce heating and cooling costs by up to 20% for many homes.
That kind of savings adds up quickly, especially when you consider that HVAC already accounts for a large share of household energy use. Upgrading your attic insulation is one of the most direct ways to cut that energy load without replacing any mechanical equipment, making it a high-return improvement for most homeowners.
How attic insulation works and what R-value means
Attic insulation works by slowing three types of heat transfer: conduction (heat moving through solid materials like your ceiling joists and roof deck), convection (warm air rising and circulating through gaps and openings), and radiation (heat radiating from a hot surface into the space below). When you understand what is attic insulation designed to resist, it becomes clear that the material itself generates no temperature change – it simply reduces the speed at which heat crosses from one side of your attic to the other. The thicker and denser the insulation, the slower that heat transfer happens, and the less work your HVAC system needs to do.
How heat transfer actually works in your attic
In summer, your roof deck can reach extreme surface temperatures, and without a proper barrier, radiant and conducted heat pushes straight down into your living space. In winter, the same physics work in reverse – warm air rises from your heated rooms, hits the attic floor, and leaks upward through any available path. Every gap, thin spot, or section of compressed insulation creates a path of least resistance where heat moves freely. Sealing and filling those paths consistently across your entire attic floor is exactly what effective insulation is built to do.
What R-value measures and why it matters to you
R-value is the standardized measurement of thermal resistance assigned to any insulation material. A higher R-value means the material resists heat flow more effectively. The number is calculated based on the material’s thickness, density, and composition, so two products that look similar on a shelf can perform very differently once installed. When you see a product rated R-38, that number tells you its specific resistance so you can compare it directly against other materials and verify it meets the requirements for your climate zone.
The U.S. Department of Energy recommends R-38 to R-60 for attic insulation in most climate zones across the United States.
The U.S. Department of Energy’s insulation guide breaks down recommended R-values by ZIP code and climate zone, giving you a precise target based on where you live. A home in Minnesota requires far more thermal resistance than one in Florida because the temperature gap between your conditioned interior and the outside air is significantly larger. Matching your insulation’s R-value to your specific climate zone is the most important decision you make before purchasing or installing any insulation material.
Types of attic insulation and where each fits
Not all insulation materials perform the same way or suit every attic layout. Choosing the right type depends on your attic’s existing structure, the R-value you need to reach, and whether you’re adding to existing insulation or starting from scratch. Understanding what is attic insulation in practice means recognizing that each material has specific strengths that make it better suited to certain situations than others.
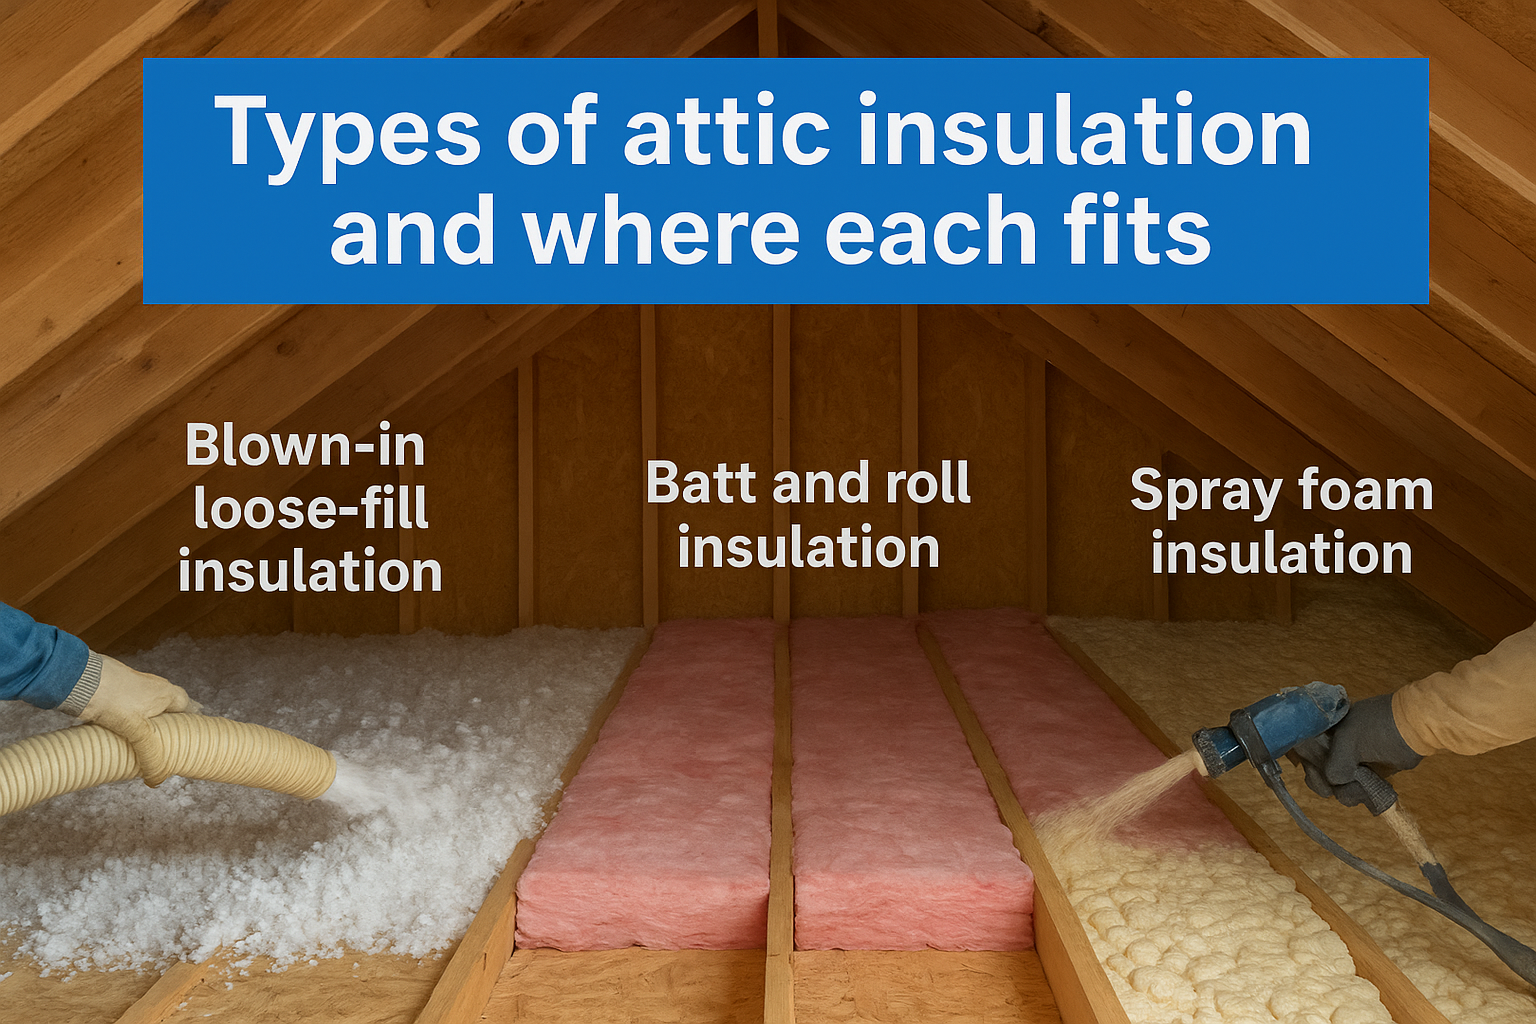
Blown-in loose-fill insulation
Blown-in insulation, available in both fiberglass and cellulose formulations, is installed using a machine that blows small fiber particles into your attic space. This method fills irregular joist cavities, gaps around framing, and hard-to-reach corners far more thoroughly than any material you place by hand. Cellulose, made from recycled paper treated with fire retardant, suits homeowners focused on sustainability and effective air sealing, while fiberglass loose-fill resists moisture absorption slightly better. Both work well for topping up existing insulation without major disruption.
Blown-in cellulose typically achieves a higher density fill than fiberglass loose-fill, which reduces air movement through the insulation layer itself.
Key situations where blown-in fits best:
- Attics with existing insulation that needs a boost
- Spaces with irregular or non-standard joist spacing
- Areas with numerous obstructions like pipes, ducts, or cross-bracing
Batt and roll insulation
Fiberglass batts are the most widely recognized type, and you’ve likely spotted the pink or yellow rolls at any home improvement store. They fit between standard-spaced attic joists and deliver consistent coverage in attics with clean, unobstructed framing and no existing insulation underneath. Installation is straightforward, making batts a practical choice for accessible attics with predictable layouts.
Mineral wool batts offer better fire resistance and a slightly higher R-value per inch than standard fiberglass. If you want stronger thermal performance without committing to a blown-in installation, mineral wool is worth the added cost per roll.
Spray foam insulation
Spray foam divides into two categories: open-cell and closed-cell. Open-cell foam is lighter, expands significantly after application, and works well for sealing gaps around joists, rafters, and any penetrations where air movement is the main concern. Closed-cell foam delivers the highest R-value per inch of any common attic insulation type and also acts as a vapor barrier, making it a strong fit for attics with moisture issues or limited space for thick layers.
The trade-off is cost, since spray foam runs considerably higher per square foot than blown-in or batt options, so most homeowners reserve it for targeted air sealing rather than covering an entire attic floor.
How to know what your attic needs
Before you buy a single bag of insulation, you need an accurate picture of your attic’s current condition. Two key factors determine what your attic needs: how much insulation is already in place, and whether air leaks are undermining your thermal barrier before the insulation can even do its job. Skipping this assessment leads to money spent on materials that underperform because the underlying problem was never addressed.
Fixing air leaks before adding insulation is one of the most important steps homeowners skip, and it’s the reason many upgrades fall short of expected savings.
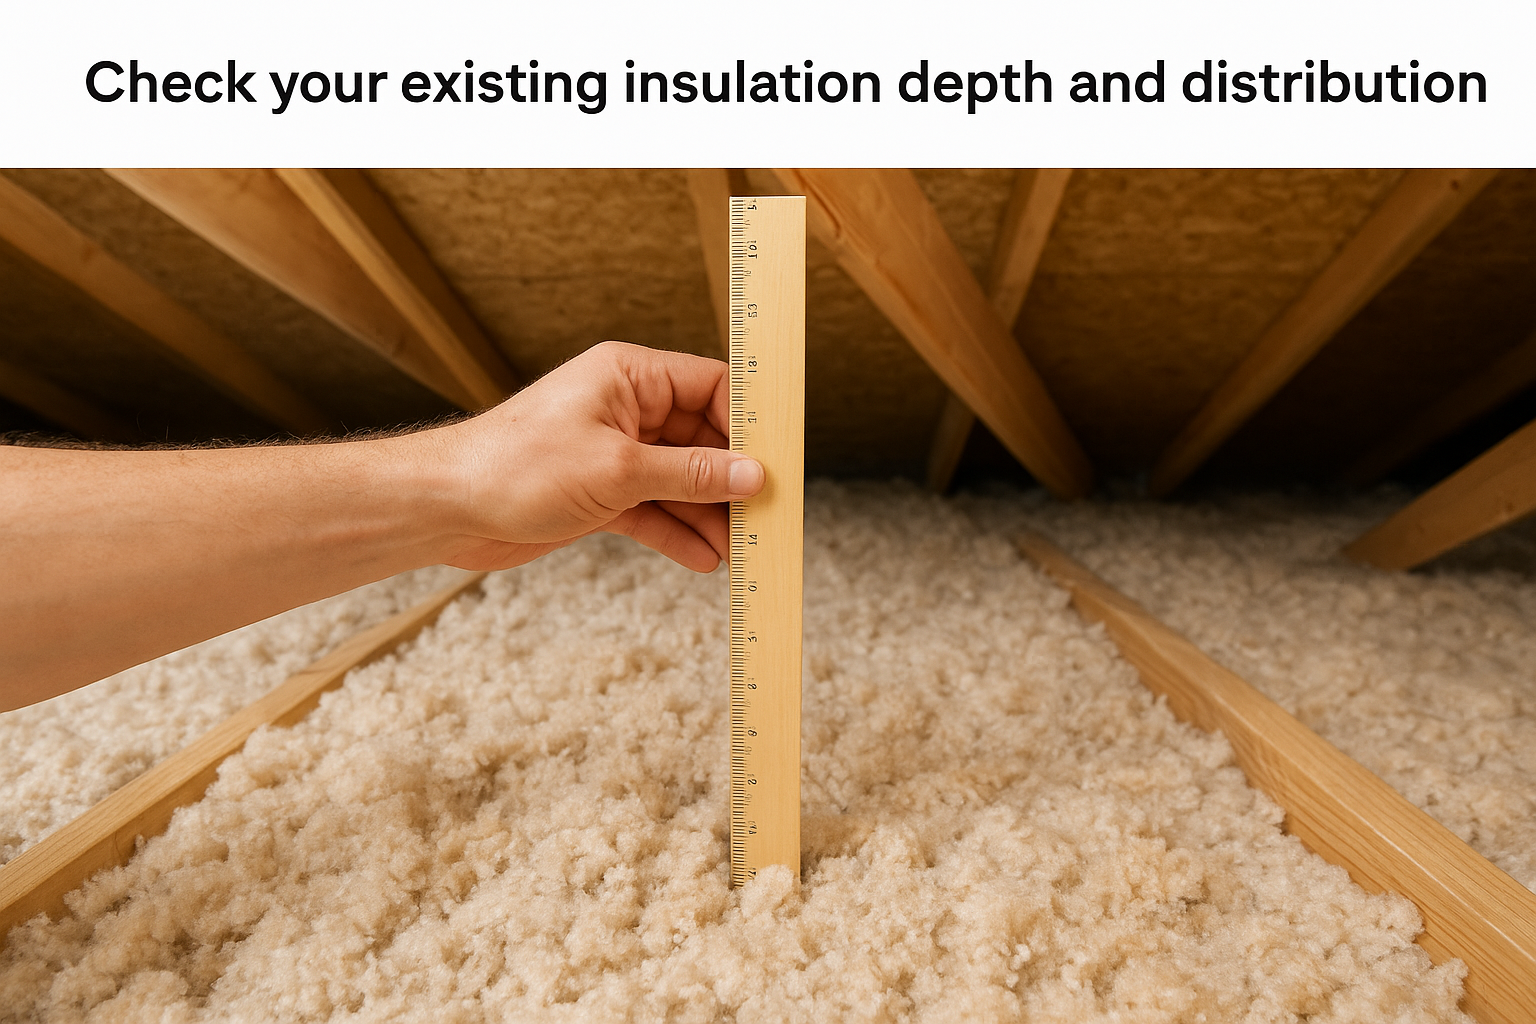
Check your existing insulation depth and distribution
Start by measuring what’s already in your attic. Grab a ruler and press it straight down to the attic floor at several points across the space, including near the eaves, the center, and around any penetrations. Fiberglass batts at 10 inches deep reach roughly R-30, while blown-in cellulose at the same depth hits closer to R-36. Uneven distribution matters just as much as average depth, so note any areas where insulation has shifted, compressed, or thinned out near edges and corners.
Check for these conditions as you measure:
- Insulation sitting below the tops of your floor joists, a reliable visual sign you’re under-insulated
- Compressed or matted batts that have lost their loft and dropped in R-value
- Wet or discolored insulation that signals past or ongoing moisture intrusion
Find and seal air leaks first
Understanding what is attic insulation actually designed to resist helps explain why air sealing comes first. Insulation slows conductive heat transfer, but it cannot stop air moving freely through gaps around recessed lights, plumbing penetrations, top plates, and pull-down stair openings. On a cold morning, run your hand along the attic floor near common penetration points and feel for noticeable air movement or temperature differences. Those spots need caulk, spray foam, or rigid foam blocking before you add any new insulation layer on top.
Once you’ve sealed the leaks, compare your measured R-value against the U.S. Department of Energy’s recommended levels for your climate zone. That gap between what you currently have and what you actually need is exactly what your insulation upgrade should close.
Cost, incentives, and DIY vs pro install
Once you know what your attic needs, the next question is what it will cost and who should do the work. Attic insulation is one of the highest-return home improvements you can make, but the right budget and installation approach depend on your attic’s size, existing conditions, and the type of material you choose. Understanding what is attic insulation going to cost before you start helps you plan realistically and take advantage of available financial programs.
What attic insulation typically costs
Material and labor costs vary by insulation type, but most homeowners pay between $1,500 and $3,500 for a full attic insulation job on a standard single-family home. Blown-in insulation runs cheaper on labor since installation is fast, while spray foam carries a higher per-square-foot cost due to the materials and equipment involved. Batt insulation sits in the middle on cost but requires more hands-on labor for thorough installation.
Here’s a general cost range by type:
| Insulation Type | Estimated Cost (Installed) |
|---|---|
| Blown-in fiberglass or cellulose | $0.80 – $1.80 per sq ft |
| Fiberglass batts | $1.00 – $2.00 per sq ft |
| Spray foam (closed-cell) | $2.00 – $4.50 per sq ft |
Tax credits and utility rebates
Federal tax credits can reduce your out-of-pocket cost significantly. Through the Inflation Reduction Act, homeowners can claim a tax credit of up to 30% of the cost of qualifying insulation materials, with an annual cap of $1,200. You can review current eligibility details directly through the IRS Energy Efficient Home Improvement Credit. Many state and local utility companies also offer rebates on top of federal credits, so check with your utility provider before scheduling installation.
Combining a federal tax credit with a utility rebate can cut your total insulation cost by a meaningful amount, making the upgrade far easier to justify.
DIY vs professional installation
Batts in an open, accessible attic are the most realistic DIY option for a homeowner with basic tools and a free weekend. Blown-in insulation requires renting a blower machine and working with a helper, which raises the complexity. Spray foam is never a DIY job since the chemicals require protective equipment and professional-grade application to cure correctly. If your attic has air sealing work, moisture issues, or hard-to-reach areas, a professional installation pays for itself in the quality of the finished result.
A simple plan to upgrade your attic
Now that you understand what is attic insulation and how it protects your home, the path forward is clear. Start by measuring your current insulation depth at multiple points across your attic floor and compare those numbers against your climate zone’s recommended R-value. Then seal any air leaks around penetrations, recessed lights, and top plates before you add any new material on top. Choosing the right insulation type, whether blown-in, batts, or spray foam, depends on your attic layout and the specific R-value gap you need to close.
Your roof and attic work together as a system, and getting both right protects your home while cutting energy costs for years ahead. At Sunflowers Energy LLC, we pair roofing expertise with energy efficiency knowledge to help you get the most out of every improvement you make. Schedule a free on-site inspection and find out exactly what your attic needs to perform well year-round.
