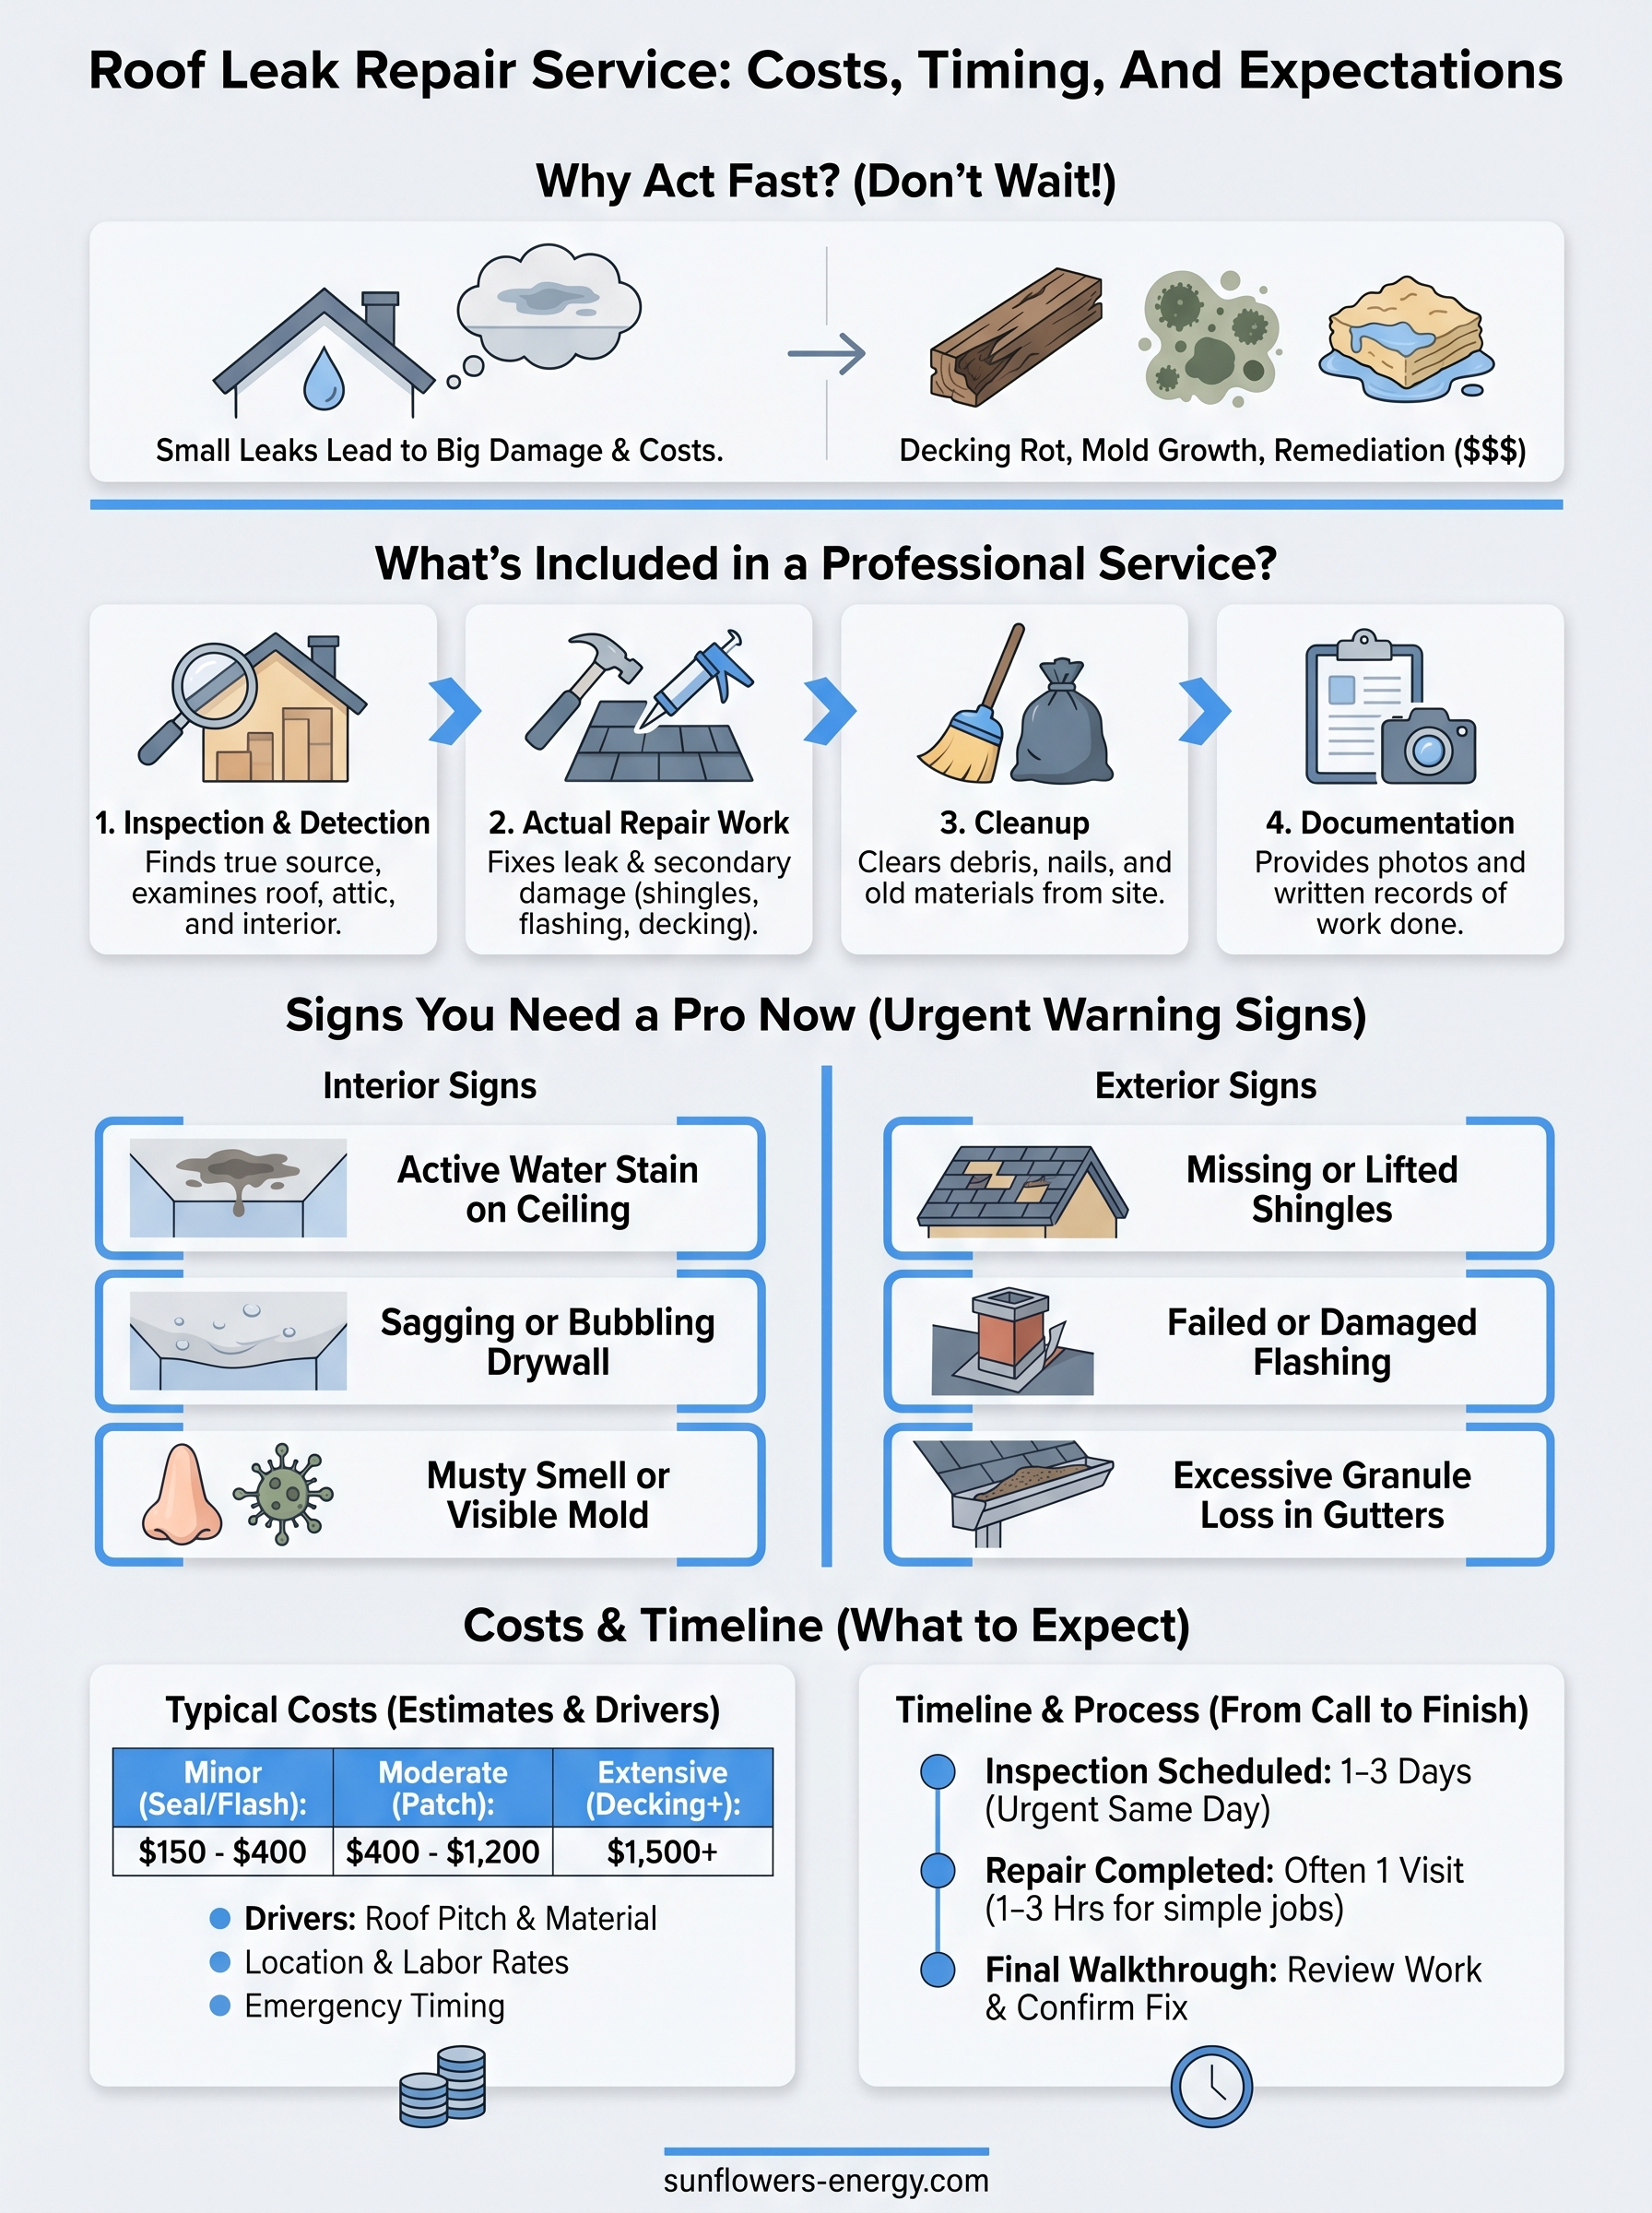
A water stain spreading across your ceiling or a drip hitting the floor during a rainstorm isn’t just annoying, it’s your roof telling you something is wrong. Left alone, even a small leak can rot decking, destroy insulation, and invite mold growth that costs thousands to remediate. Finding a reliable roof leak repair service starts with understanding what the job actually involves, how much you should expect to pay, and when it makes sense to call a professional versus attempting a temporary fix yourself.
At Sunflowers Energy LLC, we handle roof leak repairs for homeowners and business owners across our service area every week. We’ve seen leaks caused by everything from missing shingles after a storm to failed flashing around chimneys that went unnoticed for years. That hands-on experience shapes the advice in this article, it’s based on what we actually encounter on rooftops, not generic guesswork.
This guide breaks down the real costs of roof leak repair, explains how timing affects both damage and price, and walks you through what happens from the moment you schedule an inspection to the final walkthrough. Whether you’re dealing with active water intrusion right now or spotted early warning signs you want to address before they escalate, you’ll leave with a clear picture of your options. We also cover when a repair is enough and when a full replacement makes more financial sense, so you can make a confident decision about your next step.
What a roof leak repair service includes
A roof leak repair service covers more than just patching a visible hole. From the moment a contractor arrives, they’re working through a systematic process that starts with finding the true source of the water intrusion and ends with confirming the repair held under real conditions. Most homeowners only see the damage inside their home, but the actual work happens on the roof surface, inside the attic, and around every penetration point that water might exploit. Knowing what’s included helps you evaluate quotes accurately and hold your contractor accountable at every stage.
Inspection and leak detection
The first step in any professional repair is a thorough inspection, and this phase takes longer than most people expect. A technician will examine your roof surface, attic space, and interior ceiling to build a complete picture of where water entered and how far it traveled before you noticed it. Water rarely drips straight down; it follows rafters, runs along insulation, and pools in spots that have nothing to do with the visible stain on your ceiling. Finding where the damage actually started requires working backward from what you can see.
A proper leak inspection looks at the roof, the attic, and the interior damage together because the stain on your ceiling is almost never directly below the entry point.
A thorough inspector will also check flashing around chimneys, skylights, vents, and roof valleys, since these transition points are where the majority of leaks originate. They will probe any soft or spongy decking they find and document the full extent of moisture damage before a single shingle gets lifted. Skipping this step is a sign that a contractor is rushing, and rushing on a leak almost guarantees a callback.
The actual repair work
Once the source is confirmed, your contractor moves into the repair itself. The scope depends entirely on what caused the leak in the first place. Common repairs include replacing cracked or missing shingles, reseating or resealing flashing, patching damaged decking, and clearing blocked drainage points that were forcing water under the roofing material. Each task requires different materials and different amounts of labor, which is a major reason why quotes vary so much from one job to the next.
Your contractor should also address any secondary damage uncovered during the inspection, not just the obvious entry point. Ignoring secondary damage saves money upfront but almost always leads to another service call within a few months, at a higher cost than addressing it the first time around.
Cleanup and documentation
After the repair is finished, a professional crew will clear the work area of debris, old shingles, and discarded materials. Leftover nails, roofing granules, and torn underlayment in your gutters or landscaping can cause real problems if they’re left behind, so this step matters more than it sounds. Your crew should also walk you through exactly what was done and why, in plain language.
Always request written documentation of every repair performed, including photos taken before and after the work. This record protects you if a warranty issue comes up later and gives your insurance carrier what it needs if storm damage was involved. Contractors who provide this automatically are typically the ones who stand behind their work long after they leave your property.
Signs you need a pro right now
Some roof problems give you weeks to schedule a repair. Others need a call today. Knowing the difference between a minor issue you can monitor and a situation that requires a professional roof leak repair service immediately protects your home from damage that compounds quickly and silently.
Waiting even a few days on an active leak can turn a $400 repair into a $4,000 remediation project involving decking, insulation, and mold removal.
Damage you can see from inside your home
Interior signs are often what homeowners notice first, and several of them indicate that water has already been moving through your structure longer than you realize. A water stain on your ceiling is the most common signal, but the color and shape tell you more than just the fact that something is wrong. A dark, spreading ring means active moisture is still moving. A dry but discolored patch means the leak paused, not stopped. Sagging or bubbling drywall is a more urgent warning because it means water has already collected and the structural material is compromised.
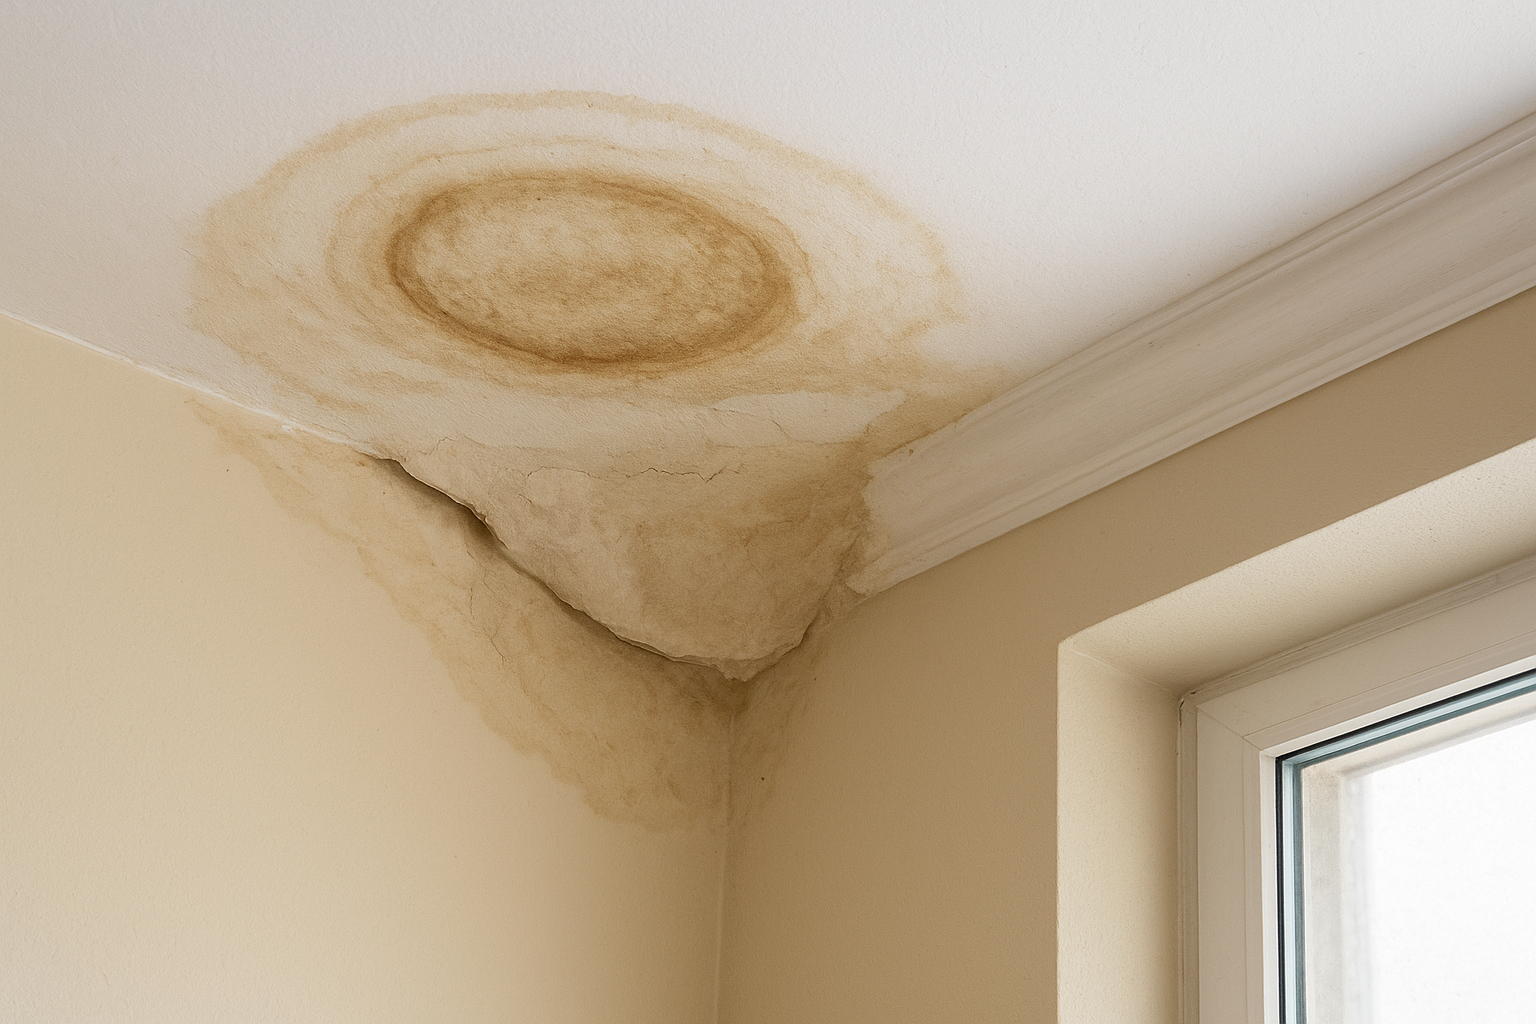
Mold or a persistent musty smell in your attic or upper rooms is another signal that water intrusion has been happening long enough to create a biological hazard. At that point, you need a professional assessment to understand both the roofing repair scope and any remediation work before more of your home is affected.
Roof-level warning signs you should not ignore
You do not need to climb onto your roof to spot these problems. Many are visible from the ground or through a quick attic check with a flashlight, and each one signals that water has or soon will find a path into your home:
- Missing or visibly lifted shingles after a storm
- Cracked, curling, or blistering shingles across a roof section
- Flashing that has pulled away from a chimney, vent, or roof edge
- Visible daylight coming through the attic rafters when you look up
- Excessive granule loss collecting in your gutters after rain
Any single item on that list warrants a same-week inspection. Two or more means you should treat it as urgent and avoid postponing the call, because the damage spreading behind your walls is not waiting for a convenient time on your calendar.
How pros find the source and stop the leak
Pinpointing a roof leak is harder than it sounds. Water travels along the path of least resistance, which means the visible damage inside your home can be several feet away from where water actually entered the roof. A professional roof leak repair service uses a combination of physical inspection techniques and years of pattern recognition to trace that path backward and find the true entry point before touching a single shingle.
Detection methods pros use
Your contractor will start by examining the most common failure points first, because experience tells them where leaks almost always begin. Flashing around chimneys, skylights, and plumbing vents accounts for the majority of residential leaks. After checking those areas, they move to the roof surface itself, looking for lifted, cracked, or missing shingles that could be funneling water underneath the underlayment. When the entry point is not obvious from the surface, some contractors use a controlled water test, where a second technician inside the attic watches for drips while water is applied in sections across the roof above.

Experienced contractors do not start pulling up materials until they know exactly where the problem is, because unnecessary tear-up adds cost without solving anything.
Attic inspections are a critical part of this phase. Your contractor will look for daylight, staining on rafters, wet or compressed insulation, and any sign that moisture has been sitting in the space for longer than one event. These clues help determine both the source and the duration of the intrusion, which matters when estimating how much secondary damage needs to be addressed alongside the primary repair.
How the repair gets done
Once the source is confirmed, the repair follows a clear sequence. The damaged or failed material gets removed, the decking beneath it gets checked for rot or soft spots, and new material goes in with proper overlap and sealing. Flashing repairs involve removing the old metal, cleaning the contact surface, and installing new flashing with roofing cement or mechanically fastened to the structure depending on the location. Your contractor should verify water cannot find an alternate path around the repair, which means checking the surrounding area rather than stopping the moment the obvious problem is fixed.
Roof leak repair costs and what affects them
Most homeowners calling a roof leak repair service for the first time have no idea what to expect on the invoice. Repair costs in the US range widely depending on the size of the problem, your roof type, and how long the leak went undetected before you made the call. Understanding the main cost drivers helps you evaluate quotes honestly and avoid overpaying for simple work or underpaying for a fix that will not last.
What typical repairs cost
Minor repairs, like reseating a few shingles or resealing flashing around a vent, typically run between $150 and $400. Moderate repairs involving decking replacement, chimney flashing, or a small section of underlayment generally land between $400 and $1,200. Once water has been sitting long enough to compromise a larger roof section or multiple failure points, costs can climb to $1,500 or more before any remediation work is factored in.
Catching a leak early is almost always the cheapest outcome. A $300 flashing repair left unaddressed for one season can easily turn into a $2,000 project once decking and insulation are involved.
Here is a general breakdown to help you calibrate expectations before you request a quote:
| Repair Type | Typical Cost Range |
|---|---|
| Flashing repair or reseal | $150 – $400 |
| Shingle replacement (small area) | $200 – $600 |
| Decking patch or replacement | $500 – $1,200 |
| Valley or underlayment repair | $400 – $1,000 |
| Full leak investigation and repair | $300 – $1,500+ |
What drives the price up or down
Your roof’s pitch and material affect labor costs directly. Steep roofs take longer to work on safely, and tile or metal roofing requires more specialized skill than standard asphalt shingles. Contractors charge more when the job is physically demanding or calls for specific expertise, and that cost difference is justified by the risk and skill involved.
Location and timing also shift the final number in ways that have nothing to do with the quality of the work. Emergency or after-hours service calls carry a premium over scheduled appointments, and areas with higher labor rates or limited material supply will produce higher quotes across the board. Getting two or three estimates from licensed, insured contractors gives you a reliable range before you commit to anyone.
Repair timeline and what to expect on site
Most homeowners asking about a roof leak repair service want to know two things: how soon can someone come out, and how long will the actual work take? Both answers depend on the severity of the damage and the contractor’s schedule, but most straightforward repairs wrap up in a single visit once the crew is on site. Having a realistic picture of the process helps you prepare your home, coordinate your schedule, and know what to ask when the crew shows up.
From first call to completed repair
Scheduling an inspection typically happens within one to three business days for non-emergency situations. If your roof is actively leaking into living space or storm damage has left part of your home exposed, most reputable contractors treat that as urgent and work to get someone out the same day or the next morning. After the inspection, minor repairs can often happen the same day, while jobs requiring ordered materials or significant decking work may need a follow-up visit once supplies arrive, usually within a few days of the original inspection.
Knowing your repair timeline upfront lets you plan around the crew and reduces the chance of delays caused by miscommunication or missed material orders.
What the crew does when they arrive
Your crew will start by setting up safety equipment and protecting the surrounding area below the work zone. They will confirm the inspection findings before removing any material, which takes roughly 15 to 30 minutes on a straightforward job. After that, the actual repair work begins, and for most single-point failures like a failed flashing seal or a small section of damaged shingles, the hands-on portion runs one to three hours from start to finish.
Once the repair is complete, expect the crew to walk the surrounding roof surface, clear gutters of any debris from the work, and remove discarded materials from the ground below. A final walkthrough with you is standard practice for any contractor worth hiring. They should show you photos of the repair, explain what was replaced and why, and confirm whether any follow-up visits are needed. If they hand you a completed job report before leaving, that is a reliable sign you hired a team that stands behind its work.
A simple plan to move forward
You now have a clear picture of what a roof leak repair service actually covers, what it costs, and what to expect from the crew that shows up at your door. The most important step you can take right now is not waiting. A small problem that costs a few hundred dollars to fix today becomes a multi-thousand-dollar project once water reaches your decking, insulation, or interior walls. If you spotted any of the warning signs covered in this article, treat them as your signal to act.
Start by scheduling a professional inspection so you know the full scope of the damage before committing to any repair plan. At Sunflowers Energy LLC, we offer free on-site inspections with no obligation attached. You get a straight assessment of your roof’s condition, an honest explanation of what needs to happen, and a clear quote so you can move forward with confidence.
