Roof flashing is one of those components most homeowners never think about, until water starts leaking into their attic or running down an interior wall. If you’re searching for Home Depot roof flashing, you’re probably trying to figure out which type you actually need for your specific roof situation. That’s a smart move, because picking the wrong flashing can leave vulnerable areas of your roof completely exposed to moisture.
At Sunflowers Energy LLC, we install and repair roofing systems every day, and flashing is a critical part of every job we do. Whether we’re replacing an entire roof or integrating solar panels into an existing one, proper flashing selection directly affects how well the system holds up over time. We’ve seen firsthand what happens when the wrong product gets used, or when flashing gets skipped altogether. It’s never pretty, and the repair costs add up fast.
This guide breaks down six types of roof flashing you can find at Home Depot: drip edge, roll flashing, pipe flashing, L flashing, and more. We’ll cover what each type does, where it’s used, and how to match it to your project. Whether you’re a DIYer prepping for a weekend repair or just researching before hiring a pro, this list will help you make an informed choice at the store.
1. Pro installation using Home Depot flashing
Buying home depot roof flashing materials is the easy part. Installing them correctly is where most DIY projects run into trouble. A professional roofer brings the tools, sequencing knowledge, and hands-on technique to make sure every piece sits tight, overlaps properly, and integrates with your underlayment and shingles. If your roof has multiple penetrations or complex transitions, hiring a pro often costs less than fixing a botched install later.
What a pro flashing install includes
A professional flashing job covers more than nailing metal to your roof deck. Your contractor will remove existing or damaged flashing, prep the substrate underneath, and layer each new piece in the correct order relative to the shingles and underlayment. They’ll apply compatible sealants at overlaps and termination points to build a continuous water barrier across every vulnerable transition on the roof.
Most pros also inspect the surrounding decking and fascia while the old flashing is off. If they find soft or rotted wood beneath the previous flashing, they’ll catch it before it becomes a structural repair.
When pro help prevents leaks and rot
Certain flashing situations go well beyond a basic DIY repair. Step flashing at wall-to-roof intersections, valley flashing on steep pitches, and chimney saddles all require precise cuts and layering sequences. If one piece is installed out of order or left with even a small gap, water can sit against the sheathing for months before you see any interior damage.
If your roof is older than 15 years or has had a previous leak, a professional inspection before replacing flashing can save you from replacing damaged decking at the same time.
Typical cost ranges and what changes the price
Professional flashing installation typically runs $200 to $500 for standard repairs, such as re-flashing a single pipe boot or a short valley section. More complex work, like full chimney flashing replacement or step flashing along an entire dormer, can reach $500 to $1,500 or more depending on linear footage, roof pitch, and local labor rates. Your material choice also shifts the final number, since copper carries a much higher price than aluminum or galvanized steel.
2. Drip edge flashing
Drip edge is the bent metal strip that runs along your roof’s eaves and rakes. Without it, water curls back under the shingles and saturates your fascia board, leading to rot that spreads into the roof deck before you notice any interior damage.
What drip edge does at eaves and rakes
Drip edge directs runoff away from the fascia and soffit and into your gutters, preventing moisture from wicking sideways under your shingles. At rakes, it holds shingle edges flat and blocks wind-driven rain from getting underneath. The metal also reinforces the roof perimeter against uplift during high winds.
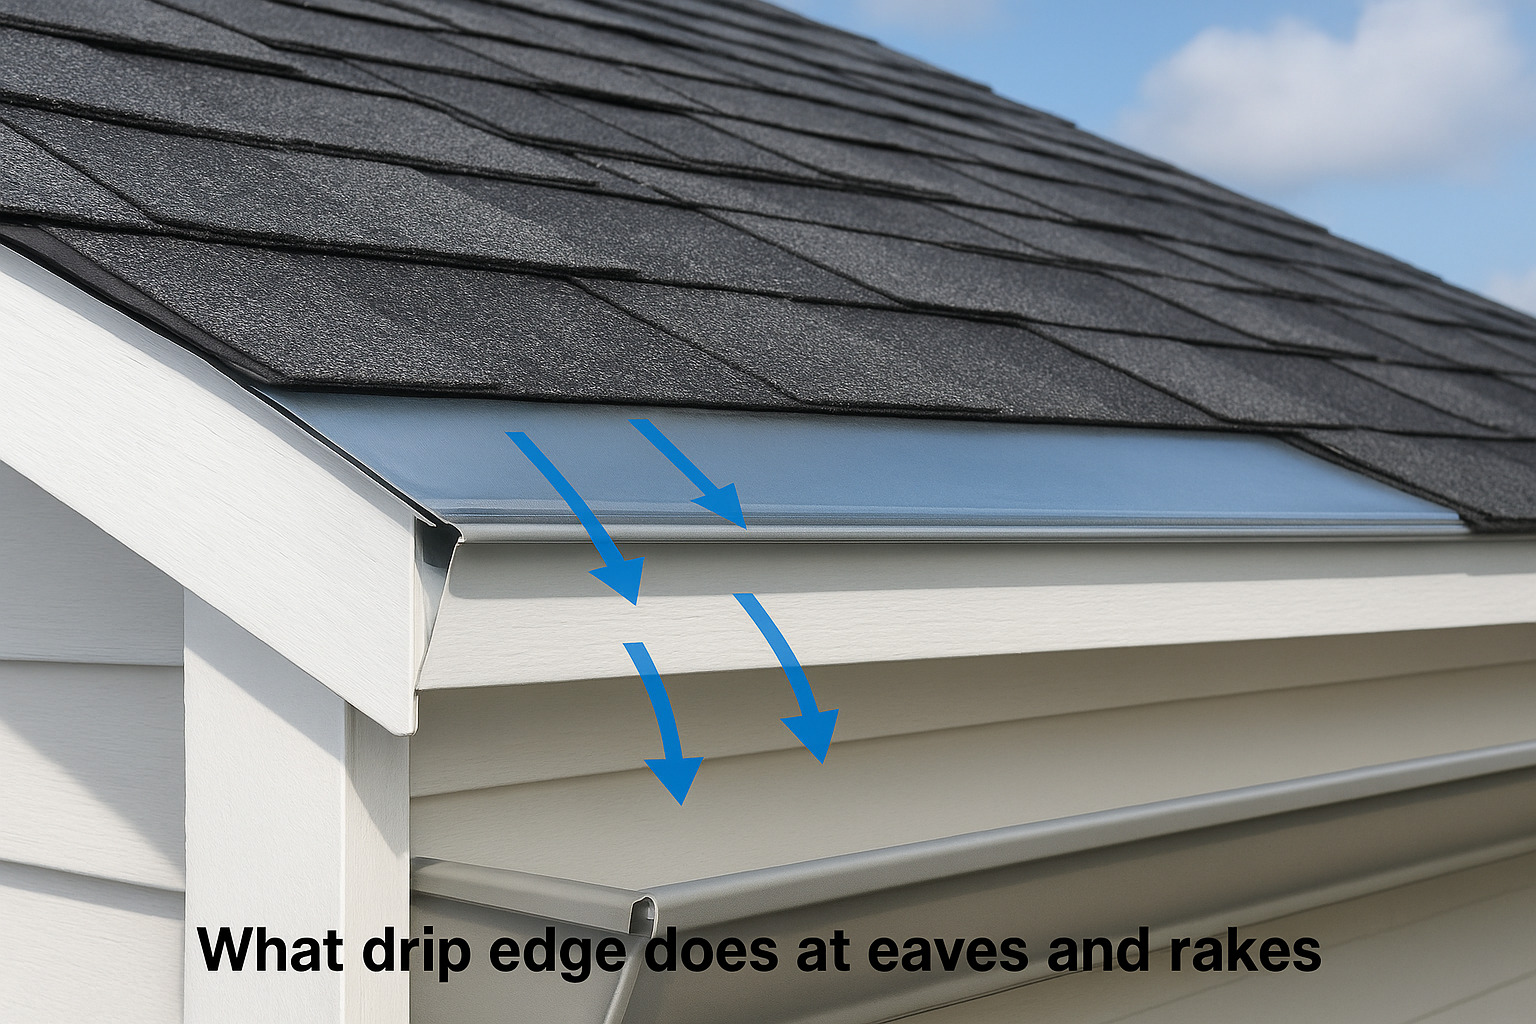
Installation sequence matters here. At eaves, the drip edge goes under the underlayment. At rakes, it goes on top. Reversing that order creates a gap where water can travel behind the metal and reach the decking.
What to look for at Home Depot
When browsing home depot roof flashing for drip edge, you’ll find aluminum and galvanized steel in three common profiles:
- Type C – standard residential profile, the most widely stocked option
- Type D – wider bottom flange, suited to thicker fascia boards
- Type F – extended leg for roofs with wider overhangs
Galvanized steel outlasts aluminum in humid or coastal climates where salt air speeds up corrosion.
Typical Home Depot price range
Drip edge typically costs $0.40 to $1.00 per linear foot, with aluminum on the lower end and galvanized steel running slightly higher. A 10-foot section usually falls between $4 and $12 depending on width, profile, and material.
3. Roll flashing and valley flashing
Roll flashing comes in continuous coils rather than pre-cut sections, which gives you flexible coverage across long roof transitions. It’s the right choice when you need to seal open valleys or base details without joining multiple short pieces end to end.
Where roll flashing works best
Roll flashing handles open valleys particularly well, where two roof planes meet and funnel a concentrated stream of water downward. The continuous material eliminates end-to-end seams that can separate over time. It also performs reliably along low-slope sections where water lingers longer and requires a wide, unbroken barrier to keep it off the decking.
Open valley flashing should extend at least 8 inches on each side of the centerline to give fast-moving water enough room to stay on the metal surface.
How to pick the right width and metal
Width is your first decision. Standard rolls run 10 to 20 inches wide, and wider material is better for steep pitches where water picks up speed before reaching the valley. For metal type, aluminum is lightweight and cuts easily, while galvanized steel holds up longer in regions with heavy rain or wide temperature swings. When shopping home depot roof flashing rolls, check whether the coil springs back during installation since flatter rolls are easier to press tight against the roof surface.
Typical Home Depot price range
Roll flashing typically costs $15 to $50 per roll depending on width, metal type, and coil length. A 10-inch aluminum roll usually runs $15 to $20, while wider galvanized options push toward $40 to $50.
4. Step flashing
Step flashing is used wherever a vertical wall meets a sloped roof surface, such as along the side of a dormer, at a chimney cheek, or where a roof plane ties into a sidewall. Each piece is an L-shaped rectangle that layers with every shingle course, creating a shingle-by-shingle water barrier that keeps moisture from migrating behind your wall cladding.
When you need step flashing
You need step flashing any time your roof meets a vertical structure along a sloped run. This includes dormers, additions, and walls that rise above the roof plane. Without it, water creeps sideways under your siding and reaches the sheathing long before you see any interior damage.
Replacing step flashing during a full shingle tear-off costs far less than repairing the rotted sheathing and framing that a skipped piece causes over several wet seasons.
What to buy at Home Depot for a clean tie-in
When shopping home depot roof flashing for step work, look for pre-bent aluminum or galvanized steel pieces sized to match your shingle exposure, typically 4×4 or 4×7 inches. Each piece should overlap both the roof deck and the wall surface to give water nowhere to enter.
Buy more pieces than you think you need. Running short on step flashing mid-install leaves exposed gaps where shingles terminate, and returning to the store risks leaving your roof open to rain while you are away.
Typical Home Depot price range
Step flashing pieces typically sell in bundles of 10 to 25 units, running $8 to $20 per bundle depending on material and size. Galvanized steel costs slightly more than aluminum but holds up better in high-moisture climates.
5. Vent pipe flashing and roof boots
Vent pipe flashing, commonly called a roof boot, seals the gap where plumbing vents, gas flues, or exhaust pipes exit through your roof surface. Without a properly seated boot, water follows the pipe straight down into your attic every time it rains.
How pipe flashing stops leaks around penetrations
A roof boot combines a flat base that tucks under your shingles with a flexible rubber or metal collar that fits snugly around the pipe. That collar compresses against the pipe wall to block wind-driven rain and standing water from reaching the roof deck below.
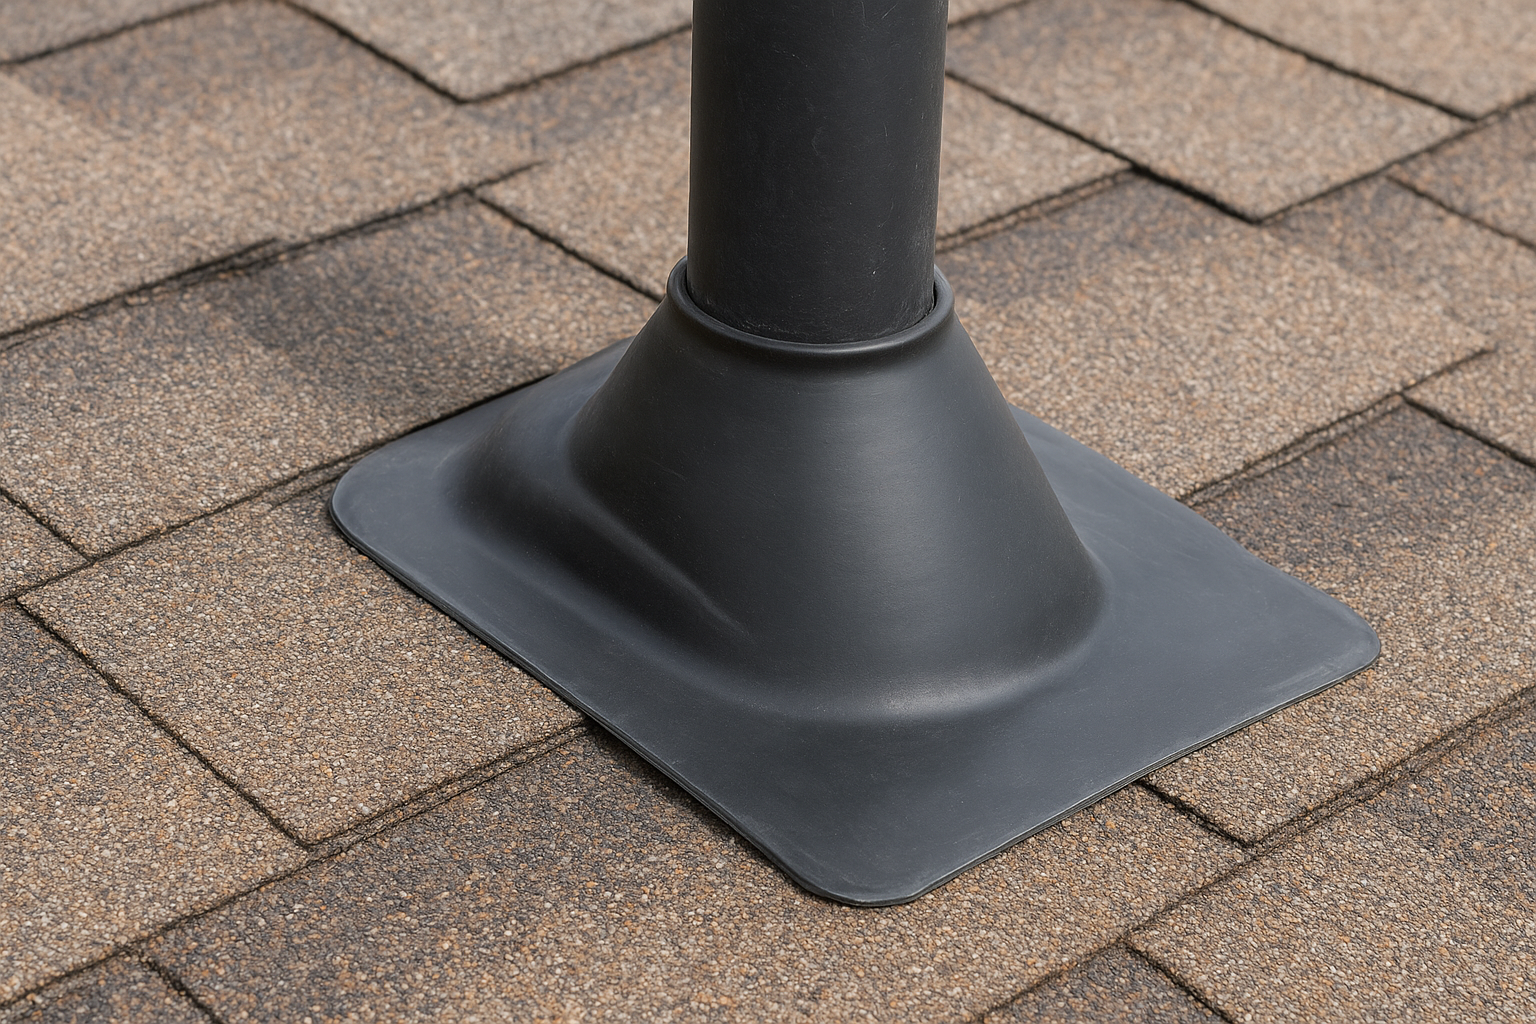
Rubber collars degrade faster than the surrounding shingles, so inspecting your pipe boots every few years can catch a failing seal before water damage sets in.
How to match the boot to your roof and pipe
Your two main variables are pipe diameter and roof pitch. Boots come in specific diameter ranges, typically 1.5 to 4 inches, so measure your pipe before you head to the store. Pitch-adjustable boots handle slopes ranging from flat to steep without leaving gaps at the base flange. When browsing home depot roof flashing options for pipe work, check that the base flange is wide enough to overlap your shingles on all sides.
Typical Home Depot price range
Pipe boots typically cost $8 to $30 per unit depending on pipe size, collar material, and whether the base is aluminum or galvanized steel. Lead boots run higher, around $20 to $40, but conform more easily to irregular pipe shapes.
6. L flashing and Z flashing
L flashing and Z flashing handle the transitions where horizontal surfaces meet vertical ones, such as where a wall base meets the roof deck or where siding overlaps a roof edge. Both profiles redirect water away from the structure before it can reach your sheathing or framing below.
Where L and Z flashing fit in the roof system
L flashing forms a simple right-angle bend used along window sills, door thresholds, and low-wall-to-deck connections where you need a clean horizontal-to-vertical transition. Z flashing adds a second bend, creating an offset that allows siding or trim to lap over the top leg while the bottom leg diverts water outward. You’ll find both profiles at window and door head details, where they cap the gap between the wall framing and the cladding above.
Z flashing is the better choice at horizontal siding joints because the offset leg keeps water from wicking behind the material above it.
How to choose the right size and material
When browsing home depot roof flashing for L or Z profiles, match the leg dimensions to the thickness of your siding and the depth of your wall assembly. Aluminum is the most common choice for residential work because it’s lightweight and resists corrosion, while galvanized steel suits high-traffic or heavy-load areas where the flashing may take physical contact.
Typical Home Depot price range
L and Z flashing typically costs $0.50 to $1.50 per linear foot, with pre-cut 10-foot lengths running $5 to $15 per piece depending on profile, leg width, and material.

Next steps
You now have a clear picture of the six main types of home depot roof flashing and where each one fits in a roofing system. Whether you’re replacing a failed pipe boot, re-flashing a valley, or adding drip edge during a shingle replacement, matching the right product to the right location is what keeps water out long-term.
Picking up the materials is straightforward once you know what you need. Installing them correctly is a different challenge, and small sequencing mistakes can leave your roof exposed to moisture for years before the damage becomes visible inside your home. If any part of your project feels beyond a confident DIY effort, getting a professional to handle the install is the smarter move.
Sunflowers Energy LLC handles roofing installations and repairs for homeowners who want the job done right the first time. Contact our team for a free roof inspection and find out exactly what your roof needs.

https://shorturl.fm/foO8i