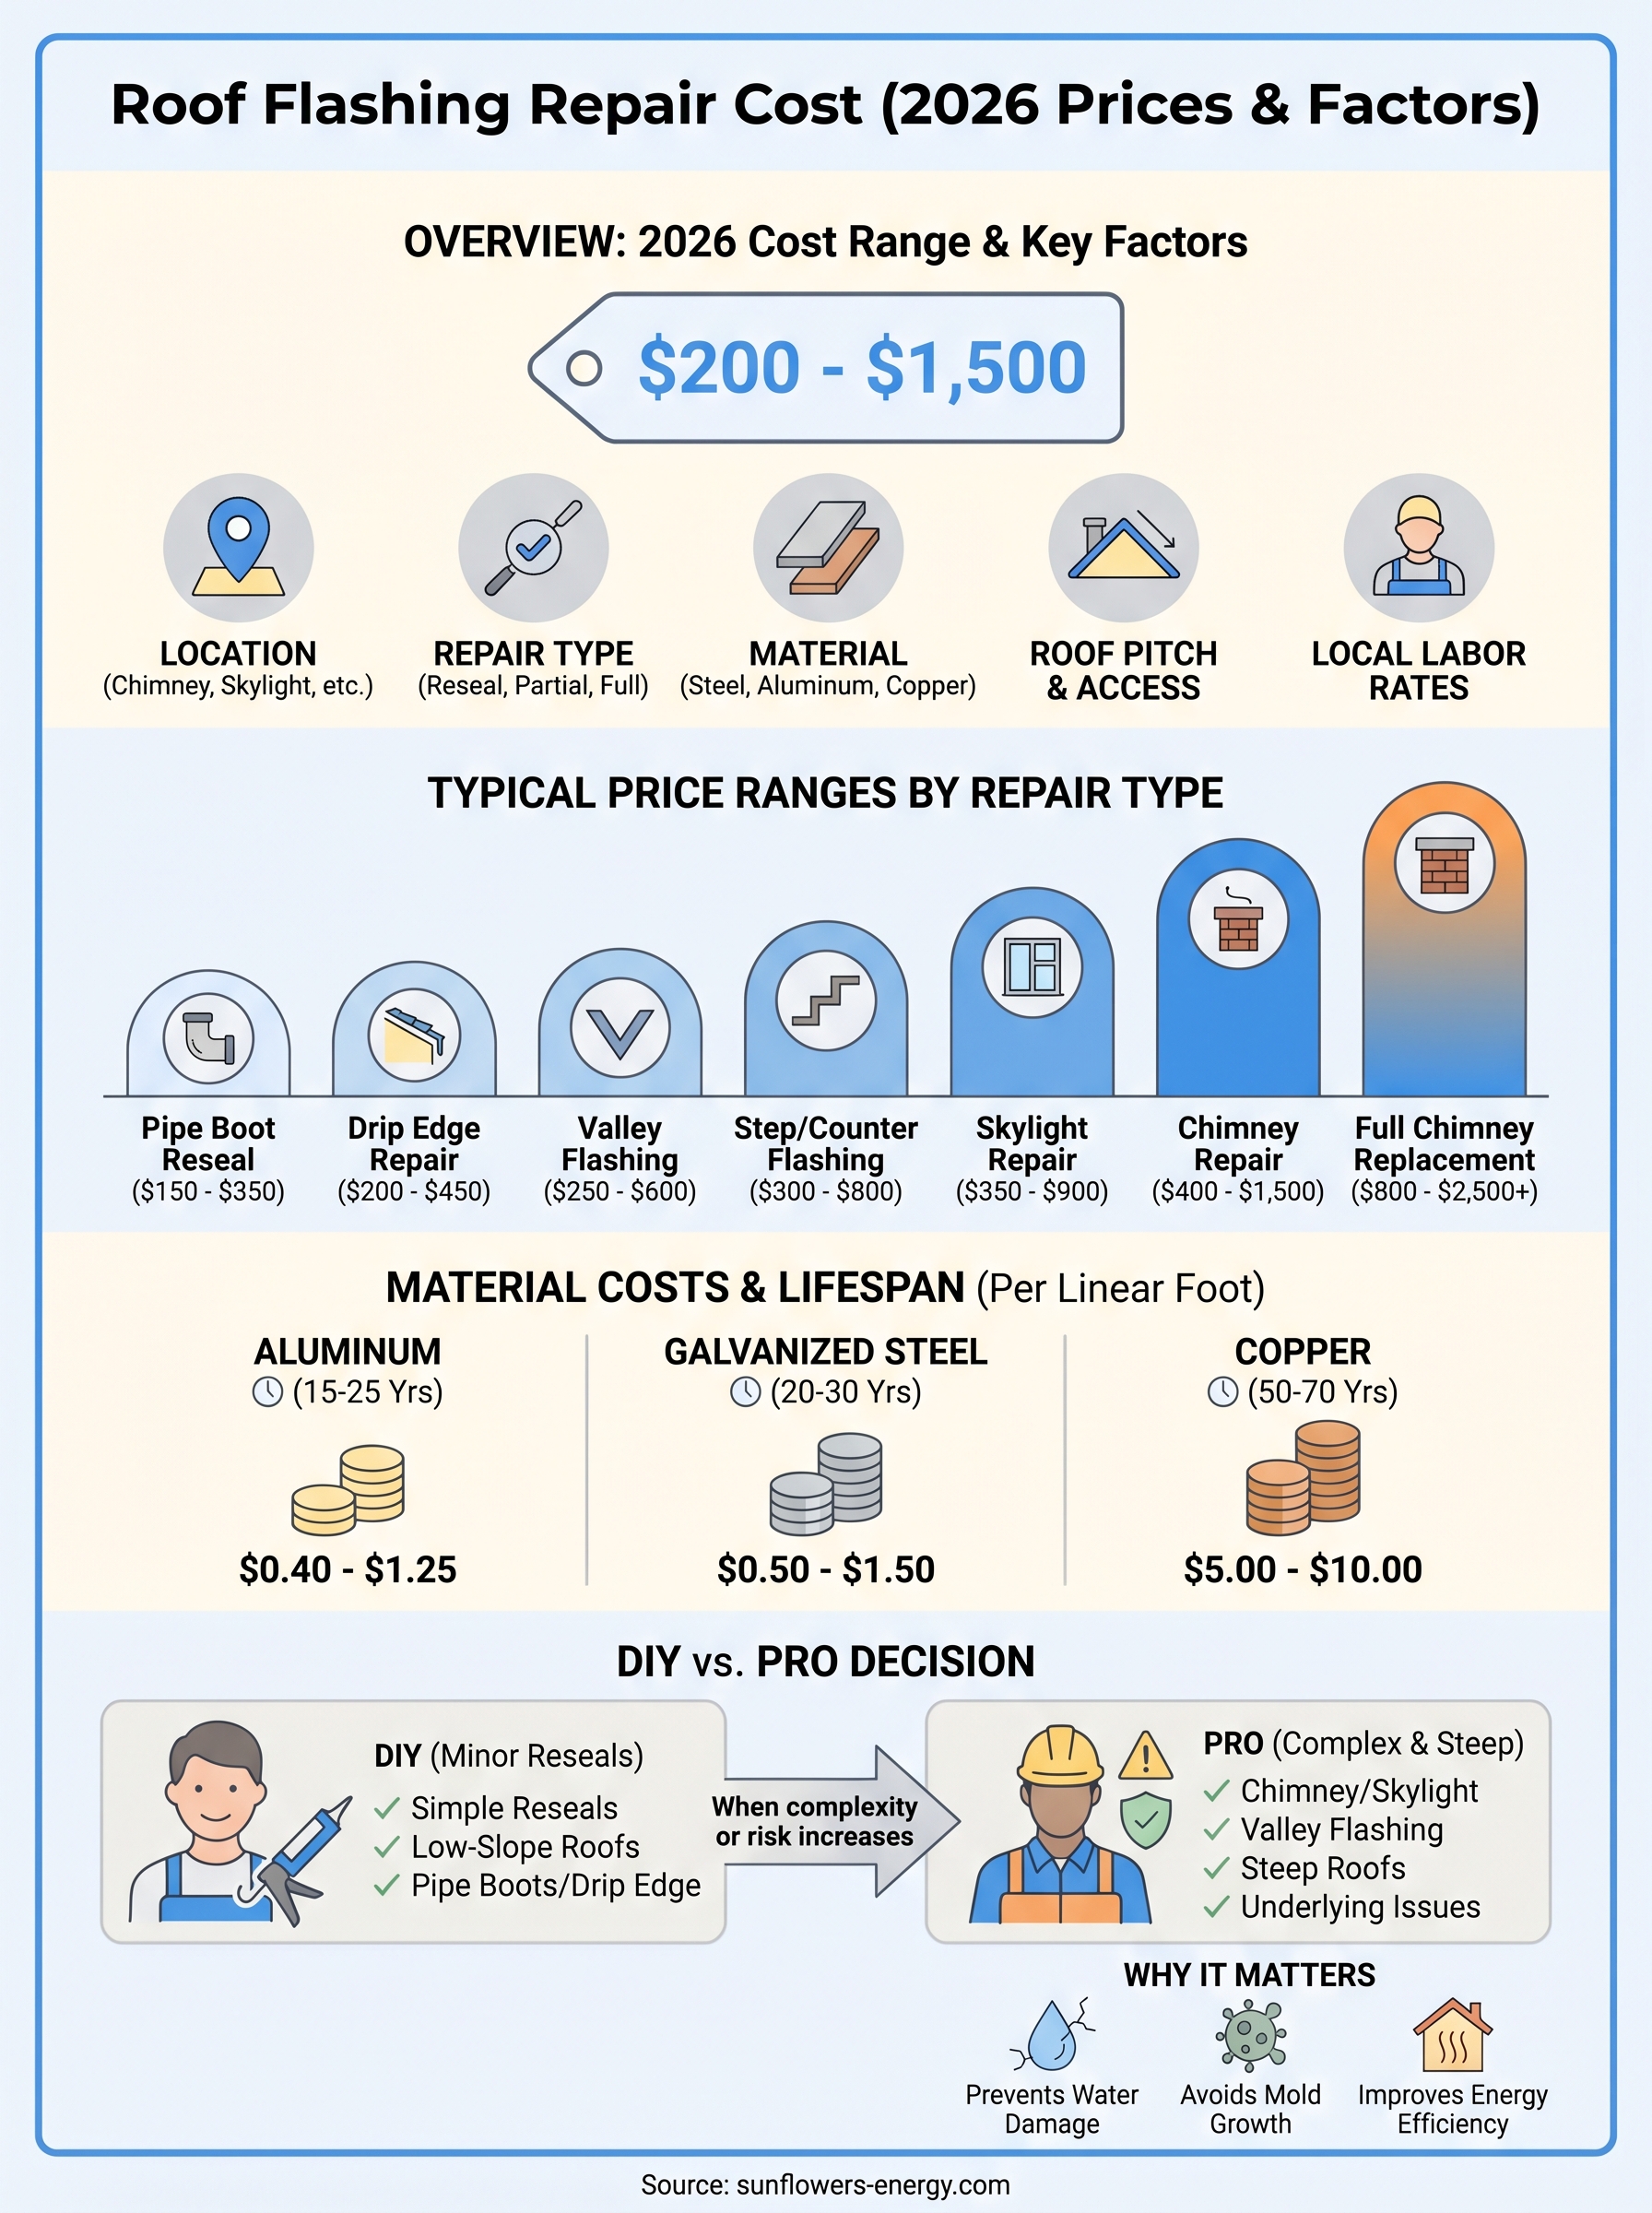
A small leak around a chimney or skylight can turn into thousands of dollars in water damage if the flashing underneath has failed. Flashing, the thin metal strips that seal joints and transitions on your roof, is one of the most common sources of leaks, and understanding roof flashing repair cost before you call a contractor puts you in a much stronger position. In 2026, most homeowners pay anywhere from $200 to $1,500 depending on the location, material, and complexity of the repair.
But those numbers only tell part of the story. The actual price you’ll pay depends on factors like roof pitch, flashing type, whether you need a simple reseal or a full replacement, and your local labor rates. There’s also the question of whether a DIY fix makes sense or whether you’re better off hiring a professional who can spot underlying issues you might miss, a decision that can save or cost you significantly in the long run.
At Sunflowers Energy LLC, we handle roof repairs and inspections daily across residential and commercial properties, so we see firsthand what drives these costs up or keeps them manageable. We put this guide together to give you honest, practical pricing information, the same kind of breakdown we’d walk through during one of our free on-site inspections. Below, you’ll find 2026 price ranges for every common flashing repair, the factors that shift those numbers, and a straightforward comparison of DIY versus professional work.
Why roof flashing repair matters
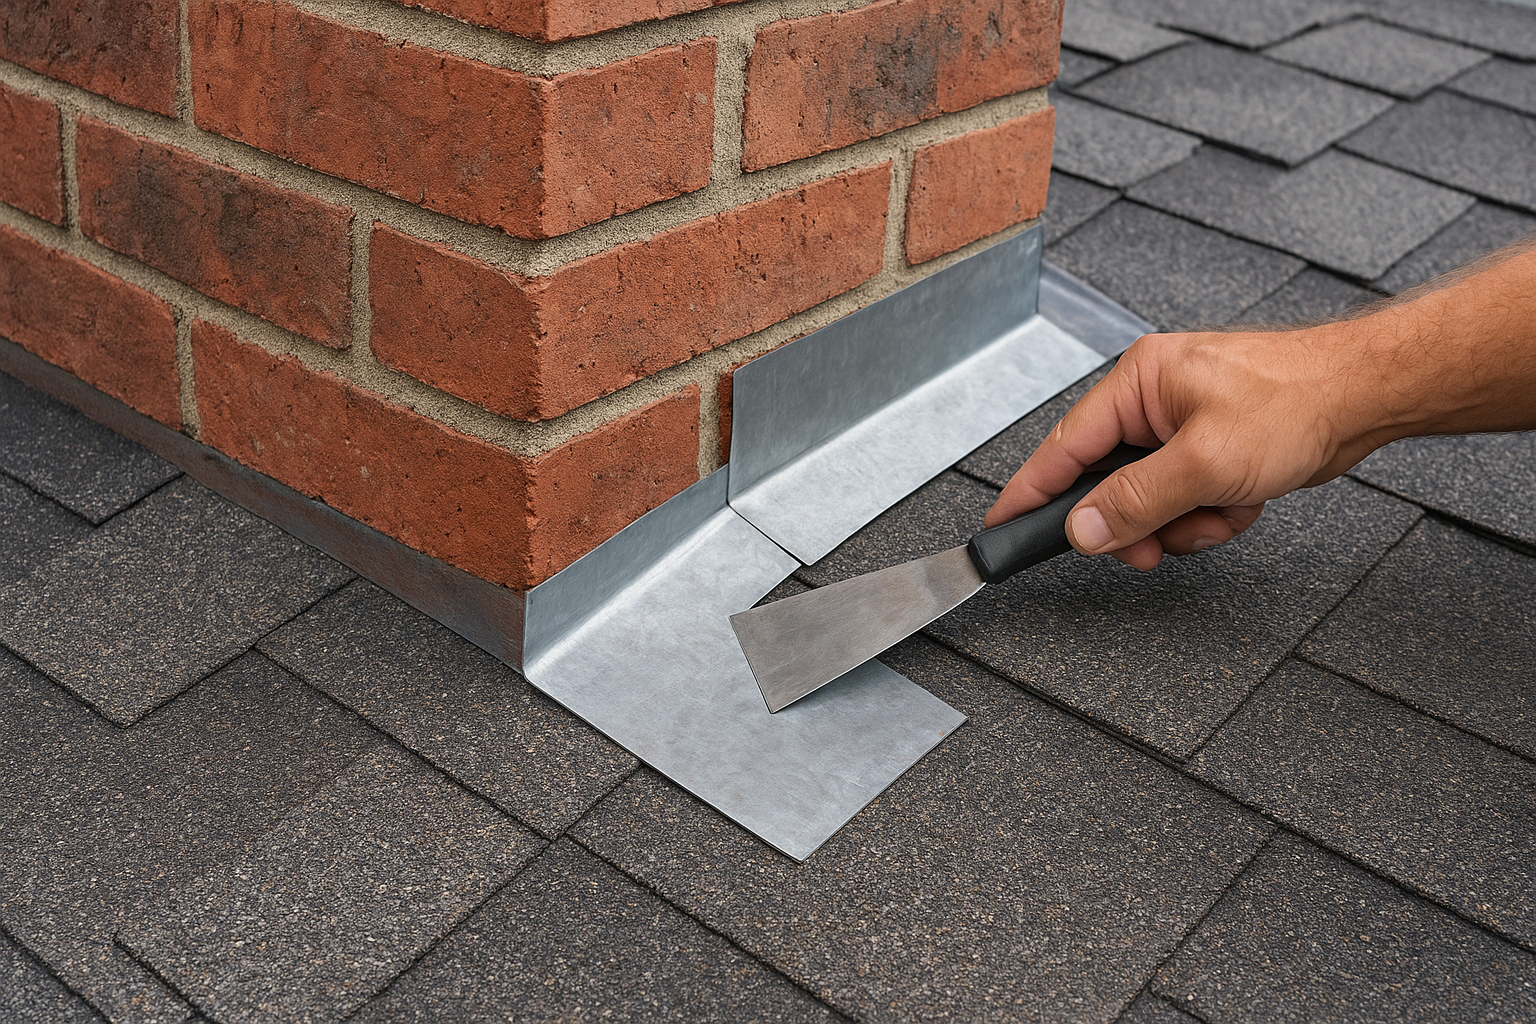
Flashing sits at every vulnerable joint on your roof, including chimney bases, skylight perimeters, roof valleys, and vent pipes. These are the exact spots where two surfaces meet and create a seam that water can exploit. Properly installed and maintained flashing channels water away from those joints and directs it safely down toward your gutters. Without it functioning correctly, even a moderate rainstorm can push water through gaps that are completely invisible from the ground.
Understanding roof flashing repair cost early, before a small issue grows, gives you meaningful control over what you spend. Most homeowners who wait until they see a water stain on their ceiling are already dealing with a problem that has been developing for months. Flashing failures rarely announce themselves loudly. They drip quietly into insulation, wall cavities, and structural wood until the damage is significant enough to show up inside your home, and by then the repair bill is rarely small.
What flashing actually does
Flashing is thin metal, most commonly galvanized steel, aluminum, or copper, bent and fitted to cover the joints and transitions where your roof deck meets vertical surfaces or changes angle. Each piece of flashing acts as a directed barrier that prevents water from sitting in a joint and eventually working its way under your roofing material. Think of it as the waterproof seal between the parts of your roof that cannot be covered with shingles alone, and the one component your entire roof depends on at its weakest points.
Your roof contains several distinct types of flashing, each serving a specific purpose:
- Step flashing: installed in overlapping pieces along sidewalls and dormers, directing water outward with each course of shingles
- Counter flashing: embedded into mortar joints on chimneys and sealed over step flashing to create a two-layer barrier
- Valley flashing: runs along the V-shaped channel where two roof slopes meet, handling the highest water volume on most roofs
- Pipe boot flashing: forms a watertight collar around vent pipes that penetrate the roof deck
- Drip edge flashing: runs along the roof perimeter to direct water into gutters and away from fascia
Each of these locations sees different levels of stress, movement, and water volume, which is one reason repair costs vary so much depending on where your flashing problem sits.
The real cost of ignoring a flashing problem
A flashing failure left unaddressed rarely stays a simple flashing problem. Water that gets past damaged or corroded flashing moves into the roof deck, the sheathing beneath it, and eventually the structural framing of your home. Once wood becomes consistently wet, rot sets in, and at that point you are no longer just repairing flashing. You are replacing decking, rafters, and possibly dealing with mold remediation on top of the original repair.
The EPA notes that mold can begin growing on wet building materials within 24 to 48 hours, meaning a slow leak that goes unnoticed for even a few weeks can create a remediation problem that far exceeds the cost of the original flashing repair.
Interior water damage compounds the problem even further. Drywall, insulation, and ceiling finishes that absorb moisture lose structural integrity and typically need full replacement rather than patching. What starts as a $300 flashing repair can escalate to a $5,000 to $15,000 remediation project if you give a leak enough time to spread through your home’s envelope. Catching flashing issues early is almost always the cheaper path, often by a wide margin.
Your roof also loses energy efficiency when flashing fails. Gaps and open joints in your roof envelope allow conditioned air to escape in winter and outside heat to push in during summer, raising utility bills in ways that are difficult to trace back to a roofing issue without a professional inspection. For homeowners who have also invested in a solar panel system, improperly sealed flashing around panel mounts creates the same infiltration risk, which is why flashing integrity matters equally for both roofing protection and solar performance.
2026 roof flashing repair cost ranges
Most homeowners in 2026 pay between $200 and $1,500 for a professional flashing repair, but that range covers a wide spectrum of work. A simple reseal around a pipe boot costs far less than a complete chimney flashing replacement using copper material, and the gap between those two jobs reflects real differences in labor time, material cost, and roof access difficulty. Knowing where your specific repair sits within these ranges helps you read contractor quotes clearly and spot outliers before you commit to any project.
Typical price ranges at a glance
The table below covers the most common flashing repair scenarios and the combined labor and material costs you can expect in 2026. National averages inform these figures, and your local labor market will typically shift them up or down by 10 to 20 percent depending on regional wage rates and demand.
| Repair Type | Low End | High End |
|---|---|---|
| Pipe boot or vent flashing reseal | $150 | $350 |
| Drip edge repair or replacement | $200 | $450 |
| Valley flashing repair | $250 | $600 |
| Step or counter flashing repair | $300 | $800 |
| Skylight flashing repair | $350 | $900 |
| Chimney flashing repair | $400 | $1,500 |
| Full chimney flashing replacement | $800 | $2,500 |
A full chimney flashing replacement using copper on a steep-slope roof can reach $3,000 or more when the surrounding mortar joints also need repointing, so always ask your contractor to walk through the complete scope before any work begins.
What the average homeowner actually pays
When you look at typical project totals, the median roof flashing repair cost lands between $500 and $700 for a single repair location. Most repairs involve replacing a limited section of damaged flashing rather than a full perimeter strip, which keeps your bill in the middle of the range rather than at the high end. Single-location repairs are also faster to complete, which reduces the labor hours billed against your project.
Labor accounts for 50 to 70 percent of your total bill in most cases, meaning your local market’s wage rates affect your final number more than the material type you choose. Emergency calls for an active leak, meaning same-day or weekend service, typically add a 25 to 50 percent premium on top of standard rates. Scheduling your repair proactively once you spot early warning signs, such as lifted flashing or granule buildup near joints, almost always produces a lower quote and gives you more time to compare multiple contractors without the pressure of an ongoing leak.
Cost by flashing location on the roof
Where your flashing problem sits on the roof is one of the biggest variables in your final price. Locations that require more setup time, trickier access, or more careful material integration consistently push costs higher than straightforward flat-surface repairs. Understanding how location affects roof flashing repair cost helps you anticipate quotes more accurately before a contractor ever steps on your property.
Chimney flashing
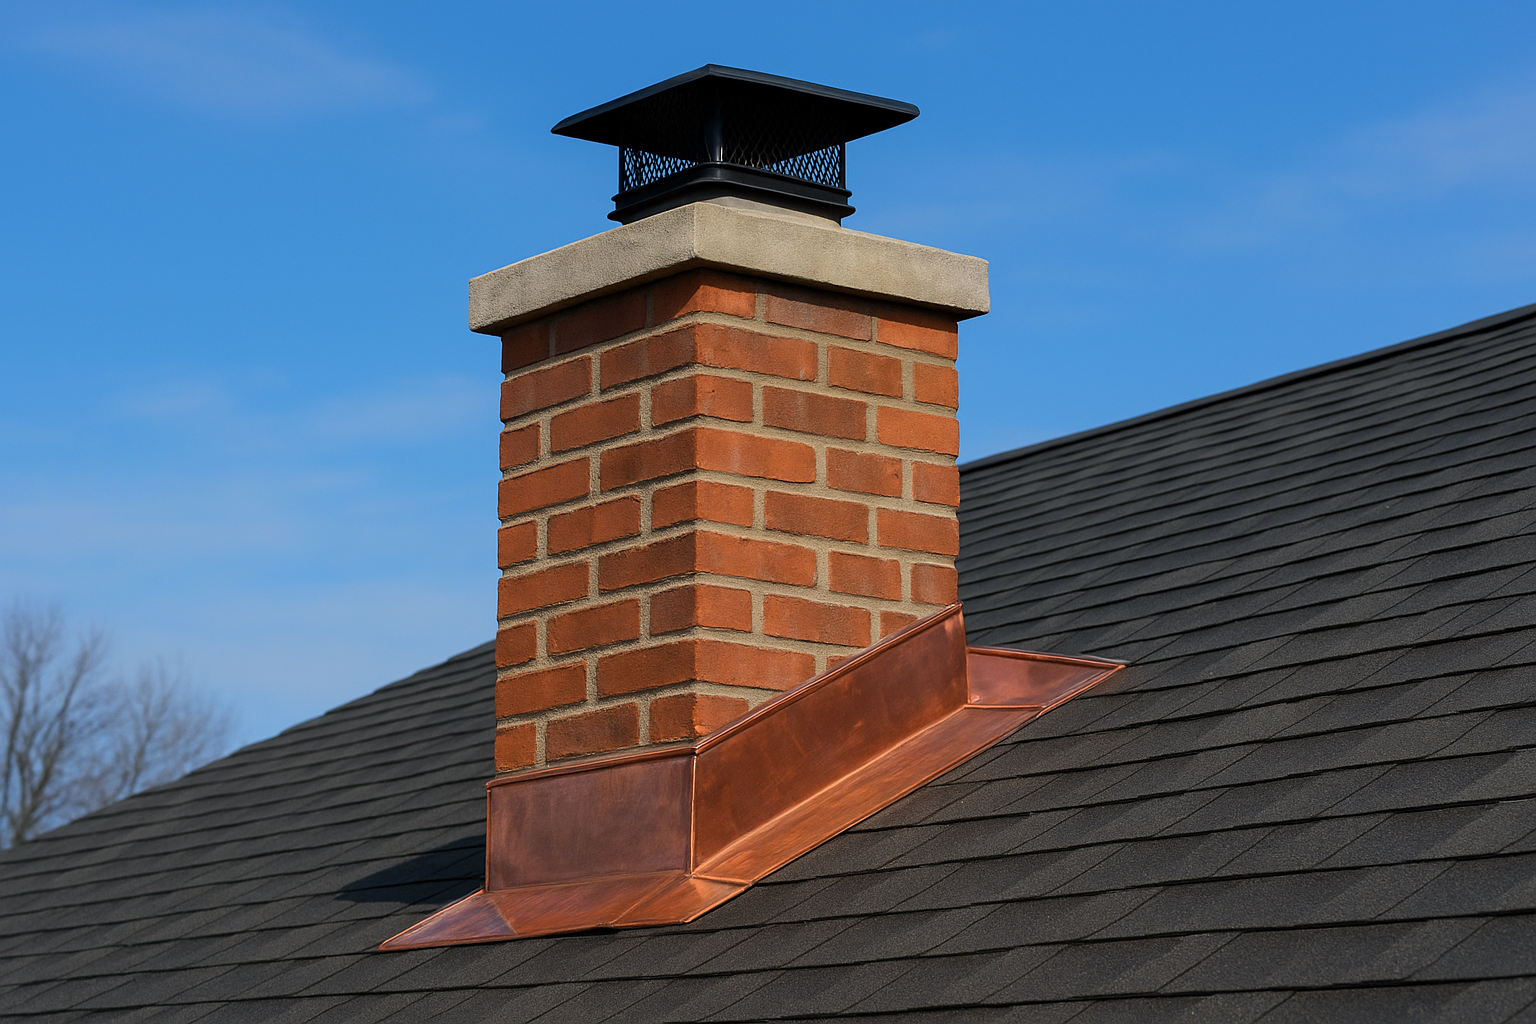
Chimney flashing is the most expensive repair location on most roofs. A chimney requires multiple layers of flashing, including step flashing along the sides, counter flashing embedded into the mortar joints, and a saddle or cricket if the chimney is wide enough to collect debris and water behind it. All of these components need to work together, and a failure in any one of them requires careful removal and reinstallation of the surrounding pieces.
Labor alone for a chimney flashing repair typically runs between $200 and $600, and that number rises when the masonry joints also need repointing or the chimney crown requires attention.
Material choices also push chimney costs higher than other locations. Copper is the preferred material for chimney flashing because it outlasts the alternatives by decades and conforms well to irregular masonry surfaces, but it commands a significant price premium over galvanized steel or aluminum. Budget between $400 and $1,500 for a standard chimney repair and up to $2,500 or more for a complete replacement using copper.
Skylight flashing
Skylights create a similarly complex waterproofing challenge because the flashing must integrate tightly with both the roofing material and the skylight frame itself. Most skylight flashing repairs cost between $350 and $900, depending on the size of the unit and whether the issue stems from the flashing itself or from the skylight’s gaskets and seals. Contractors often find that both components have deteriorated at the same time, which adds to the scope.
Manufacturer-specific flashing kits are required for many skylight brands, and sourcing the correct kit can add material cost and lead time to your project. Always confirm that your contractor is familiar with your specific skylight brand before scheduling the work.
Valley, drip edge, and pipe boot flashing
These three locations are generally the most affordable to repair because they involve simpler geometry and easier access than chimneys or skylights. Valley flashing repairs run between $250 and $600, drip edge replacement typically costs $200 to $450, and a pipe boot reseal or replacement lands between $150 and $350. Pipe boots are often the quickest fix on the roof, since they require minimal tear-out and straightforward installation around a single penetration point.
Cost by repair type and severity
The type of repair your flashing needs matters as much as the location when calculating roof flashing repair cost. A simple reseal takes a fraction of the time and materials compared to a full replacement, and severity directly controls how much surrounding roofing material a contractor needs to disturb to reach and fix the problem. Knowing where your situation falls on the severity scale helps you read contractor quotes accurately and understand whether acting quickly saves you money.
Minor repairs and reseals
Minor repairs involve no metal removal. A contractor reseals lifted edges, patches small gaps, or applies roofing cement to stabilize flashing that has not yet corroded through. These jobs typically cost between $150 and $400 and take one to two hours of labor for a single location. They are the right fix when the underlying metal is still structurally sound and the failure is limited to the sealant or caulk layer around the edge.
A reseal only extends the life of flashing that still has real material integrity. If the metal underneath is corroded, thinning, or cracked, a reseal delays the failure rather than correcting it.
You can often spot minor repair candidates yourself by looking for lifted flashing edges or dried caulk lines that have visibly pulled away from the roofing surface. Catching these early keeps the repair straightforward and the bill low.
Partial replacement
Partial replacement removes a specific damaged section of flashing while leaving the surrounding undamaged material in place. This approach costs between $300 and $800 depending on location and material choice. It requires more labor than a reseal because the contractor must lift adjacent shingles carefully to remove and reinstall the flashing without damaging what is still functional. Partial replacement makes sense when corrosion or physical damage is isolated rather than spread across the full perimeter of a feature.
Contractors performing a partial replacement will also inspect the underlayment beneath the damaged section. Finding soft or deteriorated underlayment during that inspection typically adds $100 to $300 to your project, so building a small contingency into your budget before work starts is a practical step.
Full replacement
Full replacement applies when flashing has failed across multiple sections or when corrosion has compromised the entire perimeter of a chimney, skylight, or valley. Costs start around $600 and reach $2,500 or more for premium materials like copper. This scope frequently uncovers secondary problems including rotted decking and failed mortar joints, both of which your contractor should identify and price transparently before any work begins.
Material and linear-foot pricing
The material you choose directly affects your roof flashing repair cost in two distinct ways: the per-foot material price and the expected lifespan, which determines how quickly you’ll face the same repair again. Flashing is purchased and priced by the linear foot, so knowing both the cost per foot and the total footage your job requires gives you a clear baseline before any contractor arrives. Most homeowners overlook material selection entirely and leave that decision to their contractor, but a basic understanding of the options helps you evaluate quotes with real confidence.
Common flashing materials and their costs
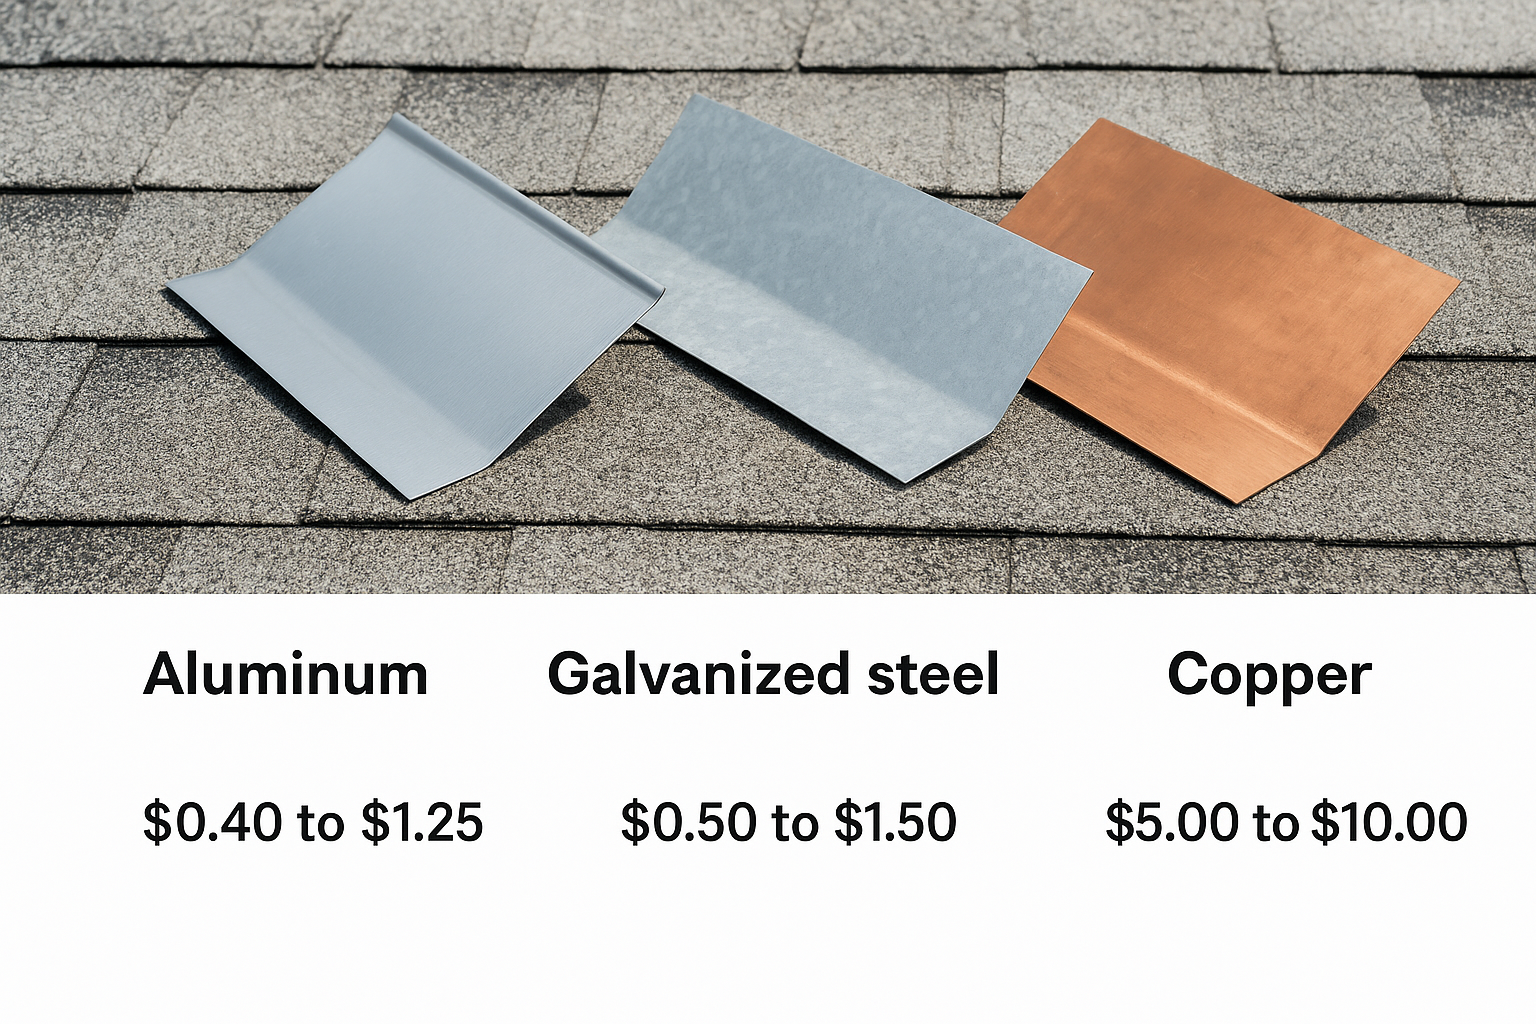
Your three primary material options are galvanized steel, aluminum, and copper, each sitting at a different price and durability level. Galvanized steel is the most common choice for standard repairs because it offers a solid combination of affordability and weather resistance. Aluminum costs slightly less per foot but corrodes faster when it contacts certain treated wood products or concrete, making it a poor fit near masonry. Copper carries the highest upfront material cost but outlasts both alternatives by decades, which explains why it remains the preferred choice for chimney flashing and other high-exposure locations where longevity justifies the premium.
Copper flashing can last 50 to 70 years with minimal maintenance, which often makes it the lower-cost option over your roof’s full lifetime once you account for future repair labor and the disruption of repeat jobs.
| Material | Cost Per Linear Foot (Material Only) | Expected Lifespan |
|---|---|---|
| Aluminum | $0.40 to $1.25 | 15 to 25 years |
| Galvanized steel | $0.50 to $1.50 | 20 to 30 years |
| Lead-coated copper | $4.00 to $8.00 | 40 to 60 years |
| Copper | $5.00 to $10.00 | 50 to 70 years |
Linear-foot pricing in practice
Material costs alone rarely reflect your total spend because most repairs require between 10 and 50 linear feet of new flashing, depending on the feature and its perimeter. A standard chimney runs roughly 20 to 30 linear feet around its base, while a roof valley can extend anywhere from 15 to 40 feet depending on your roof pitch and layout. At those lengths, choosing copper over galvanized steel adds a meaningful amount to your material budget, which is worth factoring in when you compare bids.
Installers also account for waste and overlap, typically adding 10 to 15 percent more material than the measured footage to cover cuts, seam overlaps, and sections trimmed to fit irregular surfaces. Before you compare contractor quotes on material costs, add that buffer to your measured footage to get a realistic picture of what the job requires. Contractors who provide itemized quotes that include both measured footage and waste allowance are generally more transparent about how they price their work, and that transparency is worth prioritizing when you make your final hiring decision.
Labor, access, and hidden add-on costs
Labor is the single largest line item in your roof flashing repair cost, and it shifts significantly based on where you live, how accessible your roof is, and what the contractor finds once the work begins. Understanding these cost drivers before you receive a quote helps you evaluate whether a contractor’s price is reasonable or inflated for what the job actually requires.
Labor rates and what drives them
Most roofing contractors charge between $50 and $120 per hour for flashing repair work, with regional markets driving a wide spread across that range. Urban areas in the Northeast and Pacific Coast tend to sit at the high end, while mid-size markets in the Midwest and South typically come in lower. Minimum trip charges also apply in most markets, ranging from $150 to $250, which means a 45-minute repair still carries a significant base cost before anyone touches your roof.
Scheduling your repair during a contractor’s regular work week, rather than as an emergency call, consistently produces lower labor quotes and gives you time to collect at least two or three competing bids before committing.
Contractor certification and roofing manufacturer credentials also factor into hourly rates. Certified installers from major roofing manufacturers typically charge more per hour, but they carry deeper product knowledge and often provide extended labor warranties that uncertified contractors cannot offer.
Roof pitch and access difficulty
Steep roofs add time and cost to any flashing repair because contractors must use additional safety equipment and take slower, more careful movements to work safely at high pitches. A repair that takes two hours on a low-slope roof can take three to four hours on a steep-slope structure. Contractors typically apply a pitch surcharge of 20 to 40 percent once your roof slope exceeds a 7:12 pitch, and some add further premiums for roofs requiring scaffolding rather than roof jacks alone.
Hidden add-on costs to expect
Several costs appear only after work begins, and building a contingency into your budget protects you from surprise invoices. The most common add-ons include:
- Underlayment replacement: Damaged felt or synthetic underlayment beneath the repaired section adds $75 to $200 depending on the area affected
- Decking repairs: Soft or rotted sheathing discovered under the flashing typically costs $50 to $150 per sheet to replace
- Mortar repointing: Chimney mortar joints that have cracked or deteriorated alongside the flashing add $200 to $600 depending on the extent
- Disposal fees: Removing old copper or lead-coated flashing sometimes carries a separate disposal charge of $50 to $100
Asking your contractor to identify potential add-ons during their initial inspection, before any work starts, is the most effective way to keep your final bill close to the original estimate.
DIY vs pro and when replacement makes more sense
Deciding between a DIY repair and hiring a professional is one of the most common questions homeowners face when calculating roof flashing repair cost. The right answer depends on your comfort working at height, your ability to identify the true scope of the problem, and whether the repair requires disturbing surrounding shingles or masonry. Getting this choice wrong either costs you money on a professional for a job you could have handled yourself, or costs you far more in secondary damage from a repair that was not done correctly the first time.
When DIY makes sense
DIY flashing work is reasonable in a narrow set of situations. Resealing a pipe boot with roofing sealant, pressing down lifted flashing edges with roofing cement, or replacing a straightforward drip edge section on a low-slope roof are all jobs that a careful homeowner with basic tools can complete safely. These repairs involve no major shingle removal, no masonry, and no multi-layer flashing systems, which keeps the complexity manageable.
Before attempting any roof work yourself, confirm that your roof pitch is safe to walk and that you have proper fall protection equipment in place. The Occupational Safety and Health Administration sets clear guidelines for working at heights, and residential roofing qualifies as a fall hazard regardless of how low the slope appears from the ground.
When to hire a professional
Chimney flashing, skylight flashing, and valley flashing all require professional installation because each involves integrating multiple layers of material with surrounding roofing components. A mistake in any of these locations creates a water entry point that is difficult to trace and expensive to fix later. Professionals also carry the diagnostic experience to identify underlying deck damage or failed underlayment that a surface-level DIY inspection will miss, which protects you from finding larger problems after the repair is complete.
When replacement beats repair
Choosing a full replacement over a repair makes financial sense when your existing flashing has reached the end of its material lifespan or shows widespread corrosion across multiple joints. Patching isolated sections of metal that is thinning throughout simply moves the failure point rather than eliminating it. If your flashing is galvanized steel approaching 25 years of age, or if two or more locations have failed within the same season, a complete replacement using a longer-lasting material like copper typically delivers a better return than continued patchwork repairs on aging metal.
Replacing flashing during a scheduled roof repair or re-roofing project almost always costs less than scheduling it as a standalone job, since the labor to access and expose the flashing is already accounted for in the larger project scope.
A simple plan for your flashing repair
Now that you understand what drives roof flashing repair cost, the path forward is straightforward. Start by identifying the location and severity of your flashing problem, then use the price ranges in this guide to benchmark any quotes you receive. Minor reseals on accessible locations are reasonable DIY territory, but chimney, skylight, and valley repairs consistently deliver better outcomes when a licensed professional handles them.
Acting quickly is the most important step you can take. Every week a flashing failure goes unaddressed, water moves deeper into your roof deck and closer to your interior, turning a manageable repair into a costly remediation project. Get at least two quotes and ask each contractor to walk you through the full scope before any work begins.
Ready to get a clear picture of what your repair actually requires? Schedule a free on-site inspection with Sunflowers Energy LLC and get an honest, no-obligation estimate from a team that handles both roofing and solar installations every day.
