Tesla has become one of the most recognizable names in residential solar, and for good reason, their sleek panels and integrated energy ecosystem appeal to homeowners who want both performance and aesthetics. But before you commit, understanding the full picture of Tesla solar panel installation is essential. The process involves more than just picking panels; it includes site assessments, permitting, electrical work, and utility coordination that can stretch across weeks or even months.
Costs vary significantly depending on your roof’s condition, system size, and where you live. Timeline expectations also differ based on local permitting requirements and whether your roof needs work before panels go up. These are the details that separate a smooth installation from a frustrating one, and they’re exactly what we’ll break down in this guide.
At Sunflowers Energy LLC, we handle both roofing and solar installations for residential and commercial properties. That dual expertise gives us a practical perspective on what Tesla solar installations actually involve, from roof readiness to final interconnection. We’ve put together this guide to help you understand the costs, process, and realistic timelines so you can make a confident, informed decision about going solar.
What to know before you schedule Tesla solar
Tesla operates its solar business differently from most local installers. Rather than working through a network of independent contractors, Tesla handles sales online and coordinates installation through its own team or vetted subcontractors depending on your location. That means you won’t sit across from a salesperson at your kitchen table; instead, you’ll configure your system on Tesla’s website, review a quote digitally, and manage everything through their app and customer portal. Understanding how that process works before you begin saves you from surprises later.
How Tesla prices its systems
Tesla uses a tiered, flat-rate pricing model rather than fully custom quotes built around your specific roof layout. You choose from preset system sizes, typically ranging from around 4 kW to 16 kW or more, and the price reflects that size. As of early 2026, Tesla’s pricing runs roughly $2.50 to $3.50 per watt before incentives, which puts a 10 kW system in the $25,000-$35,000 range before the federal solar tax credit applies.
The 30% federal Investment Tax Credit applies to the full installed cost, including labor and equipment, so factor it into your real budget from day one.
Beyond the standard purchase, Tesla offers a monthly rental called Solar Subscription, which removes the upfront cost in exchange for an ongoing fee and a minimum contract period. This option works for some homeowners, but it comes with restrictions around relocation and system ownership that make it a poor fit for others. Read those terms carefully before choosing it over an outright purchase.
What Tesla does not cover
Before you schedule a tesla solar panel installation, understand what falls outside their scope. Roof repairs and replacements are not included in their solar service; if your roof has damage or fewer than 10 years of remaining life, Tesla may decline to install until you address those issues separately. Your electrical panel capacity also matters, since an underpowered panel can require an upgrade that adds $1,500 to $3,000 or more to your total project cost.
Warranty terms deserve close attention as well. Tesla covers product defects for 25 years and includes a production guarantee, but workmanship coverage varies and doesn’t always match what you’d get from a local installer with a strong service relationship. Read the full warranty documents before signing anything, and pay specific attention to what triggers a covered service visit versus what you’d pay out of pocket.
Service availability and wait times
Tesla solar is not available in every state or zip code, so confirm service is active in your area before spending time configuring a system online. Even in markets where Tesla operates, realistic wait times run from 4 to 12 weeks after contract signing, depending on permitting complexity and local installer availability. Before you schedule, verify the following:
- Your address falls within Tesla’s active service area
- Your roof has at least 10 to 15 years of remaining life
- Your electrical panel meets the minimum requirements (usually 200 amps)
- You have your last 12 months of utility bills ready for system sizing
- You understand the difference between the purchase and subscription options
Going in with accurate expectations about availability and timing prevents the frustration that catches many homeowners off guard after they’ve already signed a contract.
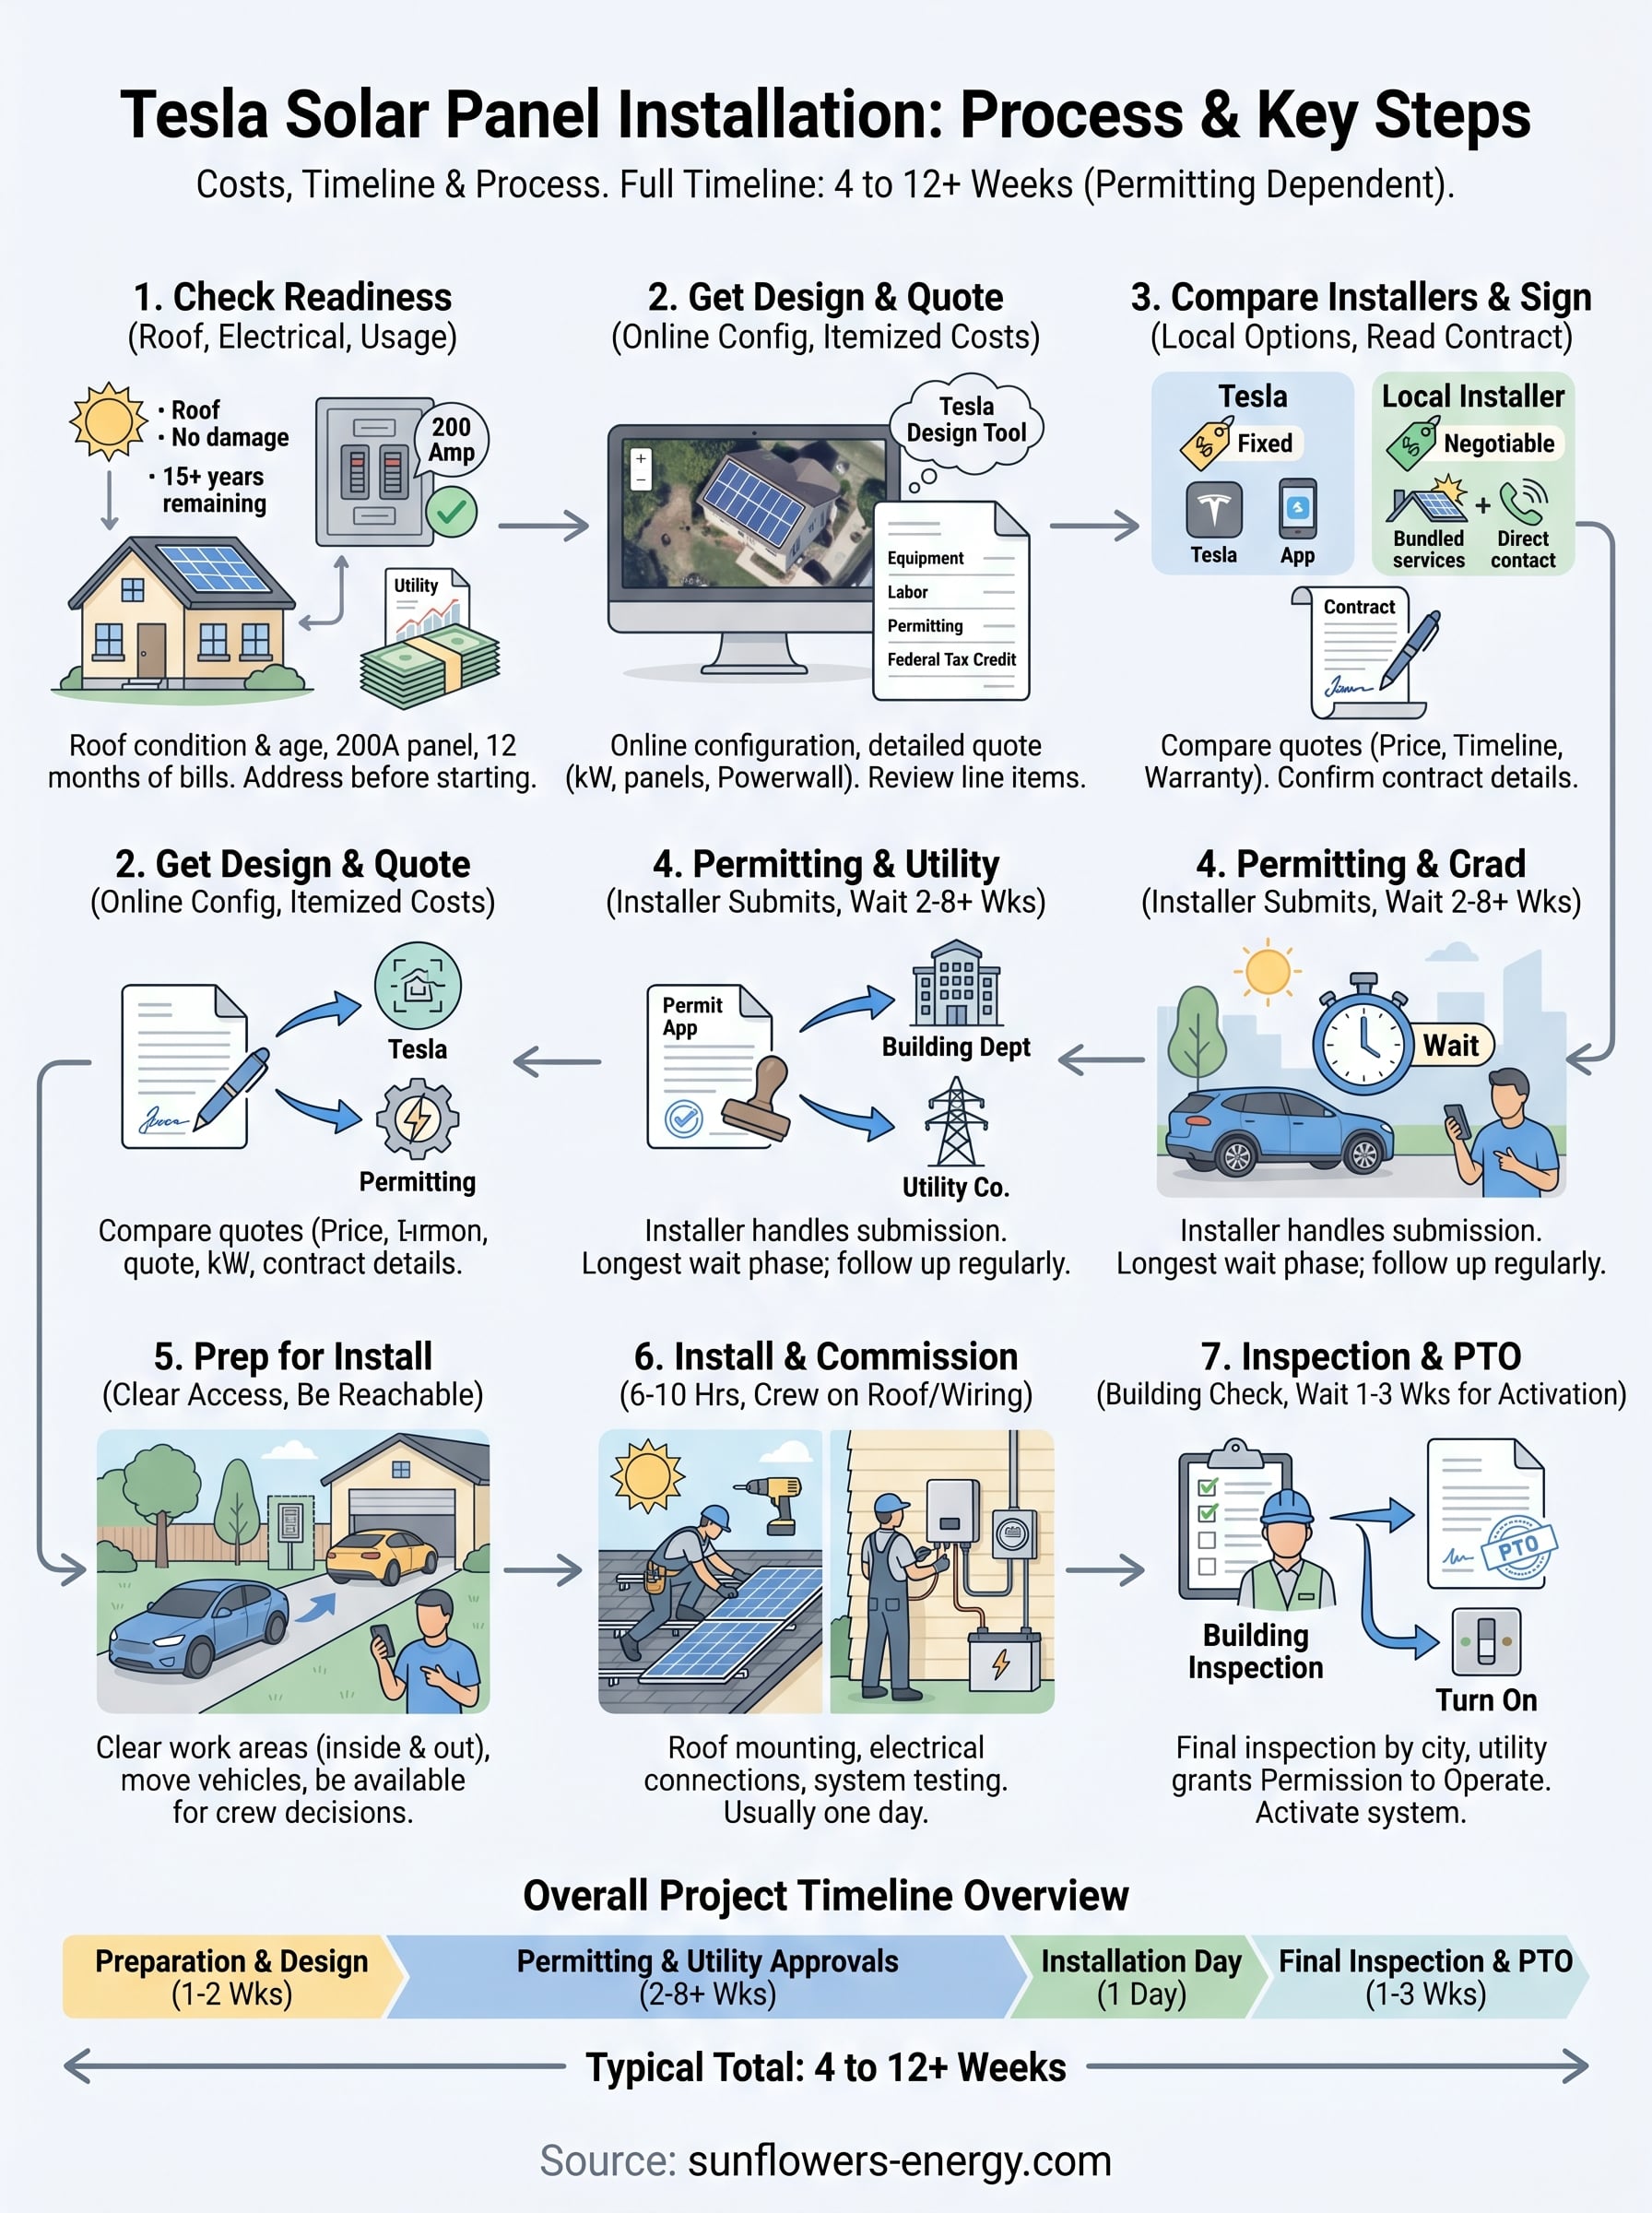
Step 1. Check your roof, usage, and eligibility
Before you do anything else in the tesla solar panel installation process, verify that your home is actually ready for panels. Tesla will not install on a roof that shows significant wear or has less than 10 years of remaining life. Running this check yourself before you request a quote saves time and prevents a costly pause midway through the process.
Evaluate your roof’s condition and age
Your roof’s age and physical condition directly determine whether Tesla will move forward or require repairs first. Inspect your roof for missing shingles, sagging areas, flashing failures, and signs of water intrusion. If your roof is 15 years or older, schedule a professional inspection before you contact any solar installer, because a site visit may reveal problems that halt the project entirely and add weeks to your timeline.
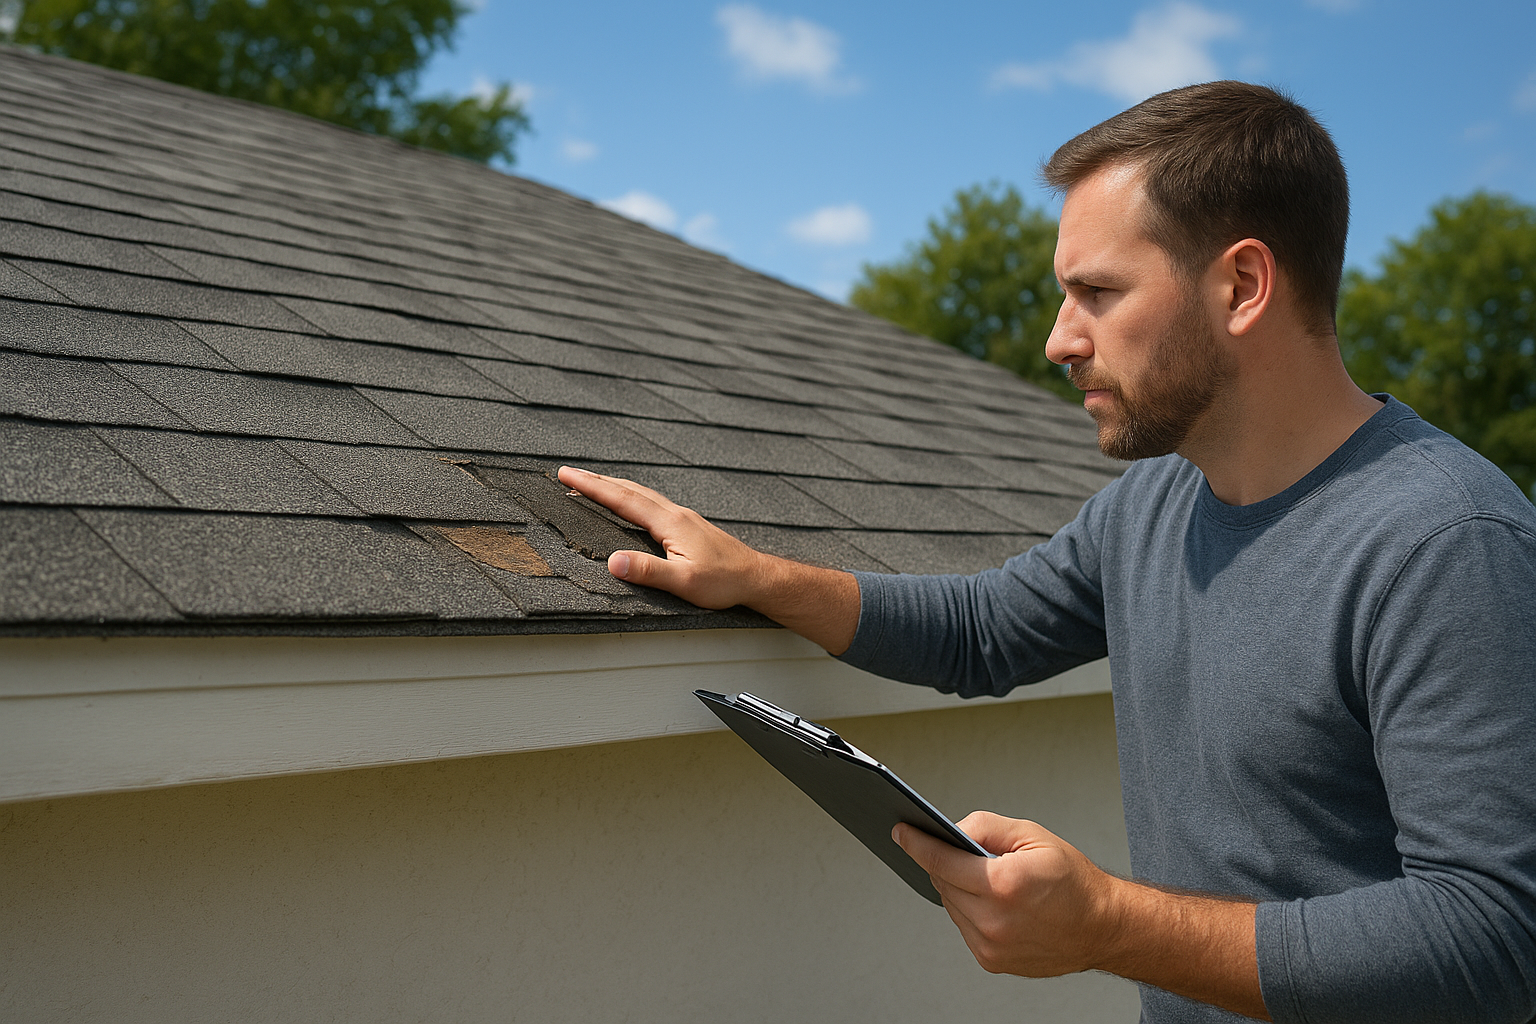
If Tesla identifies a roof issue during their site assessment, they will pause your installation until you resolve it, which adds both time and unplanned costs to your project.
A roof that works well for solar is free of active damage and has south, east, or west-facing surfaces with minimal shading from trees or nearby structures. Walk your property at midday and look for shadows falling across the roof plane. Shading problems that go undetected before quoting will reduce your system’s output and may make the size Tesla recommends inaccurate for your actual needs.
Confirm your electrical panel and energy usage
Most solar installations require a 200-amp main electrical service, and if yours is smaller or outdated, you’ll need an upgrade before Tesla can connect a system. Open your main breaker box and check the rating printed on the main breaker. A 100-amp or 150-amp service means you should contact a licensed electrician and budget $1,500 to $3,500 for the upgrade before your solar project moves forward.
Use this checklist to confirm you’re ready for Step 2:
- Roof age under 15 years with no active damage
- South, east, or west-facing surfaces with minimal shade
- 200-amp electrical panel confirmed
- 12 months of utility bills gathered for accurate system sizing
- Local utility provider identified for future interconnection paperwork
Completing this step thoroughly before you reach out to Tesla puts you in a much stronger position to move through the design and quote phase without unexpected delays or added costs.
Step 2. Get a Tesla design and a firm quote
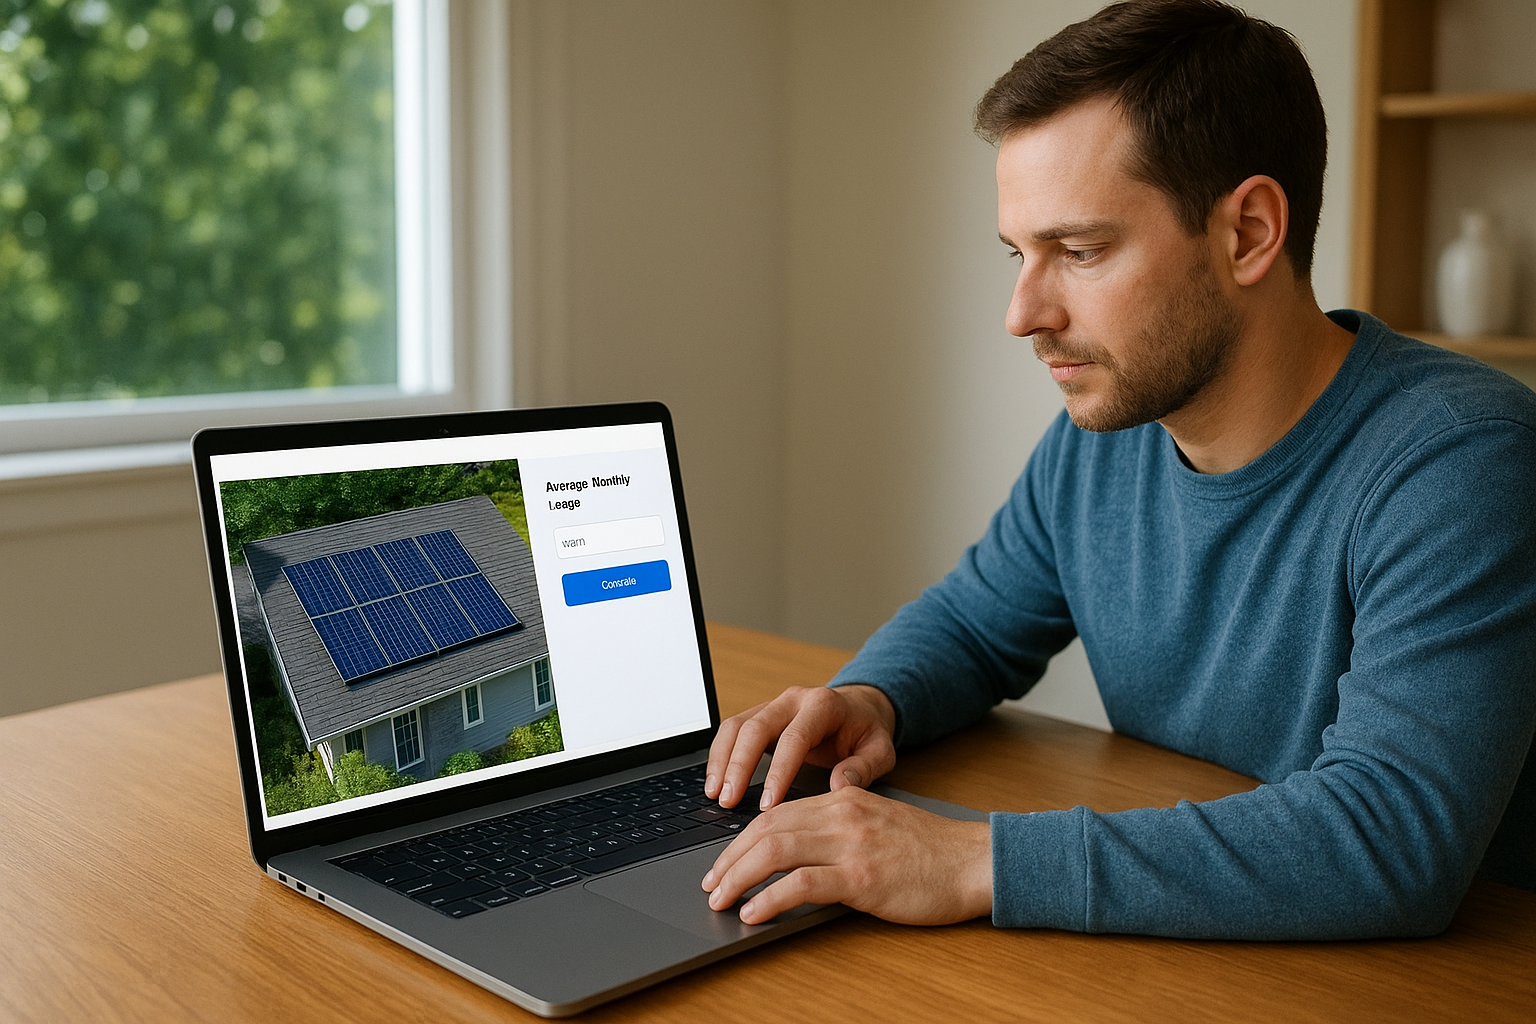
Once your roof and electrical system are ready, you can move forward and request a design through Tesla’s website. Tesla’s online design tool uses satellite imagery and your utility bill data to generate a recommended system layout and size. You enter your address, upload or manually enter your average monthly electricity usage, and the tool produces a preliminary design within minutes. This isn’t a rough ballpark; it’s the starting point for your formal quote.
How Tesla builds your system design
Tesla’s tool analyzes your roof’s orientation, pitch, and usable surface area to determine how many panels fit and where they’ll produce the most energy. The design also reflects any obstructions the satellite imagery picks up, though aerial assessments don’t always capture ground-level shading from trees or neighboring structures with full accuracy.
If your actual roof layout differs significantly from the satellite view, request a manual review before you accept the design as final.
After the automated layout generates, a Tesla energy advisor reviews your configuration and may adjust the panel count or placement based on your stated usage goals. You can request changes, add a Powerwall battery, or scale the system size up or down at this stage before anything moves to contract. Confirm the estimated annual production figure against your actual 12-month consumption from your utility bills before moving forward.
Reading your quote before you sign
Your Tesla quote will break out equipment costs, installation labor, and applicable permitting fees as separate line items. Review each section carefully rather than focusing only on the total number at the bottom. Confirm the quote includes the full system size in kilowatts, the specific panel model and watt rating, warranty terms, and whether a Powerwall appears as an included component or a separate add-on.
Use this checklist when reviewing your tesla solar panel installation quote:
- System size (kW) matches your actual usage needs
- Panel model and watt rating are clearly specified
- Production estimate aligns with your 12-month utility average
- Powerwall pricing is itemized separately if applicable
- Permitting and interconnection fees are included in the total
- Federal tax credit savings appear as a separate line, not pre-deducted
Reviewing every line item now gives you a clean baseline for comparing this quote against other installers in the next step.
Step 3. Compare installers and sign the contract
Tesla is not your only option, even if their brand appeals to you. Local certified solar installers can source panels with comparable efficiency ratings, often at a lower installed cost per watt, and with faster timelines and more direct service relationships. Before you commit to a tesla solar panel installation contract with anyone, spend time comparing at least two or three quotes side by side using the detailed breakdown you gathered in Step 2.
Why comparison matters even with Tesla
Tesla’s flat-rate pricing model means you have limited negotiating room on their quote, unlike a local installer who can adjust equipment selections, financing terms, or installation timelines to compete for your business. A local company that handles both roofing and solar, for example, can often coordinate a roof prep and panel installation in a single project, cutting weeks off your overall timeline and eliminating the coordination burden you’d otherwise carry yourself.
Getting at least two competing quotes gives you real market data on whether Tesla’s pricing and timeline are realistic for your area.
Use the table below to compare each installer on the factors that affect your long-term outcome, not just the upfront number:
| Factor | Tesla | Local Installer |
|---|---|---|
| Price per watt | Fixed by tier | Negotiable |
| Roof prep coordination | Separate contractor needed | Often bundled |
| Workmanship warranty | Varies by market | Typically 10 years |
| Response time for service | Through app or hotline | Direct local contact |
| Timeline after signing | 4 to 12 weeks | Often 2 to 6 weeks |
What to check before you sign
Once you choose an installer, read the contract in full before you put your signature on anything. Confirm that the final contract matches the quote exactly, including the system size in kilowatts, the specific panel model, the Powerwall inclusion if you ordered one, and all warranty terms for both equipment and workmanship. Any verbal promises that don’t appear in the written agreement carry no weight if a dispute comes up later.
Confirm the contract also specifies who manages permitting and utility interconnection paperwork, the projected installation start date, and the payment schedule tied to project milestones rather than a lump sum upfront. Signing only after you verify these details protects you and keeps the project on a clear, accountable path forward.
Step 4. Permitting and utility approvals
After you sign your contract, the project moves into a phase that runs almost entirely outside your direct control but has the biggest impact on your overall timeline. Permitting and utility coordination account for the majority of the waiting period in most tesla solar panel installation projects, and delays here are the most common reason timelines stretch past what your installer initially quoted. Understanding what happens during this phase helps you set realistic expectations and know when to follow up.
What your installer submits on your behalf
Your installer, whether Tesla or a local company, handles the permit application process with your local building department. This submission includes a stamped engineering plan showing your panel layout, structural load calculations, and electrical diagrams. Most jurisdictions require a dedicated plan review period that runs anywhere from one to six weeks depending on your municipality’s workload and current backlog.
If your jurisdiction requires in-person permit review rather than an online submission process, add at least one to two weeks to your expected timeline before installation can begin.
The permit application also triggers the interconnection request to your utility company, which is the formal submission to tie your solar system to the grid. Utility approval timelines vary significantly. Some utilities process requests in under two weeks; others take four to eight weeks or longer. Ask your installer upfront which utility serves your address and what the average interconnection timeline looks like in your specific area before you finalize financial plans or make promises about your go-live date.
What you need to do during this step
Your active role in this phase is limited, but staying informed protects your timeline and prevents weeks of silent delay from going unnoticed. Follow up with your installer every two weeks if you haven’t received a status update. Ask for written confirmation once the permit is submitted, once it is approved, and once the interconnection request goes to your utility. Keep copies of any permit numbers or case numbers your installer shares, since you may need them for utility paperwork or when you claim the federal tax credit.
Use this checklist to stay on track during permitting:
- Confirm permit submission date with your installer in writing
- Record your permit number for your personal files
- Request the utility interconnection case number once submitted
- Follow up every two weeks if no status update arrives
- Confirm both permit approval and utility approval before your installation date is scheduled
Step 5. Prep your home for install day
Once your permits clear and your installer books your installation date, the preparation work shifts to you. A well-prepared home allows the crew to work efficiently without interruptions, and skipping this step is one of the easiest ways to push a one-day tesla solar panel installation into a two-day job. Most of what you need to do takes less than an hour, but doing it before the crew arrives makes a measurable difference in how smoothly the day runs.
Clear the work areas inside and outside
Your installation crew needs unobstructed access to your roof, your main electrical panel, and the path between them. Before the crew arrives, move any vehicles out of the driveway so equipment can be staged close to the house. If your electrical panel is in a garage or utility room, clear a three-foot working radius around it. Crews cannot legally work in cramped panel spaces, and a blocked panel adds delays that fall entirely on your schedule.
On the exterior, trim any low-hanging branches that hang over the roof plane, because debris falling onto panels during installation creates both a safety hazard and a potential warranty issue.
Outside, check the following before your installation morning:
- Vehicles moved out of the driveway and away from the work zone
- Patio furniture and planters moved away from the house perimeter
- Gate locks opened or combinations shared with the crew lead
- Pets secured inside or off the property for the full day
- Roof access confirmed clear of stored items (antennas, satellite dishes flagged ahead of time)
Confirm access and communication with your crew
Someone with authority to make decisions must be reachable for the entire installation day, whether that means staying home or being a phone call away at all times. Crews frequently encounter minor field decisions around panel placement, conduit routing, or electrical access that require your input before they can continue. If you are unreachable, the crew may have to stop work and reschedule, which adds days to your timeline.
Confirm the following before the morning of installation:
- Your direct phone number is on file with the crew lead
- You know the crew lead’s name and contact number
- You have the full project contract accessible in case questions arise
- Your utility account number is saved in case the crew needs it for commissioning paperwork
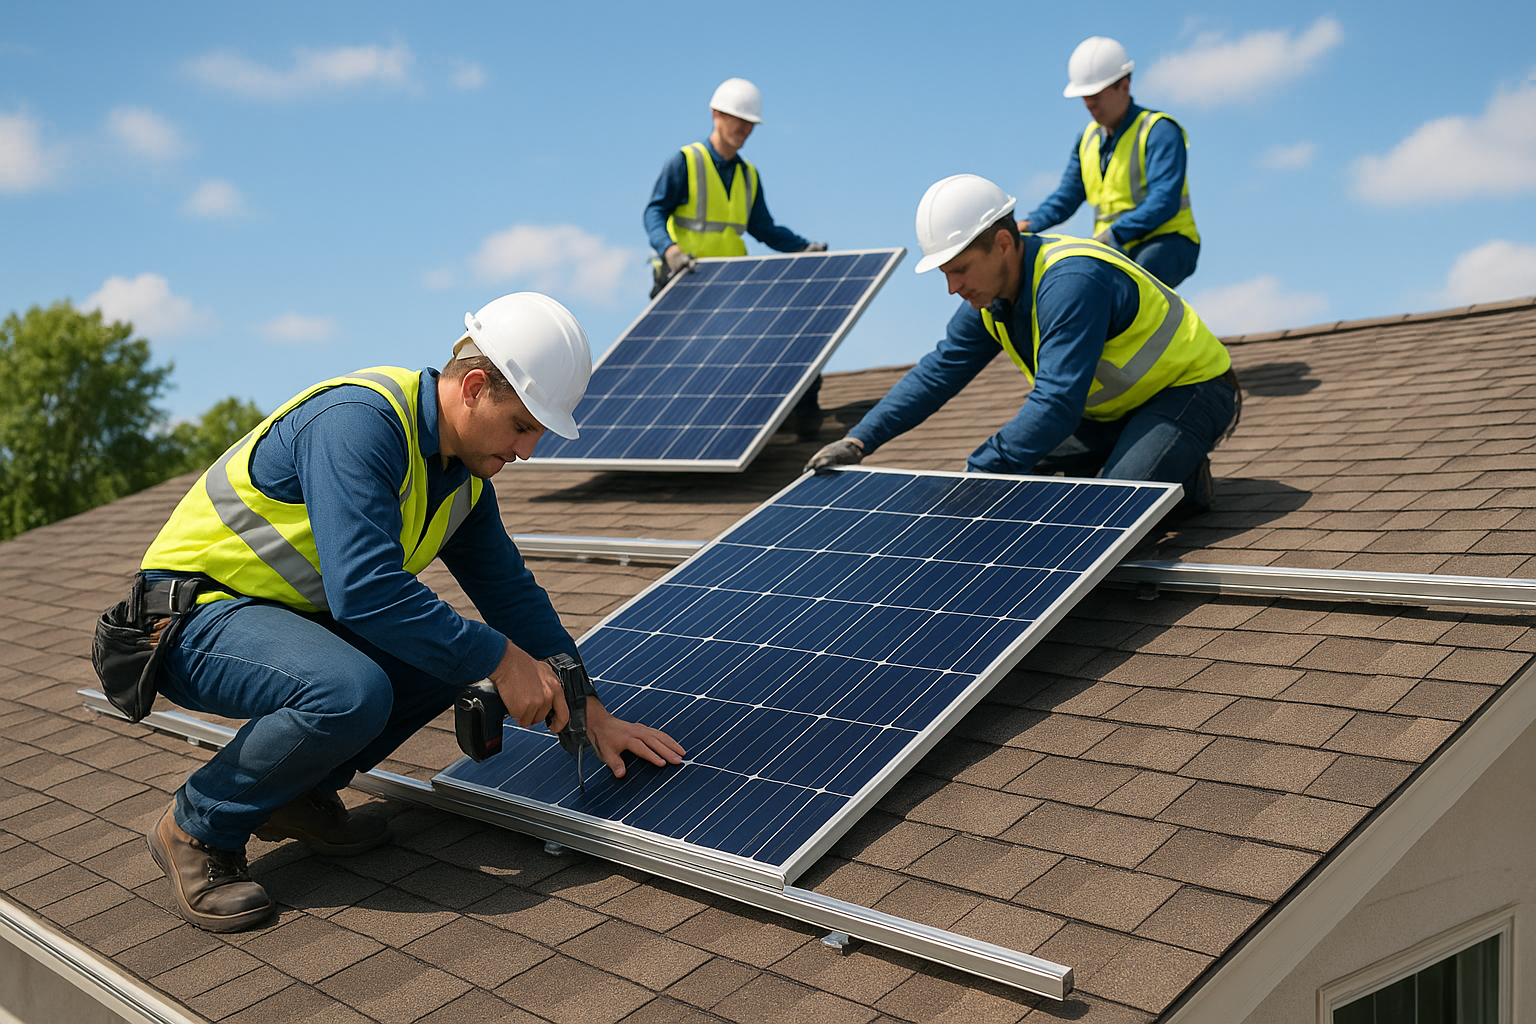
Step 6. Installation and commissioning day
Installation day is when the project becomes visible, and most tesla solar panel installation crews work through a predictable sequence that runs from roof mounting to electrical connection in a single visit for standard-sized systems. Expect the crew to arrive early in the morning, typically between 7 and 9 a.m., and plan for them to be on your property for six to ten hours depending on system size, roof complexity, and how long the electrical work takes inside your home.
What the crew does on your roof
The rooftop portion of the job starts with the crew securing rail mounting hardware directly to your roof rafters, which requires drilling through your roofing material into the structural members below. Flashing goes around each penetration point to prevent water intrusion, and the rails attach to that hardware before panels slide into place and lock down. This is the loudest and most disruptive part of the day, and it typically takes three to five hours on a standard single-story home with good roof access.
If the crew discovers unexpected structural issues during mounting, such as soft decking or undersized rafters, they will stop work and contact you before proceeding, which may push commissioning to a second visit.
Once all panels are in place, the crew runs DC wiring from the panels down to the inverter, which converts the solar output to usable AC power for your home. The inverter mounts on an exterior wall near your main electrical panel in most installations, and the crew runs conduit inside or along the exterior wall to complete the circuit.
Commissioning and system check
After the electrical connections are complete, the crew performs a commissioning sequence that tests each panel string, verifies inverter output, and confirms the system communicates with Tesla’s monitoring platform if you purchased through Tesla. This step takes roughly 30 to 60 minutes and requires your main breaker to be temporarily shut off during the final connection.
Walk through the following with your crew lead before they leave your property:
- All panels are confirmed secured and undamaged
- Inverter status light is green or matches the expected standby state
- Your monitoring app shows the system as connected
- Conduit and wiring runs are weatherproofed at all exterior penetrations
- The crew has documented any field changes made during installation
Step 7. Inspection, PTO, and turning it on
Your system is installed, but it is not legal to operate it yet. Two final approvals stand between your installed panels and actual power generation: a building department inspection and written permission to operate from your utility company. This is the last waiting period in the tesla solar panel installation process, and it typically adds one to three weeks after installation day before you can flip the switch.
The final building inspection
Your local building department schedules a final inspection to verify that the physical installation matches the approved permit drawings. An inspector visits your property, checks the mounting hardware, conduit runs, electrical connections, and labeling at your main panel. This visit typically takes 30 to 60 minutes, and your installer should coordinate the appointment on your behalf. You do not need to be present in most jurisdictions, but confirm that expectation with your installer before the appointment.
If the inspector identifies a deficiency, your installer must correct it and schedule a reinspection before your project can advance to the utility approval step.
Getting permission to operate (PTO)
Permission to Operate is the written authorization your utility issues after they confirm your system passed inspection and meets their interconnection requirements. Your installer submits the final inspection paperwork to the utility, and the utility then closes out your interconnection application. Processing times vary by provider, but most utilities complete this step within five to fifteen business days after receiving the documentation.
Track your PTO status using this simple checklist:
- Confirm your installer submitted inspection results to the utility
- Record the utility case number and the submission date
- Follow up with your installer if no PTO confirmation arrives within 15 business days
- Request a written copy of your PTO letter for your records
Activating your system
Once your PTO letter arrives, your installer or a Tesla representative walks you through the activation sequence for your inverter and monitoring app. For Tesla systems, this typically involves confirming the system appears in the Tesla app with accurate production data and no error alerts. Check that your net metering agreement is active with your utility so that excess production credits your bill correctly from day one, and save your PTO letter alongside your permit documents for future reference.
Next steps
A complete tesla solar panel installation runs through seven distinct stages, and each one builds directly on the last. From confirming your roof’s condition and reviewing your quote line by line to waiting on permits and securing your PTO letter, knowing what comes next at each stage keeps you in control of the project and reduces the chances of unexpected delays or added costs.
Before you contact any installer, verify your roof is ready, pull together your last 12 months of utility bills, and confirm your electrical panel meets the 200-amp minimum. Comparing at least two quotes gives you real leverage on pricing, timeline, and warranty terms you won’t get by going with the first option you find.
For expert guidance from a team that handles both roofing and solar in a single coordinated project, contact Sunflowers Energy LLC for a free on-site inspection and estimate before you sign anything with anyone.
